Last Updated on January 6, 2026 by
For all steps, if you have doubts or are unsure what to do, ask the supervisor for instructions.
Always use the item index page as a reference.
At any step of the process, you can always click the Previous button to go back to the previous page to change the entry.
Inspect the item for inventory. Determine which category to use to inventory the item. If not sure, ask the supervisor.

After choosing the Main category, hit the Next button at the bottom of the page and go to the Item detail page.
Item detail page
- Choose the appropriate item type for the item.
- Open the item index page by clicking the link under the picture.
- Used the index page as a reference to inventory the item.
- Fill out all the required fields.
- DATE: The date will be filled out automatically.
- TECHNICIAN: Choose the Bench that is being used.
- BRAND: fill out the brand.
- If you can not find any brand on the item, use unknown.
- USE the OEM brand first if available.
- MODEL NUMBER: Fill out the model.
- If there are multiple numbers on the item, check with all on eBay and come back to change the model that you can find the listing for.
- Refer to PC Tech Level 1: How To Identify Common Model/Part Numbers
- Remove ALL Non-Manufacturer Stickers & Asset Tags: Check or remove the asset tag, then choose the appropriate option.
- Removing the asset tag is very important.
- Check all sides of the item, including the top and bottom.
- Remove all Asset tags from the item.
- Refer to PC Tech Level 1: Asset Tag/Property Of Removal
- REMOVE HARD DRIVES & STORAGE MEDIA: Check or remove the storage, then choose the appropriate option.
- Removing storage is very important.
- Most storage needs to be removed; however, there are some exceptions. Refer to the item index page for more detailed instructions.
- Refer to PC Tech Level 1: Hard Drive & Storage Media Removal Policy
- Total Weight of PC/Server(Only for PC or Server categories): Record the weight of the PC or server.
- Make sure the scale is set to LB, not KG.
- Pickup#(Only for certain categories): Scan the Pickup number from the vessel label.

- Check the Brand Specific Instructions
- After you fill out the item’s brand, some brands will have instructions from the Brand Specific Instructions section.
- Follow the instructions.

- If the item does not have a brand and model, notify your supervisor for instructions.
Click the Next button at the bottom to go to the Value Check page.
Value Check page
- Click the Item Direct Scrap List, and check if the item is on the list. If the item is on the scrap list, choose the ” Told To Scrap By Supervisor option.

- If the item is not on the list, click the [CLICK HERE] at the top of the page, which will take you to eBay.com.
- At eBay.com
- For a PC or server, quickly find a listing with no hard drive by pressing “Ctrl+F” and typing “No+space”

- When searching for a specific item on eBay, you may encounter unrelated results that appear simply because they share similar numbers or keywords. To filter out these unwanted listings, use minus signs (–) to exclude certain terms. For example, in the eBay search bar, enter “Dell PowerEdge 840 -R840 -H840”. This tells eBay to show listings that include “Dell PowerEdge 840” but exclude any that mention R840 or H840. (See images for reference.)
-
- Try to avoid using the auction or best offer accepted listings. However, if they are the only option, then use the listing and leave a note on the value check label.
- On eBay.com, the complete page will show up first. This page will include 2 different listing types.
- Sold Listing
- The green price represents sold listings, which are the listings you should prioritize. If sold listings are available, avoid relying on other listing types.
- Start by using the highest-priced listing. Compare the listed item to the one you have, and choose a listing that matches the condition of your item.
- If a line appears through the green price on an eBay listing, it indicates that the item was sold using the Best Offer Accepted option. In these cases, eBay does not display the actual final sale price—only the original asking price is shown with a strikethrough. This makes it less reliable for determining market value. Whenever possible, prioritize listings with clearly visible final sale prices. If no other listings are available and a Best Offer Accepted listing must be used as a reference, please clearly note this limitation in the note filed.
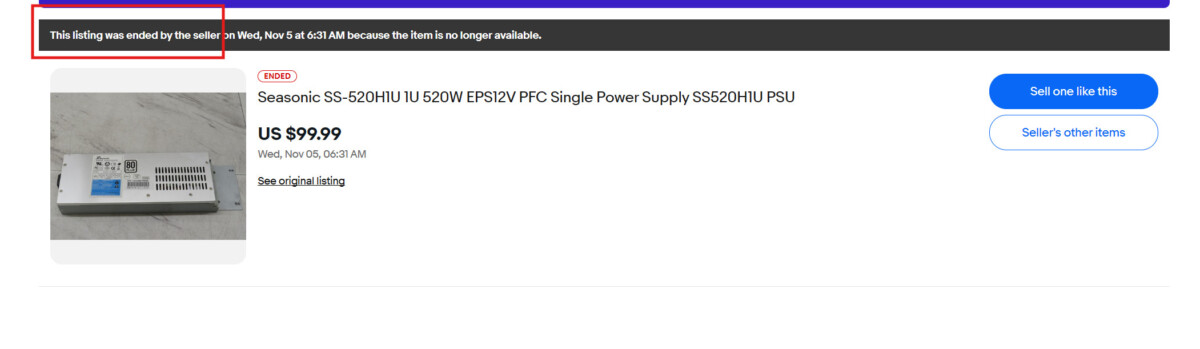
- When you open a sold listing, you may see a message at the top such as ‘This listing was ended by the seller’ or ‘This item is out of stock.’ This means the item was not actually sold. Try to avoid using these listings for pricing; however, if it is the only available listing, you may use it and leave a note.
-
- Unsold Listing
- The black color price is for unsold listings. On eBay, an “unsold listing” refers to a listing that ended without a sale. This means the item did not sell during the time it was listed.
- Use this type of listing if there is no sold listing available.
- Change sort to “Price + Shipping: lowest first“. Go with the lowest Buy It Now listing first.
- Sold Listing
- If there is no listing shown under complete page, deselect complete to go to the active listing page.
- Active Listing
-
- On eBay, an active listing refers to a currently live item that is listed for sale and available for buyers to view and purchase or bid on.
- Only use an active listing if there is no complete listing available.
- Sort the listings “Price + Shipping: lowest first”. Go with the lowest Buy It Now listing.
-
- Active Listing
- Beware of accessories, physical damage, and item conditions.
- The value checker should review the listing description when there is a large price range. If the prices are +/- $20, then the fine details of the description hold less value, since all the sold items are priced so close to each other, in terms of value. However, if prices are $100 or more apart, then it should be reasoned that something in the description or condition, maybe affecting the values, is dynamic. Many times, there is a reason, but sometimes people just price items lower or higher with no clear reason. If this is the case, then the value checker should escalate the situation to their Team Lead for the final decision.
- Different items may have different scrap values. Check the item index page.
- If there is no result with the Brand and model, you can try just the model in the search bar.
- Listing choosing priority:
- Sold
- Unsold
- Active
- After choosing the appropriate listing, copy the item number.
- Go back to the Value check page and choose the appropriate option, then click the Next button.


- If you choose “Item Sold (Price in Green)” and go to the next page.
-
- Fill out the Highest price for the sold listing and item ID. If the highest listing is much more expensive than the rest of the listings, use the second-highest listing.
- Convert the price. For Parts=1/2 Pre-Owned=1/4 Brand New/Open Box/Refurbished.
- Leave a note if needed. Higher priority from top to bottom
- Notate functional damage. Example:
- The item has corrosion in the battery compartment.
- The item has a broken connector.
- If the item is removed from a unit, note which unit is removed from. Example:
- The module is removed from the Brand Model unit.
- The item could come from a unit, but came in loose. Example:
- The module came in loose.
- Notate the pickup-related item’s previous condition. Example:
- The item is from a repair center/shop.
- The item was previously wet.
- The item came in wet.
- The item was stored outside for a long period of time.
- Notate physical damage. Example:
- The item’s case is cracked.
- Notate the difference between the item on hand and the chosen listing. Example:
- Listing included the battery. Item on hand does not.
- Notate the converted price. Example:
- ” Price converted from $XXX Pre-owned/For Parts sold.”
- Notate whether the Power supply is included or not. Example:
- Included the power supply.
- Notate QTY. Example:
- QTY: 6
- Notate functional damage. Example:
- Go to the next page and read the Instructions On How To Bag & tag the item.
- Highlight the label section and right-click click then choose print.
-
- Make sure margins are set to NONE and change the scale for all the text that fits in one label.
- Print the inventory label and apply the label to the item.


- If you choose “Item Unsold (Price In Black)” and go to the next page.
- Fill out the Lowest price for the unsold listing and item ID.
- Convert the price. For Parts=1/2 Pre-Owned=1/4 Brand New/Open Box/Refurbished.
- Leave a note if needed. Higher priority from top to bottom
- Notate functional damage. Example:
- The item has corrosion in the battery compartment.
- The item has a broken connector.
- If the item is removed from a unit, note which unit is removed from. Example:
- The module is removed from the Brand Model unit.
- The item could come from a unit, but came in loose. Example:
- The module came in loose.
- Notate the pickup-related item’s previous condition. Example:
- The item is from a repair center/shop.
- The item was previously wet.
- The item came in wet.
- The item was stored outside for a long period of time.
- Notate physical damage. Example:
- The item’s case is cracked.
- Notate the difference between the item on hand and the chosen listing. Example:
- Listing included the battery. Item on hand does not.
- Notate the converted price. Example:
- ” Price converted from $XXX Pre-owned/For Parts sold.”
- Notate whether the Power supply is included or not. Example:
- Included the power supply.
- Notate QTY. Example:
- QTY: 6
- Notate functional damage. Example:
- Go to the next page and read the Instructions On How To Bag & tag the item.
- Highlight the label section and right-click, then choose print.
- Make sure margins are set to NONE.
- Print the inventory label and apply the label to the item.
- If any note is needed, open the 4 X 2 Label Template, type all the notes, print out the label, and apply to the item.
- If you choose “Item is Not Completed (SOLD/UNSOLD) But Active” and go to the next page.
- Fill out the Lowest price for the unsold listing and item ID.
- Convert the price. For Parts=1/2 Pre-Owned=1/4 Brand New/Open Box/Refurbished.
- Leave a note if needed. Higher priority from top to bottom
- Notate functional damage. Example:
- The item has corrosion in the battery compartment.
- The item has a broken connector.
- If the item is removed from a unit, note which unit is removed from. Example:
- The module is removed from the Brand Model unit.
- The item could come from a unit, but came in loose. Example:
- The module came in loose.
- Notate the pickup-related item’s previous condition. Example:
- The item is from a repair center/shop.
- The item was previously wet.
- The item came in wet.
- The item was stored outside for a long period of time.
- Notate physical damage. Example:
- The item’s case is cracked.
- Notate the difference between the item on hand and the chosen listing. Example:
- Listing included the battery. Item on hand does not.
- Notate the converted price. Example:
- ” Price converted from $XXX Pre-owned/For Parts sold.”
- Notate whether the Power supply is included or not. Example:
- Included the power supply.
- Notate QTY. Example:
- QTY: 6
- Notate functional damage. Example:
- Go to the next page and read the Instructions On How To Bag & tag the item.
- Highlight the label section and right-click, then choose print.
- Make sure margins are set to NONE.
- Print the inventory label and apply the label to the item.
- If any note is needed, open the 4 X 2 Label Template, type all the notes, print out the label, and apply to the item.
- If you choose “Item Not Found On eBay” and go to the next page.
- Read Instructions On How To Bag & tag the item.
- Highlight the label section and right-click, then choose print.
- Make sure margins are set to NONE.
- Print the inventory label and apply the label to the item.
- If any note is needed, open the 4 X 2 Label Template, type all the notes, print out the label, and apply it to the item.

- Do not use the “Told To Scrap By Supervisor” option.
If you choose “Told To Scrap By Supervisor,” go to the next page.Read Instructions On How To Bag & tag the item.Highlight the label section and right-click, then choose print.Make sure margins are set to NONE.Print the inventory label and apply the label to the item.
Ask the supervisor for a sticker to approve the scrap.If any note is needed, open the 4 X 2 Label Template, type all the notes, print out the label, and apply it to the item.
How to bag and tag an item
Put away
- Items that are good for eBay
- Put on the pending shelf at your bench, and the quality checker will remove the items from the shelf.
- Scrap items
- Put in the destination vessels.
- Read the index page to see if the cable needs to be cut or not.
- Items need to be tested.
- Put in the destination vessels.
- Neatly stack them.
P.S.
- Remove single-use batteries from items that will go to eBay; leaving the batteries may cause damage.


12 thoughts on “How to use ARIS for value check”
Read
Read Cristal Cervantes, 12/20/24
Read
Read, Morgan Shaw
Read Cristal Cervantes
read
read Martin E. 12/20/24
Read – Alan Medina 5/12/25
Read Janna 8-1-25
Read Hector 10/13/25
read
Read Edmundo Sanchez 03/05/2025