Last Updated on June 2, 2026 by
We need to have all the wipe certificates printed via the print server so that we have a permanent record of the wipe. If you have a problem with your machine that is unable to network print, please reach out to the Team Lead who will ensure that a copy of the certificate is saved on the server and will provide you with your wipe certificate printout.
Link to label “initial labels” and “final labels” creation page.
In effort to track machines all throughout their processing within the warehouse, there is now a new wiping label that we’ll create from within a form. This form will capture important info from their machines into out database much earlier in the process, now.
You’ll use this new form twice during your process, the first time entering the most basic information such as pickup number, asset number, and serial number before you begin the wiping process. Then, once the wiping process, diagnostic test, OS install, and autopilot check are all complete and you’ve hand-written-collected additional information on your existing label, you’ll type up that added info into this new QR form again one more time.
The first label is called creating the “Initial Label”
The second label is called creating the “Final Label/Test Record”
Here is where you will find the new form!
https://fs30.formsite.com/beyondsurplus/fqxya7vffe/index
The end resulting label will now look like this:

All machines must have a maximum of only one storage drive unless a special circumstance is established, and this includes the need to remove all Optane drives.
All machines should be resold with a maximum of one storage drive. Please remove any secondary drives before wiping. We absolutely do not want to send a machine to eCommerce with two or more drives, as it will be considered a serious error. Consider yourself in the PC Tech department as always the last stop when it comes to removing extra drives, even if those extra drives already wiped. Please always take the time to remove a second immediately drive whenever you notice it so that you don’t forget about it later or the next person to touch the machine is unaware.
In regards to what this means for Optane drives in systems, yes, please remove any Optane drives from the system, and please also do not utilize any SSD that has an Optane volume built into it. It is possible to recover information from Optane drives using recovery tools and Killdisk has had very mixed results attempting to wipe Optane volumes. We are taking the safe route by choosing not to include them in any machine.
PXE boot, or Preboot Execution Environment, is a network booting process that allows computers to boot from a network instead of a local disk. PXE is a client-server protocol that uses a DHCP or TFTP server to download software for booting.
PXE boot is commonly used for:
- Mass deployment: Installing the same operating system (OS) on many computers at once
- Disaster recovery: Recovering from a disaster by installing a new OS
- Remote maintenance: Performing maintenance tasks on systems without physically accessing them.
Tech Requirements
- Finish PC tech level 1 training and maintain a good performance.
- Test I series PC wholesale with minimal or no errors.
Tools
- Ballpoint Pen. (Do not use a Gel Pen)
- The electric screwdriver set the torque at 1.
- Driver bits.
- Screwdriver set.
- Laptop pry tool.
- Rag and Cleaning solution.
The laptop needs wiping
- The 5th Gen or older I series laptop refers to PC Tech Level 2: Wholesale 5th Gen or older i Series laptop testing
- The 6th Gen or newer laptop will go to the next step for wiping.
Laptop Wiping Guide
 Loading...
Stage #1: Laptop Condition Checker
Loading...
- Wipe clean the laptop for a better judgment of the housing condition.
- Scan the laptop serial number on the label
- If the Serial number is damaged, leave the section blank.
- Record the pickup number on the label. (#1133 for drop-off laptops, #0000 for laptops that does not have the pickup#)
- Print out the label.
- Apply the label to the laptop.
- Inspect the laptop’s physical condition
- Open the laptop and look for any defects. (building battery, corrosive or liquid residue on circuit board, etc.)(Refer to the How to identify liquid/water damage for a laptop section)
- Remove any loose screws inside the laptop.
- How to identify liquid/water damage for a laptop
- Corrosion on the motherboard

- Sticky Keys on the keyboard.- Sticky keys do not bounce back as normal keys, if not sure ask the supervisor.
- The liquid damage indicator color changed to red.
- Any water /liquid residues
- If the battery is bulging, remove it. Place the battery into a bag, then put it in #1143: SCRAP: LI-ION BATTERIES, BATTERY (DDR)
- Check the case and port condition for the laptop and record the damage.
- Wipe clean the screen for better judgment of screen condition.
- Based on the laptop’s physical condition, determine the next step for the laptop. (Refer to the Laptop put away section)
- Scrap:
- Remove the RAM and storage, then initial on the Tech 1 field.
- Set it aside and accumulate until finished with all laptops for the day
- Call a second person to verify the laptop is good for scrap. The second person will be initialed on the Tech 2 field.
- Put away the scrap laptops by the end of the day.
- Need to set up for wiping:
- i series 6th Gen i-series or dual core laptops: Remove M.2 NVME drive. Other types of hard drives leave AS-IS. Make sure RAM is 2GB or more.
- i series 7th gen and newer or AMD Ryzen: make sure all laptops are included with hard drives and RAM. Make sure to remove the asset tag from the hard drive if you add a hard drive to a laptop.
- Scrap:


Laptop and general label placement rules updates
- The laptop should only display only 1 label, so either overlap the existing label or remove the existing label before applying a new one.
- If a label has a value $ dollar amount on it, we need to remove that label from the machine, not simply cross out that information. We are doing away from having those value amount labels machines. We don’t want to cover them up with other labels. Please remove them entirely. Apologies in advance for the extra time it will take. Please do your best to remove any leftover sticker residue, or be sure to place your new label over the residue.
- Place you label either on the upper left corner of the screen lid or the bottom right corner using the same location as it was delivered to us from AR. This will avoid us creating unnecessary sticker residue marks.
- If you need to not follow this guidance for some reason, please talk to your supervisor first to make sure you are ok to diverge from this procedure. There may be a different solution if it seems like you need to do this differently.
Here is an example photo Farai sent. We are trying to avoid 2 labels, especially in 2 different locations.

Stage #2: Laptop wiping Tech: Set up laptop for wiping
Most laptops will be erased through PXE boot.
Some laptops can not boot to PXE for some reason and then need to use the Killdisk USB drive to erase the storage. Refer to PC Tech Level 3-Laptop wiping: USB KillDisk wiping
For a laptop that does not have an onboard Ethernet port, refer to PC Tech Level 3: Laptop PEX Boot Register with Docking Station
While going through the steps for wiping, mark the label accordingly.
When you finish setting up one laptop, set up the next one until the bench is filled out.
Laptop wipe through PXE
Connect the laptop to the power supply and Ethernet cable.
- Use the OEM brand AC adapter for the laptop.
- If a laptop has no Ethernet port, use an Ethernet dongle to connect to the Ethernet cable.
Based on the laptop’s power or screen condition, determine the next step for the laptop. (Refer to the Laptop put away section)
-
- Scrap:
- Remove the RAM and storage, then initial on the Tech 1 field.
- Set it aside and accumulate until finished with all laptops for the day
- Call a second person to verify that the laptop is good for scrap. The second person will be initialed on the Tech 2 field.
- Put away the scrap laptops by the end of the day.
- Good to set up for wiping:
- i series 6th Gen and older or dual-core laptops
- i series 7th gen and newer or AMD Ryzen
- Scrap:
Power on the laptop, then enter the BIOS settings.
- Common Key for entering the BIOS setup.
- Dell: F2
- Lenovo:
- F1
- Enter then F1
- F2
- Before powering on, press the Novo button. The Novo button is either a small button or a pinhole with a backward arrow icon next to it that resembles an upside-down U.
- HP: F10 or Esc then F10
- Most other brands: F2 or Del

Check if the laptop has Absolute Persistence activated or not. If the status is active, put the laptops aside; do not proceed to the next step.
Check the optical drive by clicking the button, and remove any media as needed.
If the optical drive does not eject or the laptop does not power on, use a paper clip to insert into the pinhole to eject the optical drive.
While booting, check for a splash screen(Owner tag, Asset tag, or Custom logo). The Dell/Lenovo laptop splash screen can be removed or replaced so far.
If the asset tag or owner tag only contains characters that do not represent the customer, the laptop can proceed to the next step.
If the asset tag or owner tag contains a company or person name, then the information needs to be removed before proceeding to the next step.
Refer to:
- How to reset a custom BIOS Splash screen to the Dell Splash Screen
- How to Use Dell DOS Asset Tag Utility to remove Asset tag and Owner Tag

If the Splash Screen contains the customer’s information(Company name or person’s name, etc.) that can not be removed, the laptop needs to be scrapped.
If you can remove the splash screen, go next.
If the laptop has a BIOS password, use the BIOS Master Password Generator to generate a master password to unlock the BIOS.
If the BIOS password can not be removed, refer to How to bypass BIOS lock for booting to USB drive
If the BIOS password is removed or the BIOS is not locked, go to the next step.
In the BIOS, locate the serial number, and compare it with the label to see if it matches. Record the serial number if the serial section on the label is blank.
In the BIOS settings. Find the reset option. Reset the BIOS to Factory default or BIOS default. (This will eliminate some issues caused by the wrong BIOS setting.)

Reboot the laptop and re-enter the BIOS settings.
Make sure the date and time match the current date and time, adjusted if needed.
Enable Network boot or PXE boot in BIOS (IPv4).
Disable Secure Boot. (With Secure boot on, the PXE boot will not work.)

Change network boot to 1st boot in the boot order.


Change the SATA setting from RAID to AHCI for Dell laptops.
In Lenovo machines, disable Intel VMD and adjust SATA settings to AHCI for 11th Gen or newer I series laptops.
Uncheck the Configure Storage Controller for Intel Optane option under Advanced > System Options.


Save settings and reboot the laptop.
If everything is working correctly, the laptop will PXE boot; this process can take a few minutes.
The first time the PXE menu is loaded on the laptop, it will display “Host is NOT registered.”
If the laptop uses an Ethernet dongle to PXE boot, it might display (Host is registered as XXXXXXXXXX), just go to the step to load “Killdisk Active Boot Disk”.
If a laptop does not have storage, plug an empty USB drive into the laptop. The laptop will give a registration error if there is no storage media detected.
Select “Quick Registration and Inventory” from the menu. (Make sure the laptop has a hard drive or USB drive.)
After letting the program run, the laptop will be rebooted to the PXE screen again. This time will display “Host is registered as XXXXXXXXXX”. (Check the section on the label)

For 64-bit laptops
Then choose “Killdisk Active Boot Disk”

After KillDisk is loaded, click the NIC Logo in the system tray, then click the Initialize Network button.

After initializing the network,
Open the Active@KillDisk
The system may give you an error about Active@KillDisk already being open. If this error pops up, press Alt + Tab and switch to Active@KillDisk.
On the bottom right of the opened window, there is a network status icon. The green check mark means the laptop is online.

If the network status icon has a red x on it, that means the laptop is offline.

Then choose all Hard Drives that need to be wiped and click the “ERASE DISK” button. (Ctrl+clicked the drives that need to be wiped.)
Wipe an empty USB drive if there is no storage in the laptop.
For the offline laptop, expand the Erase Certificate option, choose Save to PDF, and change the save location to X:\

In the Disk Erase tab, make sure the Erase method is NIST 800-88 3 Pass. Verify is 100%, check the Initialize disk after erase, check the Write fingerprint to the first sector, and click start.

How to use Crystal Disk within Killdisk to check NVME and 2.5″ SSD detailed health status before wiping
In effort to better identify bad NVMEs and 2.5″ SSD before we include them in our laptops and PC for resale, we are implementing a new process within KIlldisk! Crystal Disk drive testing software is an .EXE application that can run from within Killdisk. Each wipe station now how two USBs with Crystal Disk ready to go to start using. You can create more of these as needed.

Before we get into more details, the idea here is that we want to review the health of the drive before we choose to actually wipe the drive in Killdisk. So if you see something in Crystal Disk that would make it scrap-worthy, we’ll need to swap it out with a new drive from our stash until we find one that is healthy. Once we find a good one and start the Killdisk wipe, as long as the Killdisk wipe completes with no errors, it is a done deal and we don’t need to check the drive again in Crystal after the wipe. Just one time before.
A quick note about Crystal Disk, it appears to be the most accurate drive S.M.A.R.T. status reading software we use. There are none deficiencies in the other software we use when it comes to wiping NVMEs and other SSDs specifically: Killdisk sometimes cannot always read all of the different S.M.A.R.T. attributes that Crystal Disk has no problem seeing. And WipeOS claims to find drives that fail tests, but no other software sees any issues and WipeOS fails to give any details as to why it declares a drive has failed its diagnostic.
↑
So for this reason, please ignore any WipeOS drive results moving forward, and just go with this Killdisk + Crystal Disk Strategy. If Killdisk + Crystal Disk says it is good, we believe is good.
To access Crystal Disk from within Killdisk, navigate to the utilities folder within Killdisk’s start menu, and then click on “Explore My Computer,” which is the file browser.

From there, locate the Crystal Disk application within the folder of the USB drive. The .exe filename is DiskInfo64.exe.

Crystal Disk should launch!
Depending on whether or not you are looking at NVME SSDs or 2.5″ SATA SSDs, the S.M.A.R.T. information you see in this software will very. Take a look at the difference in the two photos below.
This is a photo of what the output of an NVME looks like.
↓

There are no “thresholds” information like in the next photo taken of a 2.5″ SATA SSD. With this NVME, you only have “raw values” to read. These digits won’t make much sense, so here is all you need to know. We have five main things to consider here:
- Is there a “critical errors” attribute and is that value above zero? If so, scrap the drive.
- Is there a “media and data integrity errors” attribute and is that value above zero? If so, scrap the drive.
- Is the drive health indicator in the upper left hand corner have a number lower than 85%? If so, scrap the drive.
- Does the drive health indicator in the upper left hand corner not have a number at all and just say “good”? If so, you can consider that field ok despite not knowing the number.
- Are there any other fields you read that look like they could cause trouble for the customer down the line? If so and you want to check with your supervisor, please do so, but otherwise the 4 points above are what we are mainly concerned with unless something unforeseen and obviously a problem arises.
Here is what Crystal Disk looks like for 2.5″ SATA SSDs.

As you can see, there is a lot more decipherable data.
There are even more things to consider when it comes to SATA SSDs. Here is the quickish rundown of what you need to know for determining which drives are no good and should be replaced instead of wiping:
Each SSD vendor, and even from SSD to SSD from the same vendor, has a different list of SMART attributes. Each SMART list is laid out in a different order from each other. The tricky part is that some of the same attributes are named differently, but they essentially all mean the same thing.
A great example of this is Health Status of the drive.
When the box at the top left just says “good” and does not give you a percentage of life left, you need to investigate the smart status list and find the actual percentage hidden in the list somewhere.
The health status could be one of the following titles or perhaps a new name similar to these options:
- normalized media wear out
- wear leveling count
- SSD life left
- life left
Other examples of this include the SMART status “reallocated event” which can also be referred to as “retired blocks.”
For any SMART attribute that looks potentially scrap-worth, if you feel confident, go ahead and scrap it. If the SMART attribute looks like somewhat benign and you would like to ask your supervisor first so you don’t scrap something unnecessarily, please do so.
This Crystal Disk check for every Killdisk wipe is a brand new addition to our process. For that reason, since these are new standards that we hadn’t been checking before, there is a somewhat high likelihood of a large number of NVMEs being scrapped.
The increase in drives to scrap may slow down output somewhat, so please keep track of how many drives they are scrapping in case we need to make changes to the policy for what constitutes when we should scrap drives or possibly adjusting the weighting of how scrapping drives should impact our productive points tracking.
For older 32-bit laptops
Then choose “Killdisk Active Boot Disk console.”

Select the HDD after the Killdisk Active Boot Disk console load

Press F10 to open the kill window. Make sure the erase method is US DoD 5220.22-M – 3 passes. Change Verification to 100%. Check both ‘Initialize Disk(s) after Erase’ and ‘Write fingerprint to the first sector’. then press Enter to start wiping.


After wiping, mark the label based on the sanitizing status. (Next Day)

Keyboard testing
We do not test laptop keyboards until later in the process during Autopilot checks. If you aren’t sure what Autopilot checking is at this point, no problem, but know that we do eventually we check the keyboard by typing in “The quick brown fox jumped over the lazy dog.” in a command line. You don’t need to do that during the wiping phase, however, if you notice issues with keys during your initial setup such as needing to strike keys harder than normal in order for the keys to register or if there are keys you notice that simply do not work, please make a note of it on your label. The sooner we can notate any issues with keyboards we observe in our overall process, the better.
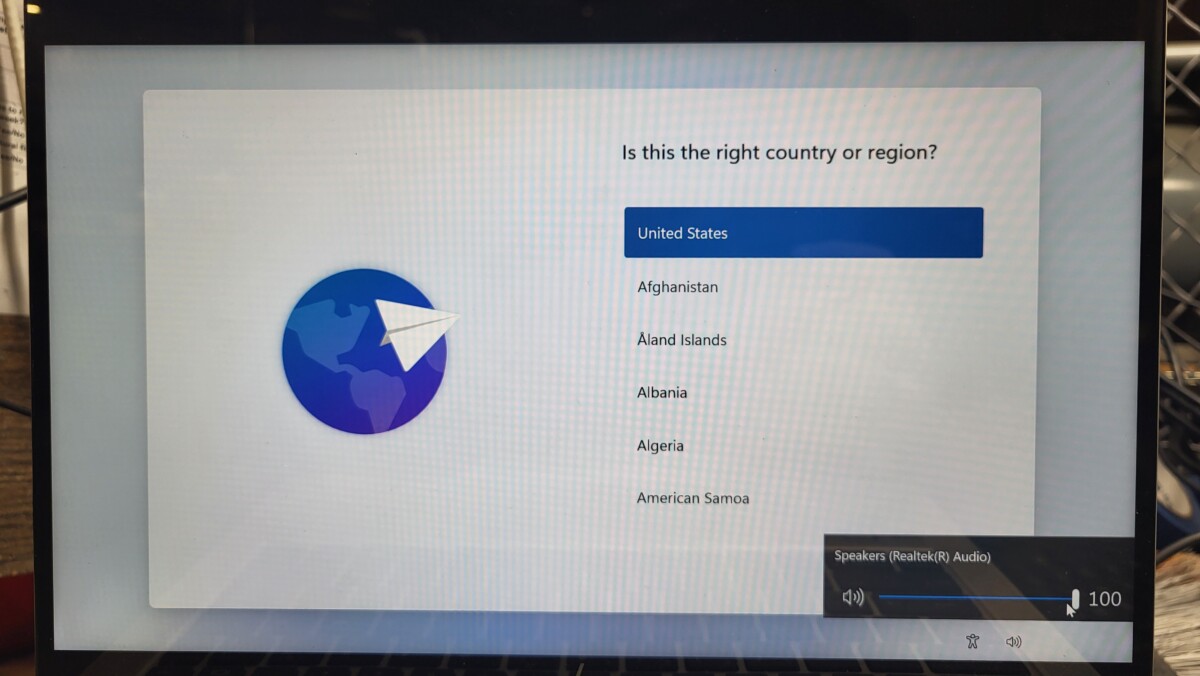
How to test speakers for wholesale laptops.
The following information is in regard to wholesale laptops only. The laptops designated for eBay still do not require us to conduct the following speaker test.
Once the decision was made that wholesale laptops should not utilize the WipeOS diagnostic, we needed an efficient method of testing that speakers worked in laptops.
This solution is mostly straight forward but comes with exceptions:
In the bottom right corner of the OOBE Windows setup, there is a speaker volume toggle that will make noise. If the speaker makes noise that is not obviously super distorted or damaged, the speaker passes. If no noise comes out, we will attempt to have the BIOS make noise for brands of laptops that do that.
By hitting Escape in a HP BIOS, a beep should occur. If the speakers beep, that is sufficient proof they work.
For Dell, there is a speaker test option that can be activated solo from within a Dell diagnostic where you can skip all the other tests.

For Lenovo machines, there isn’t a convenient way to do this, however, there is a cumbersome way, and that is to temporarily remove the ram sticks and get it to announce an audio error code.
If none of these options work or you are working on a different brand machine where there is no way to make the speaker beep within the BIOS, go ahead a leave a note that the speakers are bad.
If the speakers do emit sound, the bar for when to mark speakers as being damaged is very low. As long as you can hear the speaker even if they aren’t super loud, and as long as the speakers don’t sound obviously mega-distorted or ripped, you are good to consider them as working.
Regarding what to do about 6th gen laptops because they won’t have windows installed, the easiest method for conducting a speaker test would be getting the machine to beep in the BIOS or diagnostic or to run Hiren’s from a USB. Usually Hiren’s plays a welcome noise when it boots up. But if you miss the welcome noise or it seems like that welcome noise did not occur, then try running the speaker_test.mp3 file or test the speakers in a different way from within Hyrins.
Stage #3: Erase Certificate Matching
The laptop was wiped through the PXE Killdisk
Collect Erase Certificates from the Printer. (Next day)
The printer is located in the PC tech area.

Network wipe certificate printing only. Don’t put cert on USB to print. Speak with supervisor about issues.
We recently have had no instances of being unable to print from built-in ethernet ports or network dongles, whether or not the machines is BIOS locked. But, in the very rare circumstances that you cannot get your machine to network print after attempting the use of a dongle if the built in ethernet port isn’t working either, please let your supervisor know. We need to keep a record copy of every wipe certificate now, so please DO NOT simply USB-thumbdrive print the certificate. Please talk to your supervisor first to develop a plan of action together, as we will need to create a clearly defined plan as to how and where the wipe certificate will be saved for our long-term records.
For the offline laptop, you need to print the certificate manually.
Plug a formatted USB drive into the laptop.
On the wiping result window, click the Print button, and the Print Preview window will open.

Click the print icon on the Print Preview window, then save the Erase Certificate PDF file to the USB drive.

Unplug the formatted USB and go to the next laptop that needs to print the Erase Certificate manually.
After collecting all PDF files, go to a workstation to print out the Erase Certificate.
Match the Erase Certificate with the wiped laptop.
Match the laptop serial number and put the certificate on the laptop. The certificate will list the laptop’s serial number as “BIOS Serial.”

Do not remove the wiped USB drive.
Mark the label based on the sanitizing status.
Check the wipe result on the label. Record any defects that developed overnight
For 6th Gen i-series CPU laptops or older laptops—Initial on the Tech 1 field.
For 7th Gen i-series or newer and AMD Ryzen CPU laptops: Install Windows OS and circle the OS version on the label, then initial in the Tech 1 field.
If wiping fails:
- 6th Gen i-series CPU laptop: remove the hard drive, make the hard drive not included on the label, and remove the hard drive from the Erase Certificate.
- 7th Gen i-series or newer and AMD Ryzen CPU laptop: replace the hard drive and wipe the new drive.
If the certificate did not print out for any reason, notify your supervisor.
File path to have wipe certificates auto-printed
As of October 16, 2025, the current file path to have wipe certificates autoprinted from Killdisk is \\192.168.2.165\wipe.certs\certificates\
Stage #4: Laptop wipe Quality Checker
Check the laptop’s physical condition and compare it with the label.
Check the screen condition and storage size compared with the label.
Double-check all sections on the label with the laptop, and make sure all sections are checked and correct.
After QC the laptops,
- 6th Gen i-series CPU laptop: disconnect the power, USB drive, and Ethernet from the laptop.
- 7th Gen i-series or newer and AMD Ryzen CPU laptop:
- Check the Autopilot status. Refer to How to check Autopilot status for a Windows machine
- Shut down the laptop by using the command” shutdown -s -t 0″ or the PowerShell command”stop-computer”. Do not force shut down the laptop by using the power button or unplugging the power supply.
- Disconnect the power, USB drive, and Ethernet from the laptop.
Stage #5: Laptop put away
Check the label for the laptop’s condition
Based on the laptop’s condition, sort the laptops.
Put away the laptop on the destination vessel.
Dual Core Laptop:
- Dual-core laptop wiping success with no issue, put away: Wholesale: Dual-core Laptops
- Dual Core laptop Scrap: (anyone that applies) put away: #1077 SCRAP: LAPTOPS (Need to remove RAM and Storage.) or #1073 UNITS PENDING HARD DRIVE REMOVAL (RAM and Storage not removed)
- Has any defects on the keyboard or touchpad.
- Missing bottom cover.
- Missing ODD face plate.
- Does not power on or POST.
- Broken hinge.
- Defective LCD (cracked, no back-light, dark or light spots)
- The splash screen cannot be removed.
- Parts are missing or broken.
- Has any cosmetic issues.
i Series Laptop:
- i Series Laptop wiping success with no issue (normal wear and tear allowed) put away: #1168 WHOLESALE ISERIES LAPTOP
- i Series Laptop wiping success with issue: give to PC Tech Team Lead for QC and to put away.
- i Series Laptop that are autopilot locked: give to PC Tech Team Lead for to record serial number and to put away.
New eCommerce preselected laptops instructions – include absolutely no notes other than burn-in.
Please keep in mind that the following instructions are for eCommerce pre-selected laptops only:
★ The only note we will leave on laptops being sent to the eCommerce team is if we observe stationary/permanent burn-in during our wiping process. Please do not include any other notes besides that. So do not even mention if it is BIOS locked or if you had PXE issues.
• We will still check that the battery is not inflated
• We will also still check for the presence of active absolute persistence/computrace.
SCRAPPING LAPTOPS
If you feel certain that there is nothing you can do to get the laptop to work, you can get the laptop scrapped by preparing a wiping label that indicates the laptop should be scrapped the following critical details (you need to have all these detail prepared to earn a scrap laptop point.)
On laptop wiping label, verify you have the following information in the description section:
- You have tried a different RAM stick in a different slot
- You have tried disconnecting the battery
- You have tried disconnecting any daughter boards
- You have tried removing the wifi card
- You have tried disconnecting the display cable
- You have tried removing the SSD
- You have tried all power jack options including any USBC ports even if they are ports that claim not to be intended for charging.
- No need to write down the serial number for this machine. If you already wrote it down, that is fine, too.
- Be sure to write down your initials for Tech 1.
Once you have all that information written down, give the laptop to the PC Tech Team Lead to quickly verify the laptop is indeed scrap and also supply the initials for Tech 2.
At that point, if the machine is Ryzen or Intel i-series 6th gen and above, we will remove the SSD and RAM to harvest the parts for future machines. If the laptop is a older AMD-Pro CPU or older than that or if the laptop if a 5th-gen or older iseries, we will be OK to leave the hard drive and RAM inside and rely on downstream vendors to remove the HDDs and RAM on our behalf. That is it! Walk the laptop over to scrap laptop and place it in.
Reasons why a laptop might scrapped:
-
- All laptops have power issues. (Include does not power on, Power on no post, power on then off.) see above ↑
- All laptops have splash screens that cannot be removed.
- Autopilot is locked or unable to check Autopilot status.
Photos to add to eBay repository during laptop wiping/testing
- Computrace and Absolute Persistence
- Any error messages besides CMOS or low wattage warnings (and if unable to capture image, make a note of that and also state why you are unable to capture it. i.e. “only appeared once”)
- Typing in quick brown fox jumped over lazy dog into the command line if needed/applicable for your laptop.
- We will also start taking photos of the condition of cracked screens if we get the screen to turn on.
- Grab entire screen for BIOS during autopilot checks to ensure we don’t miss the BIOS lock icon.
All machines on wipe stations must receive two PC Tech initials before being taken off station.
In effort to avoid backlogs of unQCed items piling up in bins, moving forward we cannot remove any machine from a wiping station until it receives two PC Tech initials. This policy will undoubtedly cause throttling of work that can be done on a wipe station because there will be limited space, but this is to be anticipated and the solution is that we will find alternate work to be done until Andy or Ze or anyone else authorized to QC reaches and clears the machine. A notable good outcome of this policy will be that you will received basically immediate feedback on your work instead of us discovering errors much later.
Table of common SSD sizes with wipe paper reported size conversion
Common wipe paper size conversions:
• 477GB is equivalent to 512GB
• 466GB is equivalent to 500GB
• 238GB is equivalent to 256GB
• 232GB is equivalent to 250GB
• 224GB is equivalent to 240GB
• 119GB is equivalent to 128GB
It is to my understanding the reason why this happens is how the drive stores index data.
Absolute Persistence in Dells – important BIOS area to now check in every Dell machine
We’ve recently come across and began processing Dell laptops with Absolute Persistence activated. It is now going to require us to check for this being present and active in all the Dell laptops moving forward because it does not reveal itself until very, very late in the process where we need to leave it plugged into the ethernet for several minutes after autopilot checking before the lock-out screen activates itself.
Please take a look at the screenshot below:

Note how the options for Absolute Persistence are greyed out. This means that Absolute Persistence is activated. We cannot set this device as is. Hand it off to the PC Tech Team Lead and it will be recorded and sorted away for now.
There is one extra complication: all the BIOS options will be greyed out when the system is BIOS locked so that means there will be no way to know if Absolute Persistence is active or not, and you will need to let it sit connected to the internet after autopilot checking it. Ze has asked that we let it sit overnight or at least until the lock out screen shows up. If a lock out screen does not show up by morning, it should be all clear to sell.
HPs can have Absolute Persistence. Here is where to look:
Dell and HPs do not announce if they have Absolute Persistence active when you load into the BIOS. You have to go looking for it. Be sure to look for Absolute Persistence in the BIOS/UEFI of all laptops and computers. There is no way to tell if they have their Absolute Persistence active until you specifically go looking for it.
See the photo below for what it looks like in the HP UEFI.

Using painters tape to keep wipe papers in place.
Often times, especially with the larger sized laptops, wipe papers cant fall out even from the closed lid and get lost. For that reason, please use a small amount of painters tape to keep the wipe paper in place. You are welcome to do this for all laptops, but the ones we are particularly considered with larger laptops or laptops with lids that aren’t closing down with a tight seal you can feel confident about. Please tape down wipe papers based on your best judgement.

Defective note example:
- Does not power on.
- Powers on with no display or no boot.
- Defective LCD(non-cracked): Lines, light/dark spots, color tint, color diffusion, watermarks, and more.
- Cracked display or cracked glass with a good display.
Troubleshoot
- Does not turn on
- Try disconnecting the power and battery, then reconnect them.
- The laptop powers on but does not boot – Try different RAM, try to power on more than once.
- Always use OEM power supplies if possible.
- BIOS locked.
- Use the BIOS Master Password Generator to generate a master password to unlock the BIOS.
- CAPS lock and NUMBERS lock blinking
- Mostly HP laptops relate to missing RAM or bad RAM.
- if still not working, try to google the error code.
- The laptop won’t stay powered on
- Check the power jack for any damage. Bad power jack my result does not provide power to the laptop.
- Check the power indicator light. if the laptop has a battery the indicator light should be on.
- If a laptop has another power port, try a different one to see if it works.
- Won’t load Killdisk
- It might have a bad hard drive, replace the hard drive.
- The laptop doesn’t detect a hard drive.
- Check the port for any damage.
- Try a different drive.
- For the m.2 connector, try both SATA m.2 and NVME m.2.
- Laptop freeze
- Replace the RAM.
- Check the CPU fan.
- Blue screen
- Record the error code for the blue screen and google the solution.
- Stuck on the startup screen
- Check for any damaged ports, some metal pins might connect.
- Replace the RAM.
- Misaligned screen
- If you notice a screen is wobbly, not just rocking back and forth, but also if it is wobbling or misaligned from side to side, take a moment to tighten the hinge screws if they are available. If the screen is still misaligned, consider quickly removing the screws from the hinges, lifting it up the mechanism out of the laptop slightly and trying to realign it before screwing it back in.
8th gen laptops no longer valuable enough for eBay: needs to go to wholesale, cosmetic, or for-repair only
As time has passed, now 8th gen laptops in general are not selling at a high enough value for us to send to eBay. For any machines that are too damaged to go to cosmetic, they will default be sent to for-repair due to their lower value. That means for-repair now always received all damaged-beyond-cosmetic laptops that 6th, 7th, and 8th gens.
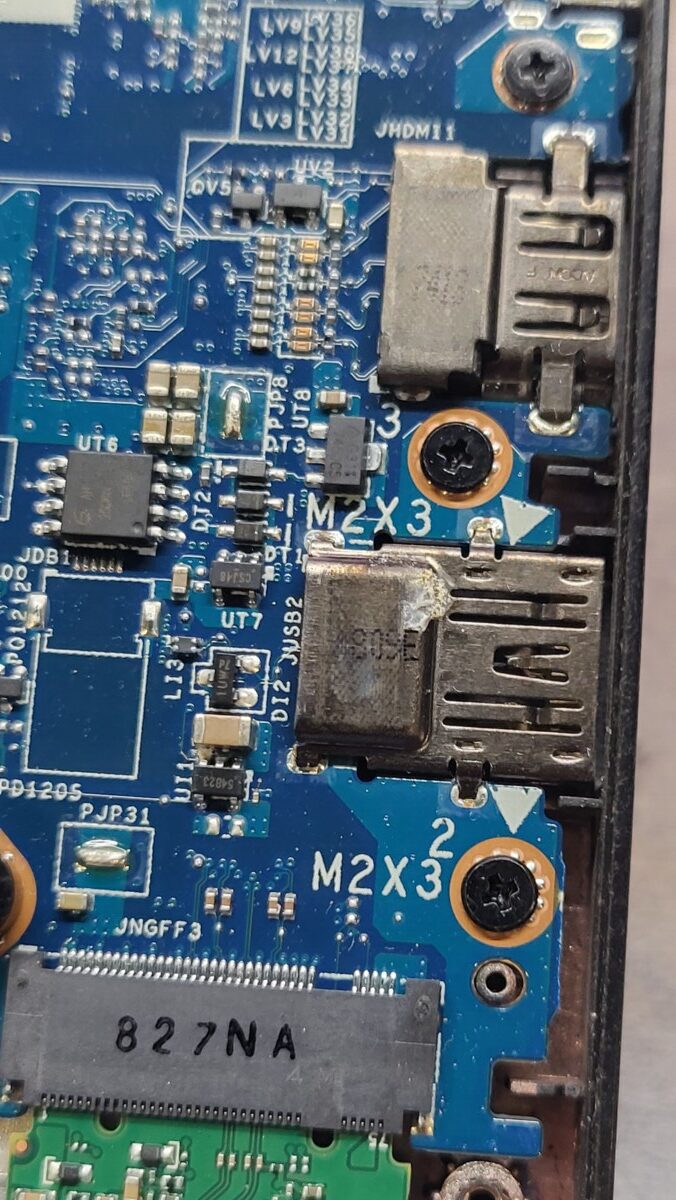
Tips to avoid overlooking already installed SSDs
Some laptops hide their storage away more than others. Typically, workbook laptops such as Dell XPS, Dell Precision, HP ZBook, The Lenovo P series laptop plus gaming laptops such as the Dell G7 series have multiple storage slots. But that being said, other more standard looking laptops sometimes also have multiple storage slots, whether that is 2 m.2 slots or sometimes a 2.5″ sata bay and also one m.2 slot.
There are 3 opportunities to check for multiple drives.
- First and most importantly, review the internals of the laptop closely and look for drives under shields or tucked away in weird positions.
- Second, the BIOS often will display the drive information. Here is a photo from a BIOS where a second hard drive was discovered. Keep in mind, the drive may not show up here if the drive or slot has failed, but it is still critical you remove the drive to protect customer data.

- Third, as long as the drive and the drive slot are working, the drive should be visible when you go to wipe it within KillDisk. If you see an unexpected drive, remove it right away before your begin you wipe so that you don’t forget to remove it after the fact.


SSDs that are in unusual places, obscured by shields, or even look and are placed in a way that make them look like wifi cards make getting all of them a challenge, but it is critical that we vigilantly check and be in the mindset of looking out for tricky ones. Please take several extra seconds with each laptop when you are looking at the motherboard to identify/verify the actual wifi card and if there are extra cards that could be storage as well as checking under shielded areas that could possibly hide one.

Use alcohol pads or Goo-gone to remove sharpie marker on machines. Do not cross out / cover up marker with more marker.
We have found it is possible to remove layers of marker and that marker that has been on a machine longer will be more difficult to remove, so for that reason we should not use black marker to hide existing marker-written asset tags of devices. There is a change that a customer could later reveal the hidden asset tag. Instead, use alcohol wipe pads or Goo-gone to remove Sharpie. Try using alcohol pads first before Goo-gone. Goo-gone is stronger so much so that it could damage paint on machines, so use it as more of a last option. If neither of these options work in removing the asset tag, let your supervisor know and alternate next steps can be decided at that point.

Notate a graphics card on your wipe label if you see one
If you see a double fan or double heat pipe set-up within a laptop, it usually means it has a GPU, and what you are looking at is the additional cooling for that component. If you see this during your wiping notetaking, please “has GPU” in your notes. This will help us from accidentally missing in during testing later. Don’t wait until the testing phase to mention this in notes. Get it somewhere in the notes as soon as possible.


When laptops have missing screws, use spare screws if you have them, but be extra careful of long-screw damage.
We should attempt to replace screws when they are missing if you have screws readily available that look like they can fit the hole. That being said, this may require you to spend more time on a occasional basis sorting your spare screws collections so that it isn’t a mess when you are looking for a specific size. Organizing spare screws into something easily searchable is an activity encouraged whenever you have comfortably met your production goal for the day/week. This is a good use of your time that will pay off with ease and improvement of life later on. If it is going to take you several minutes to find the screw you need, just don’t worry about it at this time until you can get more organized.
If you going to attempt to replace screws, be cautious to not use screws that are too long. Long-screw damage is a somewhat common issue. You’ll know long-screw damage generally from strange reverse dents on cases like on the palm rest. The screw that was used on the bottom panel was too long. Be careful not to do this, and if you do this on accident, be sure to include that in your notes.
Screen cleaning checklist form:
CIf you would like to print screen wiping checklists for yourself you can find it at this URL or by clicking the image thumbnail: https://www.xworx.app/wp-content/uploads/2025/02/Screen-cleaning-form.pdf

Photos and info needed for wholesale listings
- Photo of bottom layer or multiple layers of speedpak or gaylord.
- Overhead (overview) photo(s) of machines on pallet
- Photos of ports for some machines in the case of AIOs or if requested by Ze
- Photos of example damage on machines (3 example photos usually)
- Info for the speedpak’s weight (tare doesn’t matter) and dimesions of which are usually 40x48x(height variable).
- Any additional requests from Ze/Joseph. Please check with them before considering your work done. It is a good idea to check with them before starting to build above the bottom layer so that you don’t have to take it all apart later.


Replace the damaged laptop lithium-ion battery bin when full. Print a 1043 label and be sure to write the date on it.
PC Techs are primarily going to be the people filling up the bins/handle-boxes of damaged laptop batteries, so please replace the bins/handle-boxes when they full. For compliance reasons, print out a 1043 label for the replacement be and write the current date on that label.
Example of a damaged display cable that needs to be documented in notes
Even though this display cable works, the jacket is ripped away enough from the end and exposing the colorful cables that we will need to leave a note about a cable in this condition. It is something that a customer could point to when asking for a refund.

Another example of liquid damage – calcification
Ze says that you are likely to find this white residue on components more than the motherboard itself. This is liquid damage so be sure to notate any time you see signs of damage like this! Take a few extra seconds during your laptop wiping prep to take an extra close look around the inside of you laptop.

Here are more example photos of what liquid damage looks like within a laptop. Be sure to notate this for WHOLESALE laptops if you see signs of liquid damage during your work or if you are conducting the final inspection.


Minimum size of SSDs to include/wipe in your devices: 128GB
Anything SSD storage underneath 128GB should be given to your supervisor to be taken out of normal circulation.
Inability to set Computrace as deactivated within the BIOS of Dell laptops, but Computrace can be deactivated despite what the BIOS says.
We spoke with the support team for Computrace, and they informed us that it is not possible to remove Computrace from appearing as active in the BIOS of some Dells, but the actual function of Computrace can be removed using the Absolute Persistence removal tool.
The Dell laptops that contain Computrace, which is also referred to as “Absolute 1.0”, are mostly 6th gen and 7th gen Dells that will be wholesaled. Because we are wholesaling these laptops and not photographing them, we only will need to indicate on the wipe label that Computrace has been deactivated despite what the BIOS says. Please run the Absolute Persistence removal tool yourself to confirm this is true. If there is a newer generation laptop with Computrace enabled that needs to be tested for ebay, in that case we will need to photograph the Absolute persistence removal tool confirming
Here is the message the support team sent us for any additional clarification:
When notating damage for WHOLESALE laptops, please note when you see wear on the trackpad and keyboard like this photo where the trackpad/keyboard shines and the shine cannot be wiped off. This would be considered significant enough to notate as having a worn trackpad.

Here is a list of conditions that should be checked during the final inspection for any WHOLESALE laptops, as they have not be thoroughly inspected for these flaws prior to final inspection. If you are conducting final inspection, you are the last stop, so check for these conditions carefully!
-Laptop housing condition
-Ports condition
-Presence of a battery
-Signs of liquid damage
-Missing or damaged internal components like cables, internal plastic, or if an SSD needs to be taped down instead using properly mounting hardware
-Presence of a SIM card
-Recording issues with the keyboard, trackpad, or touchscreen outside of marking a test as failed within the WipeOS diagnostic?
-Recording the power adapter type and wattage used during processing
-Screen condition
-If USB Killdisk or a USB Windows installer was needed to be used due to PXE issues or a BIOS lock.
P.S.
- Use a marker to mark all the defective RAM with “X” or “bad” before scrapping them.
- All laptops must be registered if possible. If a laptop can not be registered, leave a note explaining the reason.
- If a laptop does not have a hard drive, plug a USB drive for wiping in Killdisk Active Boot Disk only so it can print out an erase report.
- Remove the HDD and RAM from the laptop that does not power on or POST.
- If the laptop has no liquid damage sign and the keyboard is acting normally during setup for wiping, we will assume the keyboard is working.
- Notate that screws are missing from bottom panel.
- Notate which power port you used during your wiping process (USBC or barrel jack)
- Notate if you use any electrical tape inside the machine to hold down any components.
- Laptops valued about $200 with graphics cards should run the Heaven benchmark
- Notate missing caddies used in laptops – this is especially important for Rugged laptops.
- Always notate if the machine is BIOS locked, if RAID is on, and if Computrace/Absolute Persistence is active.
- A disconnected display cable because the screen doesn’t work needs to be notated. This is also considered a separate issue from the screen being cracked. Notate any time the display cable is disconnected.
- We need to notate whether BIOS lock is RAID or AHCI any time there is a BIOS lock. If BIOS does not specify the mode anywhere, notate that the “BIOS does not specify RAID/AHCI.”
Everything below is line is no longer relevant to the process but being left on this page for record keeping.
This checklist is currently not used, but leaving record of it here in case it ever returns.
Please use this link to load up the wipe paper as a PDF so you can use one of the color printers to print on both sides of 1 sheet of paper: https://www.xworx.app/wp-content/uploads/2025/12/Laptop-checklist-updated-March-26-2026.pdf


-Please hand write any issue you observe immediately onto the checklist, and then later replace the handwriting with a printed label for legibility
-Within the new laptop wiping sheet, there are 3 conditions where we will want to use a highlighter in addition to circling with a pin to make sure it is not overlooked. These 3 conditions are if absolute persistence active, autopilot is locked, or if there is a splash screen. Also, we ask that you fix absolute persistence right there at the wipe station if possible, too, once windows is installed of course.
Reminder to test all USBC ports and barrel jack for power/charging. Check all USBA ports with a mouse and check the video ports that you can get to display out. Visually inspect any ports you cannot check within the BIOS. We may expand our port testing later, but this should be adequate for now.
Touch the screen of every laptop to test for touchscreen. If you are not sure if the laptop has a touchscreen, check for its settings in the BIOS. Two other clues there are is a touchscreen is that the screens often have a glass coating (not always), and another clue is when you see an internal touchscreen connector on the motherboard.
Please initial for all fields you have tested. Do not initial if you have not completed your test in full.
We will continue to put wipe labels on the screen lid, but we just need serial and pickup number, and you can leave the rest blank.

Records of Revisions
- — pctechlead@beyondsurplus.com: Updated post "PC Tech Level 3-Laptop Wiping: Laptop PXE Boot and Registration."
- — pctechlead@beyondsurplus.com: Updated post "PC Tech Level 3-Laptop Wiping: Laptop PXE Boot and Registration."
- — pctechlead@beyondsurplus.com: Updated post "PC Tech Level 3-Laptop Wiping: Laptop PXE Boot and Registration."
- — pctechlead@beyondsurplus.com: Updated post "PC Tech Level 3-Laptop Wiping: Laptop PXE Boot and Registration."
- — pctechlead@beyondsurplus.com: Updated post "PC Tech Level 3-Laptop Wiping: Laptop PXE Boot and Registration."
- — pctechlead@beyondsurplus.com: Updated post "PC Tech Level 3-Laptop Wiping: Laptop PXE Boot and Registration."
- — pctechlead@beyondsurplus.com: Updated post "PC Tech Level 3-Laptop Wiping: Laptop PXE Boot and Registration."
- — pctechlead@beyondsurplus.com: Updated post "PC Tech Level 3-Laptop Wiping: Laptop PXE Boot and Registration."
- — pctechlead@beyondsurplus.com: Updated post "PC Tech Level 3-Laptop Wiping: Laptop PXE Boot and Registration."
- — pctechlead@beyondsurplus.com: Updated post "PC Tech Level 3-Laptop Wiping: Laptop PXE Boot and Registration."
- — pctechlead@beyondsurplus.com: Updated post "PC Tech Level 3-Laptop Wiping: Laptop PXE Boot and Registration."
- — pctechlead@beyondsurplus.com: Updated post "PC Tech Level 3-Laptop Wiping: Laptop PXE Boot and Registration."
- — pctechlead@beyondsurplus.com: Updated post "PC Tech Level 3-Laptop Wiping: Laptop PXE Boot and Registration."
- — pctechlead@beyondsurplus.com: Updated post "PC Tech Level 3-Laptop Wiping: Laptop PXE Boot and Registration."
- — pctechlead@beyondsurplus.com: Updated post "PC Tech Level 3-Laptop Wiping: Laptop PXE Boot and Registration."
- — pctechlead@beyondsurplus.com: Updated post "PC Tech Level 3-Laptop Wiping: Laptop PXE Boot and Registration."
- — pctechlead@beyondsurplus.com: Updated post "PC Tech Level 3-Laptop Wiping: Laptop PXE Boot and Registration."
- — pctechlead@beyondsurplus.com: Updated post "PC Tech Level 3-Laptop Wiping: Laptop PXE Boot and Registration."
- — pctechlead@beyondsurplus.com: Updated post "PC Tech Level 3-Laptop Wiping: Laptop PXE Boot and Registration."
- — pctechlead@beyondsurplus.com: Updated post "PC Tech Level 3-Laptop Wiping: Laptop PXE Boot and Registration."
- — pctechlead@beyondsurplus.com: Updated post "PC Tech Level 3-Laptop Wiping: Laptop PXE Boot and Registration."
- — pctechlead@beyondsurplus.com: Updated post "PC Tech Level 3-Laptop Wiping: Laptop PXE Boot and Registration."
- — pctechlead@beyondsurplus.com: Updated post "PC Tech Level 3-Laptop Wiping: Laptop PXE Boot and Registration."
- — pctechlead@beyondsurplus.com: Updated post "PC Tech Level 3-Laptop Wiping: Laptop PXE Boot and Registration."
- — pctechlead@beyondsurplus.com: Updated post "PC Tech Level 3-Laptop Wiping: Laptop PXE Boot and Registration."


read 10.24.23jc
read
reread
Under Stage #4: Laptop wipe Quality Checker
‘Shut down the laptop by using the command” shutdown -s” or the PowerShell command”stop-somputer”. Do not force shut down the laptop by using the power button or unplugging the power supply.’
There is a typo: it should be “stop-computer” and I recommend to use the shutdown command with t 0 like this: “shutdown -s -t 0” to start the shutdown right away without having to wait a minute.
Read Lee 7/28
Huy 11/10/2025
Read Edmundo Sanchez 04/14/2026