Last Updated on February 2, 2026 by
Check for any updates every time you go through the process before testing.
Scope:
This process will apply to the laptops that need tech labels after wiping.
Link to eBay laptop testing page:
PLEASE PRINT OUT THIS CHECKLIST before you get started.
Please use this link to load up the wipe paper as a PDF so you can use one of the color printers to print on both sides of 1 sheet of paper: Laptop wiping checklist https://www.xworx.app/wp-content/uploads/2025/12/Laptop-wiping-checklist.pdf
^ Click the linked PDF above ^


-Please hand write any issue you observe immediately onto the checklist, and then later replace the handwriting with a printed label for legibility
-Within the new laptop wiping sheet, there are 3 conditions where we will want to use a highlighter in addition to circling with a pin to make sure it is not overlooked. These 3 conditions are if absolute persistence active, autopilot is locked, or if there is a splash screen. Also, we ask that you fix absolute persistence right there at the wipe station if possible, too, once windows is installed of course.
Reminder to test all USBC ports and barrel jack for power/charging. Check all USBA ports with a mouse and check the video ports that you can get to display out. Visually inspect any ports you cannot check within the BIOS. We may expand our port testing later, but this should be adequate for now.
Touch the screen of every laptop to test for touchscreen. If you are not sure if the laptop has a touchscreen, check for its settings in the BIOS. Two other clues there are is a touchscreen is that the screens often have a glass coating (not always), and another clue is when you see an internal touchscreen connector on the motherboard.
Please initial for all fields you have tested. Do not initial if you have not completed your test in full.
We will continue to put wipe labels on the screen lid, but we just need serial and pickup number, and you can leave the rest blank.
Saving copies of your photos onto the network drive as backup
There is a network drive where we would like everyone to begin saving copies of their photos. This is because occasionally errors in our web forms cause photos to disappear from our database, and having a backup copy on this network drive would resolve this problem and prevent future data loss.
The network drive location is:
\\WIN-SIXBIT\Inventory.Lists\Bios.Pictures
Please follow the naming mechanisms. Create subfolders based on the serial numbers of your device, or you can rename your photos to contain that serial number, or both. Please ensure that this network drive continues to stay orderly. Thanks!


1. Check the Erase Certificate
Check the erase certificate with the laptop by the serial number.
2. Value check the laptop
Value check the i5 and i7 8th Gen or newer laptops that are worse than cosmetic condition but not scrap. 6th and 7th gen will not be tested for ebay, and i3 8th gens are also too low value to send to ebay and will be sold differently.
- Laptop with a cracked LCD or broken hinge
- Sold less than $150(Pre-owned) will go to #1169 WHOLESALE LAPTOP REPAIR, Use PC tech level 2: Govdeals Wholesale laptop for repair
- Sold of $150 or more will go to #1078 EBAY: LAPTOPS.
- Laptop with other issues
- Sold less than $100(Pre-owned) will go to #1169 WHOLESALE LAPTOP REPAIR. Use PC tech level 2: Govdeals Wholesale laptop for repair
- Sold of $100 or more will go to #1078 EBAY: LAPTOPS.
- Cosmetic laptops will use PC tech level 2: Cosmetic Laptops for Wholesale
Below is the current list of laptops models that have been pre-marked as being destined for wholesale for-repair. So if you have a laptop model in the list below, DO NOT EBAY TEST it. It would instead be destined for a different, less time consuming test.
The following models are 8th-gen or newer laptops that ebay does not want us to send to them due to low value.
- Dells:
- Dell Latitude 3400 (all)
- Dell Latitude 3500 i5
- Dell Latitude 3510 i3
- Dell Latitude 5400 (all)
- Dell Latitude 5401 unless there is only scratches. – If it is BIOS locked or anything series, it is for-repair
- Dell Latitude 5410 (all)
- Dell Latitude 5411 (all)
- Dell Latitude 5480 (all)
- Dell Latitude 5490 (all)
- Dell Latitude 5500 – i5 8th gen with any issues other than scratches
- Dell Latitude 5501 if it has a cracked screen
- Dell Latitude 5511 (all)
- Dell Latitude 5590 (all)
- Dell Latitude 7290 (all)
- Dell Latitude 7300 i5
- Dell Latitude 7390 (all)
- Dell Latitude 7390 2-in-1 (all)
- Dell Latitude 7400 8th gen
- Dell Latitude 7480 i5
- Dell Latitude 7490 (all)
- Dell Precision 3530 (plastic case) i5
- Dell inspiron 15 3511 if it has a 10th gen CPU
- Lenovo:
- Lenovo ThinkPad E480 i5
- Lenovo ThinkPad E490 i5
- Lenovo Ideapad FLEX 5-1570
- HP:
- HP Pavilion x360 Convertible i5
- HP ProBook 440 G7 i5
- ProBook 650 G5 – all 8th gen models
3. Open the page
Open the Laptop testing page. Check the laptop and fill out the specs.
4. Inventory: Record Brand, Series, Model, Serial Number, & Pickup Number

Click the picture for zoom-in. (The picture is from a desktop PC, and might look different from the phone interface.)
- Test Date: Date for test
- Technician: Choose your bench or name
- Brand: Laptop Brand
- Series: For most Laptops, there will be series like Latitude, ProBook, ThinkPad, etc. Leave blank if not applicable.
- Model: Laptop Model. How To Identify Common Model/Part Numbers
- Serial Number or Service Tag: Use the barcode scanner to scan the S/N. do not manually enter the SN if there is a barcode or QR code.
- Pickup Number: Record the pickup number for the laptop.
5. Inspect The Machine


Click the picture for zoom-in. (The picture is from a desktop PC, and might look different from the phone interface.)
- CHECK PORTS: Check ports for any physical damage.
- CHECK THE CASE: Check for any damage.
- Battery: Included or not
- Hinge: Check to see if the hinges are damaged or loose.
- Keyboard: Check the keyboard.
- Open the bottom cover and inspect the motherboard.
- Any defects or liquid damage need to be noted.
- If the motherboard has 2 heatsinks, the laptop should have a dedicated graphics card.


6. Testing
- Powers On
- POST to BIOS and take a picture of the specs.
- Optical Drive
- Screen
- Touchscreen
- Property of Splash
- BIOS Password
- Need to run onboard hardware diagnostic if applicable.
- Check the autopilot status by using Laptops For eBay Bios & Autopilot Check Repository
- The capture screen is for the BIOS screen and diagnostic screen. Run an extended diagnostic for a laptop over $300


- Also, use the camera to take a picture of the laptop screen to show the screen condition.
- Plug in the HBCD USB drive and restart the laptop, and boot to HBCD.
- You will hear a chime when the system is loaded. If there is no chime, the speaker is not working.
- Test the keyboard with the AquaKeyTest and test the keyboard.
While testing the keyboard in Aqua’s Keytest, you may experience the application showing a slightly discolored key. This tends to happen if you quickly rub your hand over the keys while testing for the sake of getting it done quickly. That being said, this discolored looking key will confuse a customer into thinking there is a problem with that key. So if you ever get a discolored key, press it again and the issue should resolve itself. If you have to press the key extra hard to get it to register, then that is something you need to note. But if that isn’t the case, the discolored key is just a byproduct of this software that occasionally you will need to correct. Please see the example below on the left-side Windows key.

HIERARCHAL ORDER OF NOTES
The order in which we present notes to ebay customers is important. The labels we print for ebay labels only have space to contain some of the critical information for ebay customers, and the machines need to have the most critical information printed on them instead of less critical information. We want to make sure ebay customers don’t accuse us of burying the most serious issues we find with our machines deep in paragraphs of less consequential notes. Please see the example photo below.

So although the diagnostics portion of this note would normally be in the correct place IF the diagnostics had passed, but because the diagnostics came back with memory errors, that note should be have been moved up to the second note in this list, right after the liquid damage note. The liquid damage is the most consequential note, and the memory error is the second most consequential note. Keep this frame of mind when writing out laptop notes.
Below is a guide for the priority of notes from top to bottom. This is not a 100% comprehensive list of all situations so please use this in addition to your best judgement.
★★★★Very first★★★★ Notate damage that could potentially cause the machine the fail later
Examples: Signs of liquid damage. Failed diagnostic tests for critical components like RAM and fans. Random restarts: include any Windows or BIOS error codes if they are displayed. Get photos of the error codes if possible, too. If you can’t photograph error codes, include why in the note. Failed GPU Heaven benchmark tests that resulted in a unfixable very bad score or a system crash.
★★★Second★★★ Notate functional damage and configuration issues
Examples: Screen cracked or defective to the point where it cant be used normally, issues with keyboard and trackpad that prevent them from working normally. Motherboard connector broken preventing replacement parts being installed. Broken hinge. BIOS locked (include if it is in AHCI mode or RAID mode).
★★Third★★ Notate major physical damage
Examples: Case has significant chipped plastic or is severely cracked. A case panel or screen bezel will no longer stay sealed in the correct location. Missing keys that can still be pressed. Ports that do not work. Anything that could be be described as major damaged not yet mentioned.
★ Fourth ★ Notate minor physical damage
Examples: Smaller cracked plastic or very minor chipped plastic. Scratches, scuffs, and minor damage to corners, heavy wear on trackpad, paint of keys being worn off but you can still read the letters.
After including the damage listed above, then include the following information in this order.
1) Passed (laptop brand) diagnostic. If it did not pass, this note should be jumped up higher on the list based on severity of the failed test.
2) Win 11 installed.
3) No drivers included.
4) Precise video card name (if applicable).
5) Ran heaven benchmark (if applicable). If it did not pass the test, be sure that all of your drivers (including drivers in the optional updates section) are fully up to date, but if there is no improvement or if the test causes the computer to crash, put this up at the first section of the notes that could cause the computer to fail later.
6) Tested with _(Dell barrel jack, Lenovo square jack, HP barrel jack, Lenovo 65W USBC, Dell 130W USBC, etc.)_ power.
7. Record PC Specs(Only put down specs from BIOS or POST screen)
- CPU: Record CPU brand, CPU model, and CPU speed. If the BIOS did not list 12th gen or newer CPU speed, use the Max Speed 12th Gen or newer CPU Max Speed
- RAM: Record total RAM.
- Hard Drive/s: Record QTY of hard drives, Hard drive size, and wipe condition
- COA: use “None”.
- Note:
- Record anything that needs to be mentioned, including details for any defects.
- Record the defects first in the note.
- The section that is labeled COA in this test is confusing to the customer. The actual COA usually should be Windows 10, but we actually install Windows 11 on the machine. Paul deals with confused ebay customers for this reason. So, while doing these eBay laptop test, just put your response to the COA as “none.” That is the preferred answer unless you hear otherwise.
8. Double Check Your Entries.
- Do not turn off the Laptop before checking that all the specs you entered are correct
- Upload Pictures: Upload pictures captured before.
- Pictures that need to be uploaded
- BIOS page with specs picture.
- Diagnostic picture.
- OS picture if installed (Need the picture as proof of Autopilot free)
- Motherboard pictures.
- Defects.
- Benchmark picture. (If a laptop with a dedicated graphics card is worth more than $300)
- PowerShell script that shows autopilot status.
- How to install Windows through PXE boot and check Autopilot status for Windows machine
- Pictures that need to be uploaded


9. Print Label

Click the picture to zoom in. (The picture is from a desktop PC and might look different from the phone interface.)
Desktop PC
- Check the specs again after printing the label.
- Make sure the label has all the information so that the sales department does not have to power on the machine and test it again.
- Make sure all the information is correct.
- Submit
Phone
- Check the specs again.
- Make sure the label has all the information so that the sales department does not have to power on the machine and test it again.
- Make sure all the information is correct.
- Submit
- Go to the email on the PC tech Phone, open the PDF to print the tech label.
10. Apply the label to the laptop
11. Put away
 Loading...
12. Go to the next laptop
Existence of HP diagnostics USB for testing
PC Tech Level 3-Laptop Wiping: Laptop PXE Boot and Registration https://www.xworx.app/?p=8128
When wanting to conduct diagnostic tests for HP machines, the method Beyond Surplus requires is the use of the HP diagnostic test USB too. This interface has a different look and consolidates the testing information onto two pages rather than running multiple individualized tested as you would with HP’s built-in diagnostic tools.
Keep in mind, this USB takes MULTIPLE MINUTES to LOAD into itself, and that is before even beginning testing. Anticipate the completion of both test stages (from the “fast test” option) to take 1-2 hours depending on how much RAM you have in. Here are the 2 photos required (as an example) from a successful diagnostic test:


Here is a quick checklist for your laptop before you print the label and submit the information:
–(1)– DID YOU VALUE CHECK LAPTOP?
Rules:
– Needs to reach a minimum of $150 highest sold price with a cracked screen
– Needs to reach a minimum of $100 highest sold price with all other issues but with a screen that is not cracked.
–(2)– DID YOU GET ALL THE PHOTOS NEEDED?
Make sure the photos are not blurry.
Make sure there are no other objects in background such as thumb drives or mice. The customer may try to claim they thought that object was also included in the sale.
Photos you’ll need:
A) The wipe paper
B) BIOS (multiple photos as needed) – please also take a photo of a BIOS locked screen if you encounter one
C) Diagnostic test – (also, do you have experience running these diagnostic tests at Beyond Surplus already? Speak with your supervisor about specific instructions if not because there is a specific way we record results for each different brand of laptop. For example, do you have the HP diagnostics USB you’ll need?)
D) Keyboard test (also remember to test touchscreen and trackpad while testing)
E) Autopilot script ideally in front of the name your device screen – This photo likely has already been taken. You should be able to find it in this database towards bottom of page: https://www.xworx.app/?p=12223. Simply take a photo of your computer screen of the photo you’ve previously taken already within this database. The quality will be lower, but as long as you can read all the text, it will be fine.
F) Motherboard
And if there is a graphics card:
G) Heaven benchmark
H) Pull up the About PC settings page and the Device Manager side by side.
Do you know about using OOBE\BYPASSNRO to pull up the desktop for graphics card testing? Ask your supervisor to explain if you are not familiar. Use the username: user and the password: (blank) just hit enter. You can accept all the privacy options.
A computer with a graphics card typically has two heatpipes and usually two fans. This is typically but not necessarily always. Usually laptops with graphics cards are the Dell XPS, Dell Precision, HP ZBook, and any gaming laptops. Lenovos are the wild cards, but usually the X1 series and often the P series tend to have graphics. You will need to inspect those closely to find out. Do a Google search to look for evidence of a potential graphics card if you still feel unsure. Also ask your supervisor if still in doubt.
–(3)— DO YOU HAVE THESE DESCRIPTION ON YOUR TECH LABEL IN THIS ORDER?
1) Issues with laptops always go first.
2) Passed (laptop brand) diagnostic.
3) Win 11 installed.
4) No drivers included.
5) Precise video card name (if applicable).
6) Ran heaven benchmark (if applicable).
7) Tested with _(Dell barrel jack, Lenovo square jack, HP barrel jack, Lenovo 65W USBC, Dell 130W USBC, etc.)_ power.
Remove laptop’s AR value label once laptop is given test label, but copy over pickup number info.
The purpose of the label with value of the laptop on it is to let the PC Tech team know which speedpack the laptop will belong in after testing it for ebay, cosmetic, or sending it to for-repair. For that reason, please remove the AR value label after your test is complete so that end the end we only keep one sticker on the machine. Please copy over the pickup number information to the remaining sticker before removing value sticker. It is important that we keep the pickup number available and visible on the laptop at all times.
Make sure you are capturing all that is required in the BIOS
During autopilot checks, be sure to grab both the screens needed within the BIOS for Dells (Grey and White theme) and HPs. This information is needed by eBay, and sometimes also displays generally helpful information like the GPU and screen resolution. Below are example screens for Dells and HPs. Both need two photos taken each to capture everything. Also, please capture the entire screen to show at least a bit of all 4 edges if possible. This will prevent us from failing to capture the Dell BIOS lock icon which is either at the top left corner or bottom center area of the BIOS screen with the lock icon.


In HP laptops if you are BIOS locked, hit F1 instead on startup to get a summary of the systems specs that way.
With Lenovo laptops if you are greeting with a locked symbol on a blank screen while trying to enter the BIOS, sometimes if you simply press enter, you can bypass the lock, however, you still wont be able to change any settings in the BIOS.

Please take a photo of a BIOS lock screen if you encounter one.
Example photos for ebay test requirements:
Here are examples of what the eBay laptop test photos of should look like. Please reach out if you have any additional questions about what is required in these photos. Thanks!
A) The wipe paper


B) BIOS (multiple photos as needed)


C) Diagnostic test

D) Keyboard test (also remember to test touchscreen and trackpad while testing) If the keyboard shows keys that are darker than the rest, press the key again until the color turns normal yellow.


E) Autopilot script ideally in front of the name your device screen


F) Motherboard


And if there is a graphics card:
G) Heaven benchmark (needs a score above 300. Change settings as needed and try updating Windows and downloading drivers – check the “advanced: optional updates” section)


H) Pull up the About PC settings page and the Device Manager side by side. – Include the Processors, disk, graphics, and computer name open in the photo of the device manager.


New type of asset tag to look out for! Will require a closer look at labels across all machines.
An asset tag was recently discovered within a manufacturer label itself. We will need to begin visually scanning over manufacturer labels to look out for labels in this in the future. If you see a manufacture label like this, the preferred solution to keep the manufacturer label intact if possible if it contains important product information like the model number, serial number, or other details important for identifying the product, and to use scissors and cut out the offending asset tag portion. If that isn’t possible, then it would be ok to fully remove the label.
It is going to require us to be even more detail oriented, but do not let this destroy your productivity output. Just quickly visually scan over the labels on the machines and look for brand names that should not be there.
Please click on the photo below to see an example.

Another example of a tricky asset tag
This looks somewhat like a manufacturer tag at first glance as it only has this machine’s serial number and an QR code. Unfortunately this is a QR link to rhinofamilyofcompanies.samanage.com. So here is a general overarching policy for asset tags: Be very suspicious and remove any sticker that is not 100% conclusively a manufacturer sticker, and in fact, you can remove any label that is deemed removable, meaning it isn’t absolutely necessary to identify the product. Anything that looks out of place compared to similar models or anything that sticker that looks out of place in general, investigate it before assuming it is OK. Scan QR codes to verify them if you plan on leaving them on the machines.

Do not notate on your labels any asset tags remaining on systems
Depending on what an asset tag says, we may choose to sell systems with asset tags that are non-removable assuming that the asset tag in no way implies or reveals who was the original owner. For the reason of trying to not draw any attention to something the previous owner wrote in the system, please do not mention the asset tags on labels. As an important reminder, the PC Tech Team Lead or any other supervisor needs to review any asset tags being intentionally left in machines, even if you deem it indecipherable yourself.
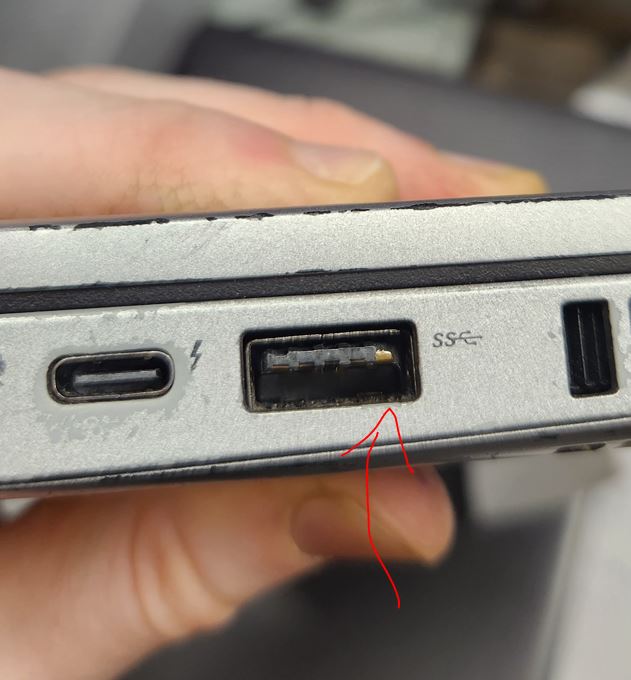
Inspect ports closely and notate damage even if very minor
Minor damage within ports is still enough damage where we need to mention it to the customer. The concern is that it is in a state that could get worse, like the port pins could break off when a cable is connected which has happened before even to us while working here at the warehouse. There is also a chance the port could be sensitive/finicky or stop working later. So please inspect all ports very closely for this reason to make sure you don’t miss subtle damage. Thanks!

Inability to set Computrace as deactivated within the BIOS of Dell laptops, but Computrace can be deactivated despite what the BIOS says.
We spoke with the support team for Computrace, and they informed us that it is not possible to remove Computrace from appearing as active in the BIOS of some Dells, but the actual function of Computrace can be removed using the Absolute Persistence removal tool.
The Dell laptops that contain Computrace, which is also referred to as “Absolute 1.0”, are mostly 6th gen and 7th gen Dells that will be wholesaled. Because we are wholesaling these laptops and not photographing them, we only will need to indicate on the wipe label that Computrace has been deactivated despite what the BIOS says. Please run the Absolute Persistence removal tool yourself to confirm this is true. If there is a newer generation laptop with Computrace enabled that needs to be tested for ebay, in that case we will need to photograph the Absolute persistence removal tool confirming
Here is the message the support team sent us for any additional clarification:
Autopilot fails prevent OOBE\BYPASSNRO, must use Administrative Mode
Once you have an autopilot failed machine, you will be unable to run OOBE\BYPASSNRO to get into the Windows desktop. Your only option to enter Windows will be to enter through administrative mode. The keyboard code to Windows administrative mode (Audit Mode) from the Out-Of-Box Experience (OOBE) is Ctrl+Shift+F3, and it will reboot into the built-in Administrator account’s Windows desktop.
Some rugged laptops do not need a motherboard photo taken
We do not need to take photos of the motherboard of these type of rugged laptops. It would take a very, very long time for us to reach the motherboard and it would increase the chances that we would accidently damage the laptop during the disassembly. The photo of this one rugged laptop below is not the only machine that applies to the policy. If you have a laptop that has a deeply concealed motherboard where it would be abnormally difficult to get a photo of it, please speak with your supervisor about potentially skipping the motherboard photo and they will advise you from there.

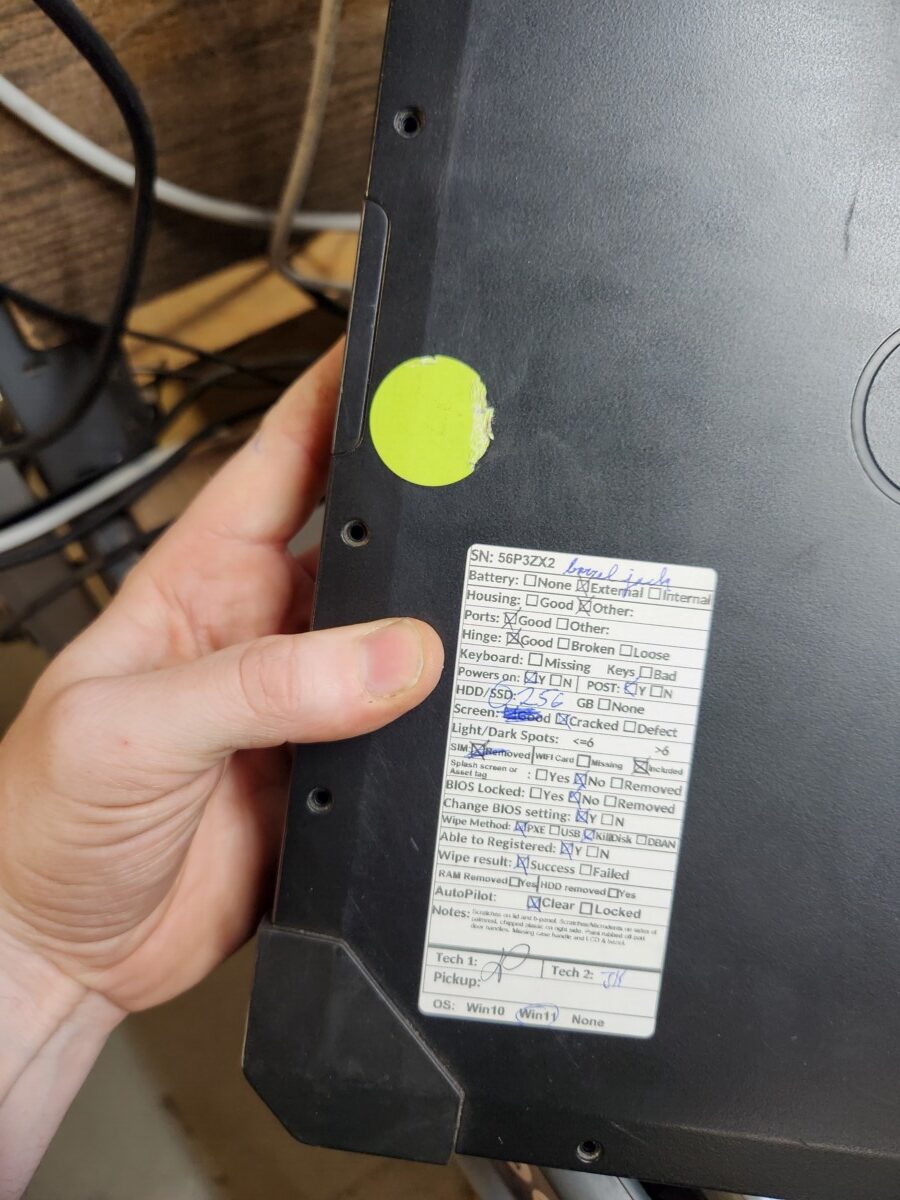
Remove extraneous processing stickers – ask if unsure
If you see a laptop with a green circle sticker, please remove the sticker before testing. This sticker was from a special batch where we needed to keep track of where the laptops came from but none of the laptops had a pickup number. Please notate if by removing the sticker it causes damage to the paint. Thank you.
If you photos of strange glare/darkness, please retake attempting to resolve the issue
Here is an example of a photo that is readable, however, it still may result in complaints about it being difficult to read or that it appears that there is something wrong with the image. If your photo comes out unusual due to glare and a bit of bad luck, please go ahead and retake it so that it isn’t an issue.

P.S.
- A laptop that POSTs leaves the RAM and HDD with it.
- Start using up all the 4GB DDR4 sticks within the laptops we are wiping as well as off-brand RAM. These are both are sticks that we aren’t going to be able to sell in wholesale, so using them in laptops is the only way to make use of them.
- Remove the RAM and HDD from Laptops that are not powered on or not POST.
- All 8th Gen and newer laptops need to be checked for Autopilot status. An unknown status will be scrapped.
- Any defect needs to be elaborated in the note field.
- Mention in the note which OS is installed, if there is one.
- Mention the dedicated graphics card information.
- All the laptops that go to eBay need to have a keyboard.
- If a laptop with a dedicated graphics card is worth more than $200, run the Heaven benchmark to stress test the GPU.
- When you are recapturing the autopilot clear status of your laptop from the autopilot clear database, be sure you don’t capture the logo of your computer monitor. For example, some of us have HP branded monitors at our desks, and that would be confusing to show up in a photo where we are documenting information for a Dell or Lenovo.
- When you are taking photos of the motherboard, be sure to capture the entire insides of the laptop, not just specifically the motherboard within the case. Show the entire underside of the laptop opened up. The reason why this is important is that we want to document that there is no visible water damage anywhere inside the casing.
- When photographing the wipe paper, temporarily remove any dog-ear-tagged stickers from that wipe paper. The reason why this matters is because we don’t want the notes from the laptop to be permanently documented within the photo of the wipe paper. We may fix portions of the laptop or change the notes slightly later on, and notes recorded in this photo would result in a mismatch that eBayers may try to take advantage of and try to get some sort of refund.
- Be sure to accurately specific when a laptop component is missing vs broken. We had a situation where a missing hinge was marked as a broken hinge. I can see how this might happen, however, this could be used a gotcha from an ebay customer to initiate a return. Try to focus on accuracy in your descriptions for this reason, even if it is seemingly a very minor difference. Anything that could be declared as “not as described” may end up being returned.
- Because of the nature of keyboard marks on a screen, if you see any instances of keyboard marks that look like they could be boarder-line passable, like it may not even need to be notated, please ask your supervisor to look and make a judgement call on it before proceeding. This is one common defect note that we may be overreporting as a team, so this is just a double-check to make sure the note is actually warranted.
- Ze has seen several examples of laptops where we should have written “scratches on screen” instead of “keyboard marks.” He has given this definition to help us distinguish the difference. If you feel unsure between the two, default to “scratches on screen.”
- Keyboard marks are faint discolorations or pressure points on a laptop screen caused by the keyboard’s contact with the screen, often from dirt on the keys pressing into the anti-glare coating.
- Scratches are physical abrasions that go deeper, removing material from the screen or its coating
- OVERALL: Find the right balance between under-reporting and over-reporting in the descriptions of your notes is the goal, writing notes in a way that is precise but also in a way that will not allow trickster ebay customers to use our precise descriptions against us to initiate refunds.
- Mention why a laptop was unable to be registered or why you were forced to use USB Killdisk
- Don’t forget to mention any sunken buttons
- Clarify in your notes if you have copied over written notes from slips of paper left by previous owners.
- When you have buttons that are no longer springy, be sure to call that our specifically and not leave that implied or bundled into a different note.
- If you have a bad keyboard, clarify further a reason that made you consider the keyboard bad.
- If you have scratches on the edges of the casing, mention that if it isn’t already implied through other notes, or feel free to include this as its own note just to be thorough.
- Reminder to go back and add the appropriate checkmarks higher up in the label when applicable when new issues are discovered.
- Look out for hinges breaking within the case
- Cracked screen bezels are a very common problem so look closely
- Be sure to verify that the wipe paper does not stay Terminated
- If a key is missing but the key nub remains, mention if you can still activate the key by pressing the key nub without using extra force.
- Don’t forget to mention if there is a damaged rubber screen bezel liner.
- Be sure to double check if there is a battery
- Very small micro-cracks on the plastic case still count so look closely especially around the edges and corners.
- We should work to clean the screens to a super clean state, as much as possible aside from areas of permanent damage.
- Mention if any logos are obviously missing or damaged such as a Dell logo or ThinkPad logo.
- if you see small chips within the plastic within a USBA port, little cracks and damage like that should always be notated.
- Discolorations of the case including metal caused by stickers should be notated.
- When bottom panel/case screws are missing, write down how many are missing.
- Include in your notes the type and wattage of power adapter used to test it.


2 thoughts on “PC Tech Level 3: All Other Laptops Testing (Non Wholesale) instruction”
read
Samer Metry 12.15.25