Last Updated on May 29, 2026 by
We need to have all the wipe certificates printed via the print server so that we have a permanent record of the wipe. If you have a problem with your machine that is unable to network print, please reach out to the Team Lead who will ensure that a copy of the certificate is saved on the server and will provide you with your wipe certificate printout.
Link to label “initial labels” and “final labels” creation page.
In effort to track machines all throughout their processing within the warehouse, there is now a new wiping label that we’ll create from within a form. This form will capture important info from their machines into out database much earlier in the process, now.
You’ll use this new form twice during your process, the first time entering the most basic information such as pickup number, asset number, and serial number before you begin the wiping process. Then, once the wiping process, diagnostic test, OS install, and autopilot check are all complete and you’ve hand-written-collected additional information on your existing label, you’ll type up that added info into this new QR form again one more time.
The first label is called creating the “Initial Label”
The second label is called creating the “Final Label/Test Record”
Here is where you will find the new form!
https://fs30.formsite.com/beyondsurplus/fqxya7vffe/index
The end resulting label will now look like this:

All machines must have a maximum of only one storage drive unless a special circumstance is established, and this includes the need to remove all Optane drives.
All machines should be resold with a maximum of one storage drive. Please remove any secondary drives before wiping. We absolutely do not want to send a machine to eCommerce with two or more drives, as it will be considered a serious error. Consider yourself in the PC Tech department as always the last stop when it comes to removing extra drives, even if those extra drives already wiped. Please always take the time to remove a second immediately drive whenever you notice it so that you don’t forget about it later or the next person to touch the machine is unaware.
In regards to what this means for Optane drives in systems, yes, please remove any Optane drives from the system, and please also do not utilize any SSD that has an Optane volume built into it. It is possible to recover information from Optane drives using recovery tools and Killdisk has had very mixed results attempting to wipe Optane volumes. We are taking the safe route by choosing not to include them in any machine.
PXE boot, or Preboot Execution Environment, is a network booting process that allows computers to boot from a network instead of a local disk. PXE is a client-server protocol that uses a DHCP or TFTP server to download software for booting.
PXE boot is commonly used for:
- Mass deployment: Installing the same operating system (OS) on many computers at once
- Disaster recovery: Recovering from a disaster by installing a new OS
- Remote maintenance: Performing maintenance tasks on systems without physically accessing them.
Tech Requirements
- Finish PC tech level 1 training and maintain a good performance.
- Test the i series PC wholesale with minimal or no errors.
Tools
- Ballpoint Pen. (Do not use a Gel Pen)
- The electric screwdriver set the torque at 1.
- Driver bits.
- Screwdriver set.
Stage #1: Physical Condition Checker
 Loading...
- Scan the serial number on the label to avoid human error.
- If the serial number is damaged, leave the section blank.
- Record the pickup number on the label. (#1126 for drop-off, #0000 for PC that does not have the pickup#)
- Print out the label.
- Apply the label to the PC.

- Inspect the PC’s physical condition and record on the label
- Open the case and check the motherboard condition.
- Remove any loose screws inside.
- Add RAM or storage as needed.
- Based on the PC’s physical condition, determine the next step for the PC. (Refer to the Micro PC put away section)
- Scrap:
- Remove the RAM and storage, then initial on the Tech 1 field.
- Remove the CPU, then put the CPU in the CPU tray.
- Set it aside and accumulate until finished with all PCs for the day
- Call a second person to verify the PC is good for scrap. The second person will be initialed on the Tech 2 field.
- Put away the scrap PCs by the end of the day.
- Need to set up for wiping:
- i series 6th Gen i-series or dual core: Remove M.2 NVME drive. Other types of hard drives leave AS-IS. Make sure RAM is 2GB or more.
- i series 7th gen and newer or AMD Ryzen: make sure all PCs are included with hard drives and RAM. Make sure to remove the asset tag from the hard drive if you add a hard drive to a PC.
- Scrap:

Use Functional Condition F3 for the REC category any machines that have not been fully tested through diagnostics.
F3 is the default for working condition machines unless we have the test records to prove that all functions are working, which is generally not something we will do for wholesale products.
For future PC wholesale testing, you can scrap the machine if the cosmetic condition is C2 (used poor)
Ze let us know that moving forward, such as with Micro PCs or Desktop iSeries PCs, we can scrap “used poor” C2 condition PCs.
Here are some examples of micro PCs from our latest wholesale that Ze prefers we scrap next time, most likely because the perception of the quality of the wholesale might drag the price down overall more than the individual machines are worth.

Stage #2: Wiping Tech: Set up PCs for wiping
Most PCs will be erased through PXE boot.
Some PCs can not boot to PXE for some reason and then need to use the Killdisk USB drive to erase the storage.
While going through the steps for wiping, mark the label accordingly.
When you finish setting up one PC, set up the next one until the bench is filled out.
Wipe through PXE
Connect the PC to the power supply, Video cable, keyboard, mouse, and Ethernet cable.
- Use the OEM brand AC adapter for the PC.
- If the PC has a bad Ethernet port, use an Ethernet dongle to connect to the Ethernet cable.
Based on the PC’s power condition, determine the next step for the PC.
-
- Scrap:
- Remove the RAM and storage, then initial on the Tech 1 field.
- Set it aside and accumulate until finished with all PCs for the day
- Call a second person to verify the PC is good for scrap. The second person will be initialed on the Tech 2 field.
- Put away the scrap PCs by the end of the day.
- Good to set up for wiping:
- i series 6th Gen and older or dual-core PCs
- i series 7th gen and newer or AMD Ryzen
- Scrap:
Power on the PC, then enter the BIOS settings.
- Common Key for entering the BIOS setup.
- Dell: F2
- Lenovo:
- F1
- Enter then F1
- F2
- HP: F10 or Esc then F10
While booting, check for a splash screen(Owner tag, Asset tag, or Custom logo). Only the Dell splash screen can be removed or replaced.
Refer to:
- How to reset a custom BIOS Splash screen to the Dell Splash Screen
- How to Use Dell DOS Asset Tag Utility to remove Asset tag and Owner Tag
If the Splash Screen contains the customer’s information(Company name or person’s name, etc.) that can not be removed, the PC needs to be scrapped.
If you can remove the splash screen, go next.
If the PC has a BIOS password,
- Use the BIOS Master Password Generator to generate a master password to unlock the BIOS.
- Find the PWSD jumper to reset the BIOS password.

Example video for Lenovo micro PC. Use Google to learn what pins to use for your particular machine:
If the BIOS password can not be removed, refer to How to bypass BIOS lock for booting to USB drive
If the BIOS password is removed or the BIOS is not locked, go to the next step.
In the BIOS, locate the serial number, and compare it with the label to see if it matches. Record the serial number if the serial section on the label is blank.
In the BIOS settings. Find the reset option. Reset the BIOS to Factory default or BIOS default. (This will eliminate some issues caused by the wrong BIOS setting.)

Reboot the PC and re-enter the BIOS settings.
Disable Secure Boot. (With Secure Boot on, the PXE boot will not work.)

Enable Network boot or PXE boot in BIOS (IPv4).
Change network boot to 1st boot in the boot order.

Change the SATA setting from RAID to AHCI for the Dell PC.
Disable Intel VMD and adjust SATA settings to AHCI for 11th Gen or newer PCs.
Save settings and reboot the PC.
If everything is working correctly, the PC will PXE boot; this process can take a few minutes.
The first time the PXE menu is loaded on the PC, it will display “Host is NOT registered.”

If the PC uses an Ethernet dongle to PXE boot, it might display (Host is registered as XXXXXXXXXX), just go to the step to load “Killdisk Active Boot Disk”.
If a PC does not have storage, plug an empty USB drive into the PC. The PC will give a registration error if there is no storage media detected.
Select “Quick Registration and Inventory” from the menu. (Make sure the PC has a hard drive or USB drive.)
After letting the program run, the PC will be rebooted to the PXE screen again. This time will display “Host is registered as XXXXXXXXXX”. (Check the section on the label)
Then choose “Killdisk Active Boot Disk”

After KillDisk is loaded, click the NIC Logo in the system tray, then click the Initialize Network button.

After initializing the network,
Open the Active@KillDisk
The system may give you an error about Active@KillDisk already being open. If this error pops up, press Alt + Tab and switch to Active@KillDisk.
On the bottom right of the opened window, there is a network status icon. The green check mark means the PC is online. If the network status icon has a red x on it, that means the PC is offline.


Then choose all Hard Drives that need to be wiped and click the “ERASE DISK” button. (Ctrl+clicked the drives that need to be wiped.)
Wipe an empty USB drive if there is no storage in the PC.
For the offline PC, expand the Erase Certificate option, choose Save to PDF, and change the save location to X:\

In the Disk Erase tab, make sure the Erase method is US DoD 5220.22-M 3 Pass. Verify is 100%, check the Initialize disk after erase, check the Write fingerprint to the first sector, and click Start.

How to use Crystal Disk within Killdisk to check NVME and 2.5″ SSD detailed health status before wiping
In effort to better identify bad NVMEs and 2.5″ SSD before we include them in our laptops and PC for resale, we are implementing a new process within KIlldisk! Crystal Disk drive testing software is an .EXE application that can run from within Killdisk. Each wipe station now how two USBs with Crystal Disk ready to go to start using. You can create more of these as needed.

Before we get into more details, the idea here is that we want to review the health of the drive before we choose to actually wipe the drive in Killdisk. So if you see something in Crystal Disk that would make it scrap-worthy, we’ll need to swap it out with a new drive from our stash until we find one that is healthy. Once we find a good one and start the Killdisk wipe, as long as the Killdisk wipe completes with no errors, it is a done deal and we don’t need to check the drive again in Crystal after the wipe. Just one time before.
A quick note about Crystal Disk, it appears to be the most accurate drive S.M.A.R.T. status reading software we use. There are none deficiencies in the other software we use when it comes to wiping NVMEs and other SSDs specifically: Killdisk sometimes cannot always read all of the different S.M.A.R.T. attributes that Crystal Disk has no problem seeing. And WipeOS claims to find drives that fail tests, but no other software sees any issues and WipeOS fails to give any details as to why it declares a drive has failed its diagnostic.
↑
So for this reason, please ignore any WipeOS drive results moving forward, and just go with this Killdisk + Crystal Disk Strategy. If Killdisk + Crystal Disk says it is good, we believe is good.
To access Crystal Disk from within Killdisk, navigate to the utilities folder within Killdisk’s start menu, and then click on “Explore My Computer,” which is the file browser.

From there, locate the Crystal Disk application within the folder of the USB drive. The .exe filename is DiskInfo64.exe.

Crystal Disk should launch!
Depending on whether or not you are looking at NVME SSDs or 2.5″ SATA SSDs, the S.M.A.R.T. information you see in this software will very. Take a look at the difference in the two photos below.
This is a photo of what the output of an NVME looks like.
↓

There are no “thresholds” information like in the next photo taken of a 2.5″ SATA SSD. With this NVME, you only have “raw values” to read. These digits won’t make much sense, so here is all you need to know. We have five main things to consider here:
- Is there a “critical errors” attribute and is that value above zero? If so, scrap the drive.
- Is there a “media and data integrity errors” attribute and is that value above zero? If so, scrap the drive.
- Is the drive health indicator in the upper left hand corner have a number lower than 85%? If so, scrap the drive.
- Does the drive health indicator in the upper left hand corner not have a number at all and just say “good”? If so, you can consider that field ok despite not knowing the number.
- Are there any other fields you read that look like they could cause trouble for the customer down the line? If so and you want to check with your supervisor, please do so, but otherwise the 4 points above are what we are mainly concerned with unless something unforeseen and obviously a problem arises.
Here is what Crystal Disk looks like for 2.5″ SATA SSDs.

As you can see, there is a lot more decipherable data.
There are even more things to consider when it comes to SATA SSDs. Here is the quickish rundown of what you need to know for determining which drives are no good and should be replaced instead of wiping:
Each SSD vendor, and even from SSD to SSD from the same vendor, has a different list of SMART attributes. Each SMART list is laid out in a different order from each other. The tricky part is that some of the same attributes are named differently, but they essentially all mean the same thing.
A great example of this is Health Status of the drive.
When the box at the top left just says “good” and does not give you a percentage of life left, you need to investigate the smart status list and find the actual percentage hidden in the list somewhere.
The health status could be one of the following titles or perhaps a new name similar to these options:
- normalized media wear out
- wear leveling count
- SSD life left
- life left
Other examples of this include the SMART status “reallocated event” which can also be referred to as “retired blocks.”
For any SMART attribute that looks potentially scrap-worth, if you feel confident, go ahead and scrap it. If the SMART attribute looks like somewhat benign and you would like to ask your supervisor first so you don’t scrap something unnecessarily, please do so.
This Crystal Disk check for every Killdisk wipe is a brand new addition to our process. For that reason, since these are new standards that we hadn’t been checking before, there is a somewhat high likelihood of a large number of NVMEs being scrapped.
The increase in drives to scrap may slow down output somewhat, so please keep track of how many drives they are scrapping in case we need to make changes to the policy for what constitutes when we should scrap drives or possibly adjusting the weighting of how scrapping drives should impact our productive points tracking.
Stage #3: Erase Certificate Matching
The PC was wiped through the PXE Killdisk
Collect Erase Certificates from the Printer. (Next day)
The printer is located in the PC tech area.

For the offline PC, you need to print the certificate manually.
Plug a formatted USB drive into the PC.
On the wiping result window, click the Print button, and the Print Preview window will open.

Click the print icon on the Print Preview window, then save the Erase Certificate PDF file to the USB drive.

Unplug the formatted USB and go to the next PC that needs to print the Erase Certificate manually.
After collecting all PDF files, go to a workstation to print out the Erase Certificate.
Match the Erase Certificate with the wiped PC.
Match the PC serial number and put the certificate with the PC. The certificate will list the PC’s serial number as “BIOS Serial.”
Use painter’s tape to tape the folded certificate at the bottom of the PC. Display the Hardware Information for QC.


Do not remove the wiped USB drive.
Mark the label based on the sanitizing status.
Record any defects that developed overnight, then initial on the Tech 1 field.
If wiping fails:
- 6th Gen i-series CPU: remove the hard drive, make the hard drive not included on the label, and mark off the hard drive information from the Erase Certificate.
- 7th Gen i-series or newer and AMD Ryzen CPU: replace the hard drive and wipe the new drive.

If the certificate did not print out for any reason, notify your supervisor.
Stage #4: PC wipe Quality Checker
Check the PC’s physical condition and compare it with the label.
Double-check all sections on the label with the PC, and make sure all sections are checked and correct.
After QC the PCs,
- 6th Gen i-series CPU: disconnect all the cables and the USB drive.
- 7th Gen i-series or newer and AMD Ryzen CPU:
- Check the Autopilot status. Refer to How to check Autopilot status for a Windows machine
- Mark the Label based on the Autopilot status. Circle the OS version on the label.
- Disconnect all cables.
All machines on wipe stations must receive two PC Tech initials before being taken off station.
In effort to avoid backlogs of unQCed items piling up in bins, moving forward we cannot remove any machine from a wiping station until it receives two PC Tech initials. This policy will undoubtedly cause throttling of work that can be done on a wipe station because there will be limited space, but this is to be anticipated and the solution is that we will find alternate work to be done until Andy or Ze or anyone else authorized to QC reaches and clears the machine. A notable good outcome of this policy will be that you will received basically immediate feedback on your work instead of us discovering errors much later.
Stage #5: Micro PC put away
Check the label for the PC’s condition
Based on the PC’s condition, sort the PCs.
Put away the PC in the destination vessel.
- PC that wipes successfully with no issue(Normal wear and tear allowed), put away: Wiped Micro PCs
- PC Scrap: (anyone that applies) put away: #1009 SCRAP: PC COMPUTER (Remove RAM, and storage for all PCs)(Remove CPU for 6th Gen or newer CPU PCs)
- PC that has a power issue. (Include does not power on, Power on no post, power on then off, or random shut off.)
- The splash screen cannot be removed.
- Damaged motherboard.
- Autopilot is locked or unable to check Autopilot status. (7th Gen or newer I series or AMD Ryzen CPUs.)
- More than 1 damaged port
Micro PCs notetaking and process guidance
Blake has been working on Micro PC database entries and had suggestions for how our note descriptions can look as uniform as possible. Here are his notes. Please follow them when applicable as best you can. Thanks! :
1. Wifi card not included
2. wifi card and antenna hardware not included
3. external wifi antenna damaged
4. front bezel damage
5. internal wifi antenna damage
6. Splash screen shows asset tag of indecipherable numbers above the HP logo
To dos:
- If your unit still has an antenna attached, remove the antenna.
- If half of the casing is missing or if you feel like the case is in very bad shape where it isn’t appropriate for wholesale, flag me down and we can scrap it on the spot.
Notate missing wifi cards:
- Check and notate no/missing wifi card
- Check and notate if the internal wifi antenna cabling is damaged.
- Check and notate if the external wifi antenna base is damaged.
- As long as the unit has an NVME storage slot, we do not need to mention if there is no 2.5” drive caddy, however, if there is a caddy, please utilize the 2.5” SSDs we have first in order for us to use them and get rid of them.
- Notate front bezel damage, and check with your thumb if the bezel has broken plastic that is actually coming off the casing
- Highlight on the label if it is bios locked.
- Check the ports and notate any damage, even if small.
A few quick a reminders and examples for micro PCs:
1) Please be sure not to cover up defects with labels.
2) Be sure to notate subtle dents in meshing.
3) Look out for asset tags that blend in with the other manufacturer stickers.
Below is a photo of a machine that has dents on the metal meshing. These dents are significant enough where they need to be notated. But also, because this is a mini PC, it tech label was placed overtop of this dents. So please be sure to be on the lookout for these types of dents in machines and whenever you identify a flaw, be careful not to place a label over it so that other team members can inspect and verify the flaws as well.

Also, remember that not all asset tags jump out at you and often they are placed somewhat hidden or they look a bit like other manufacturer stickers. So identify these asset tags by their company names, and also be sure to scan QR codes that do not identify themselves because we’ve seen asset tags that are simply unmarked QR codes that link back to the original purchaser’s company website.

Absolute Persistence in Dells – important BIOS area to now check in every Dell machine
We’ve recently come across and began processing Dell laptops with Absolute Persistence activated. It is now going to require us to check for this being present and active in all the Dell laptops moving forward because it does not reveal itself until very, very late in the process where we need to leave it plugged into the ethernet for several minutes after autopilot checking before the lock-out screen activates itself.
Please take a look at the screenshot below:

Note how the options for Absolute Persistence are greyed out. This means that Absolute Persistence is activated. We cannot set this device as is. Hand it off to the PC Tech Team Lead and it will be recorded and sorted away for now.
There is one extra complication: all the BIOS options will be greyed out when the system is BIOS locked so that means there will be no way to know if Absolute Persistence is active or not, and you will need to let it sit connected to the internet after autopilot checking it. Ze has asked that we let it sit overnight or at least until the lock out screen shows up. If a lock out screen does not show up by morning, it should be all clear to sell.
HPs can have Absolute Persistence. Here is where to look:
Dell and HPs do not announce if they have Absolute Persistence active when you load into the BIOS. You have to go looking for it. Be sure to look for Absolute Persistence in the BIOS/UEFI of all laptops and computers. There is no way to tell if they have their Absolute Persistence active until you specifically go looking for it.
See the photo below for what it looks like in the HP UEFI.

Do not notate on your labels any asset tags remaining on systems
Depending on what an asset tag says, we may choose to sell systems with asset tags that are non-removable assuming that the asset tag in no way implies or reveals who was the original owner. For the reason of trying to not draw any attention to something the previous owner wrote in the system, please do not mention the asset tags on labels. As an important reminder, the PC Tech Team Lead or any other supervisor needs to review any asset tags being intentionally left in machines, even if you deem it indecipherable yourself.
New type of asset tag to look out for! Will require a closer look at labels across all machines.
An asset tag was recently discovered within a manufacturer label itself. We will need to begin visually scanning over manufacturer labels to look out for labels in this in the future. If you see a manufacture label like this, the preferred solution to keep the manufacturer label intact if possible if it contains important product information like the model number, serial number, or other details important for identifying the product, and to use scissors and cut out the offending asset tag portion. If that isn’t possible, then it would be ok to fully remove the label.
It is going to require us to be even more detail oriented, but do not let this destroy your productivity output. Just quickly visually scan over the labels on the machines and look for brand names that should not be there.
Please click on the photo below to see an example.

Another example of a tricky asset tag
This looks somewhat like a manufacturer tag at first glance as it only has this machine’s serial number and an QR code. Unfortunately this is a QR link to rhinofamilyofcompanies.samanage.com. So here is a general overarching policy for asset tags: Be very suspicious and remove any sticker that is not 100% conclusively a manufacturer sticker, and in fact, you can remove any label that is deemed removable, meaning it isn’t absolutely necessary to identify the product. Anything that looks out of place compared to similar models or anything that sticker that looks out of place in general, investigate it before assuming it is OK. Scan QR codes to verify them if you plan on leaving them on the machines.

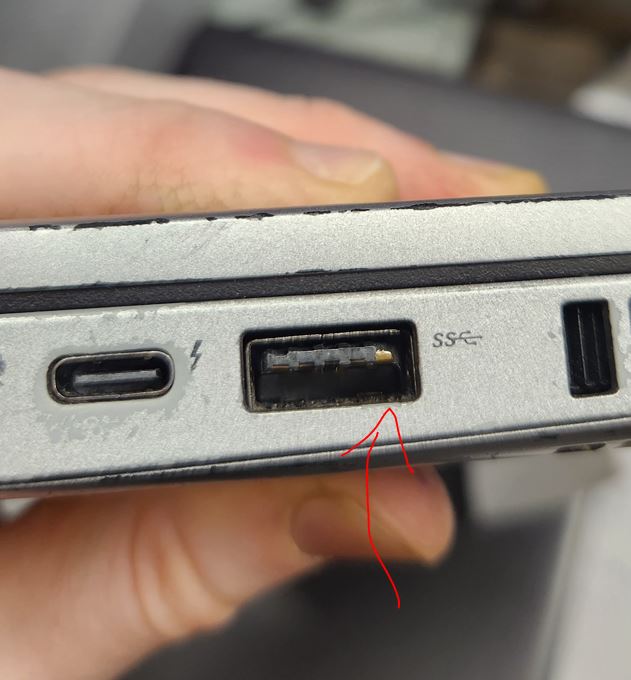
Inspect ports closely and notate damage even if very minor
Minor damage within ports is still enough damage where we need to mention it to the customer. The concern is that it is in a state that could get worse, like the port pins could break off when a cable is connected which has happened before even to us while working here at the warehouse. There is also a chance the port could be sensitive/finicky or stop working later. So please inspect all ports very closely for this reason to make sure you don’t miss subtle damage. Thanks!

Common issues to avoid found during micro PC QCing
- Wipe paper placement: try to not put wipe paper or sticker label on top of any manufacturer info. Find a spot on the machine where the wipe paper doesn’t overlap anything.
- We need to begin checking for wifi cards.
- Don’t put painters tape over words on the wipe paper, just carefully tape over the corners.
- Use a minimal amount of painters tape and make the presentation not look sloppy
- remove any serial numbers on case that do not match BIOS (meaning all BIOS and case serial numbers need to be cross-checked against each other every time)
- Use your finger to check the front panels to see if the plastic front clips are busted and the front panel may get ripped off on accident.
- While checking the motherboard, if you notice any busted RAM clips, RAM slots, or other device slots damaged, please add that to the notes.
- Please begin referring to the antennae nub attached to the back of the case as the “antennae port” as the actual antenna would be a device we would attach to this nub, so we want to describe the computer as accurately as possible.
- Don’t forget to also leave a note in the notes section to indicate that the machines is BIOS locked, don’t just put a check mark on the label! They are harder to see, and it is an important detail to the customer that we don’t want to overlook.


Minimum size of SSDs to include/wipe in your devices: 128GB
Anything SSD storage underneath 128GB should be given to your supervisor to be taken out of normal circulation.
P.S.
- All PCs must be registered if possible. If a PC can not be registered, leave a note explaining the reason.
- If a PC does not have a hard drive, plug a USB drive for wiping in Killdisk Active Boot Disk only, so it can print out an erase report.
- Remove the HDD and RAM from all scrap PCs.
- Remove the 6th Gen or newer CPU from scrap PCs.
Below this line, notes no longer apply and are being kept on this page for record keeping.
Notating missing 2.5″ drive caddies in micro PCs
You may encounter newer units that have both an m.2 nvme slot and a 2.5″ sata slot, however, the caddy for the sata slot is missing.
Regardless of whether it is unclear if the machine originally came with a caddy since 2.5″ SSDs are less common than m.2 drives these days, we need to mention in the notes that the caddy is missing if there is a SATA slot that is unusable without a caddy. According to Paul, we do not need to be overly descriptive when describing what caddy is missing. Simply writing “missing caddy” in the notes will be sufficient.


Records of Revisions
- — pctechlead@beyondsurplus.com: Updated post "PC Tech Level 3-Micro PC Wiping: Micro/Mini/Tiny PC PXE Boot and Registration"
- — pctechlead@beyondsurplus.com: Updated post "PC Tech Level 3-Micro PC Wiping: Micro/Mini/Tiny PC PXE Boot and Registration"
- — pctechlead@beyondsurplus.com: Updated post "PC Tech Level 3-Micro PC Wiping: Micro/Mini/Tiny PC PXE Boot and Registration"
- — pctechlead@beyondsurplus.com: Updated post "PC Tech Level 3-Micro PC Wiping: Micro/Mini/Tiny PC PXE Boot and Registration"
- — pctechlead@beyondsurplus.com: Updated post "PC Tech Level 3-Micro PC Wiping: Micro/Mini/Tiny PC PXE Boot and Registration"
- — pctechlead@beyondsurplus.com: Updated post "PC Tech Level 3-Micro PC Wiping: Micro/Mini/Tiny PC PXE Boot and Registration"
- — pctechlead@beyondsurplus.com: Updated post "PC Tech Level 3-Micro PC Wiping: Micro/Mini/Tiny PC PXE Boot and Registration"
- — pctechlead@beyondsurplus.com: Updated post "PC Tech Level 3-Micro PC Wiping: Micro/Mini/Tiny PC PXE Boot and Registration"
- — pctechlead@beyondsurplus.com: Updated post "PC Tech Level 3-Micro PC Wiping: Micro/Mini/Tiny PC PXE Boot and Registration"
- — pctechlead@beyondsurplus.com: Updated post "PC Tech Level 3-Micro PC Wiping: Micro/Mini/Tiny PC PXE Boot and Registration"
— pctechlead@beyondsurplus.com: Updated post "PC Tech Level 3-Micro PC Wiping: Micro/Mini/Tiny PC PXE Boot and Registration" Show details
Content
Before After Unchanged: <strong>PXE boot, or Preboot Execution Environment, is a network booting process that allows computers to boot from a network instead of a local disk. PXE is a client-server protocol that uses a DHCP or TFTP server to download software for booting.</strong> Unchanged: <strong>PXE boot, or Preboot Execution Environment, is a network booting process that allows computers to boot from a network instead of a local disk. PXE is a client-server protocol that uses a DHCP or TFTP server to download software for booting.</strong> Unchanged: <strong>PXE boot is commonly used for:</strong> Unchanged: <strong>PXE boot is commonly used for:</strong> Unchanged: <ul> Unchanged: <ul> Unchanged: <li><strong>Mass deployment: Installing the same operating system (OS) on many computers at once</strong></li> Unchanged: <li><strong>Mass deployment: Installing the same operating system (OS) on many computers at once</strong></li> Unchanged: <li><strong>Disaster recovery: Recovering from a disaster by installing a new OS</strong></li> Unchanged: <li><strong>Disaster recovery: Recovering from a disaster by installing a new OS</strong></li> Unchanged: <li><strong>Remote maintenance: Performing maintenance tasks on systems without physically accessing them.</strong></li> Unchanged: <li><strong>Remote maintenance: Performing maintenance tasks on systems without physically accessing them.</strong></li> Unchanged: </ul> Unchanged: </ul> Unchanged: <h2>Tech Requirements</h2> Unchanged: <h2>Tech Requirements</h2> Unchanged: <ul> Unchanged: <ul> Unchanged: <li>Finish PC tech level 1 training and maintain a good performance.</li> Unchanged: <li>Finish PC tech level 1 training and maintain a good performance.</li> Unchanged: <li>Test the i series PC wholesale with minimal or no errors.</li> Unchanged: <li>Test the i series PC wholesale with minimal or no errors.</li> Unchanged: </ul> Unchanged: </ul> Unchanged: <h2><strong>Tools</strong></h2> Unchanged: <h2><strong>Tools</strong></h2> Unchanged: <ul> Unchanged: <ul> Unchanged: <li>Ballpoint Pen. (Do not use a Gel Pen)</li> Unchanged: <li>Ballpoint Pen. (Do not use a Gel Pen)</li> Unchanged: <li>The electric screwdriver set the torque at 1.</li> Unchanged: <li>The electric screwdriver set the torque at 1.</li> Unchanged: <li>Driver bits.</li> Unchanged: <li>Driver bits.</li> Unchanged: <li>Screwdriver set.</li> Unchanged: <li>Screwdriver set.</li> Unchanged: </ul> Unchanged: </ul> Unchanged: <h2><strong>Stage #1: Physical Condition Checker</strong></h2> Unchanged: <h2><strong>Stage #1: Physical Condition Checker</strong></h2> Unchanged: [embeddoc url="https://xworxapp.wpenginepowered.com/wp-content/uploads/2025/04/Desktop-wiping-checklist-1-1.pdf" width="600px" Height="800px" viewer="browser"] Unchanged: [embeddoc url="https://xworxapp.wpenginepowered.com/wp-content/uploads/2025/04/Desktop-wiping-checklist-1-1.pdf" width="600px" Height="800px" viewer="browser"] Unchanged: <ul> Unchanged: <ul> Unchanged: <li><strong>Scan the serial number </strong><strong>on the label to avoid human error.</strong></li> Unchanged: <li><strong>Scan the serial number </strong><strong>on the label to avoid human error.</strong></li> Unchanged: <li><strong>If the serial number is damaged, leave the section blank.</strong></li> Unchanged: <li><strong>If the serial number is damaged, leave the section blank.</strong></li> Unchanged: <li><b>Record the pickup number on the label. (<strong>#1126 for drop-off, #0000 for PC that does not have the pickup#)</strong></b></li> Unchanged: <li><b>Record the pickup number on the label. (<strong>#1126 for drop-off, #0000 for PC that does not have the pickup#)</strong></b></li> Unchanged: <li><strong>Print out the label.</strong></li> Unchanged: <li><strong>Print out the label.</strong></li> Unchanged: <li><strong>Apply the label to the PC.</strong></li> Unchanged: <li><strong>Apply the label to the PC.</strong></li> Unchanged: <li><a href="https://xworxapp.wpenginepowered.com/wp-content/uploads/2025/04/IMG_1463.jpg"><img class="alignnone size-medium wp-image-12084" src="https://xworxapp.wpenginepowered.com/wp-content/uploads/2025/04/IMG_1463-300x225.jpg" alt="" width="300" height="225" /></a></li> Unchanged: <li><a href="https://xworxapp.wpenginepowered.com/wp-content/uploads/2025/04/IMG_1463.jpg"><img class="alignnone size-medium wp-image-12084" src="https://xworxapp.wpenginepowered.com/wp-content/uploads/2025/04/IMG_1463-300x225.jpg" alt="" width="300" height="225" /></a></li> Unchanged: <li><strong>Inspect the PC's physical condition and record on the label</strong> Unchanged: <li><strong>Inspect the PC's physical condition and record on the label</strong> Unchanged: <ul> Unchanged: <ul> Unchanged: <li>Open the case and check the motherboard condition.</li> Unchanged: <li>Open the case and check the motherboard condition.</li> Unchanged: <li>Remove any loose screws inside.</li> Unchanged: <li>Remove any loose screws inside.</li> Unchanged: <li>Add RAM or storage as needed.</li> Unchanged: <li>Add RAM or storage as needed.</li> Unchanged: </ul> Unchanged: </ul> Unchanged: </li> Unchanged: </li> Unchanged: <li><strong>Based on the PC's physical condition, determine the next step for the PC. (</strong>Refer to the<strong> Micro PC put away </strong>section<strong>)</strong> Unchanged: <li><strong>Based on the PC's physical condition, determine the next step for the PC. (</strong>Refer to the<strong> Micro PC put away </strong>section<strong>)</strong> Unchanged: <ul> Unchanged: <ul> Unchanged: <li><strong>Scrap</strong>: Unchanged: <li><strong>Scrap</strong>: Unchanged: <ul> Unchanged: <ul> Unchanged: <li>Remove the RAM and storage, then initial on the Tech 1 field.</li> Unchanged: <li>Remove the RAM and storage, then initial on the Tech 1 field.</li> Unchanged: <li>Remove the CPU, then put the CPU in the CPU tray.</li> Unchanged: <li>Remove the CPU, then put the CPU in the CPU tray.</li> Unchanged: <li>Set it aside and accumulate until finished with all PCs for the day</li> Unchanged: <li>Set it aside and accumulate until finished with all PCs for the day</li> Unchanged: <li>Call a second person to verify the PC is good for scrap. The second person will be initialed on the Tech 2 field.</li> Unchanged: <li>Call a second person to verify the PC is good for scrap. The second person will be initialed on the Tech 2 field.</li> Unchanged: <li>Put away the scrap PCs by the end of the day.</li> Unchanged: <li>Put away the scrap PCs by the end of the day.</li> Unchanged: </ul> Unchanged: </ul> Unchanged: </li> Unchanged: </li> Unchanged: <li><strong>Need to set up for wiping</strong>: Unchanged: <li><strong>Need to set up for wiping</strong>: Unchanged: <ul> Unchanged: <ul> Unchanged: <li><strong>i series 6th Gen i-series or dual core:</strong> Remove M.2 NVME drive. Other types of hard drives leave AS-IS. Make sure RAM is 2GB or more.</li> Unchanged: <li><strong>i series 6th Gen i-series or dual core:</strong> Remove M.2 NVME drive. Other types of hard drives leave AS-IS. Make sure RAM is 2GB or more.</li> Unchanged: <li><strong>i series 7th gen and newer or AMD Ryzen:</strong> make sure all PCs are included with hard drives and RAM. Make sure to remove the asset tag from the hard drive if you add a hard drive to a PC.</li> Unchanged: <li><strong>i series 7th gen and newer or AMD Ryzen:</strong> make sure all PCs are included with hard drives and RAM. Make sure to remove the asset tag from the hard drive if you add a hard drive to a PC.</li> Unchanged: </ul> Unchanged: </ul> Unchanged: </li> Unchanged: </li> Unchanged: </ul> Unchanged: </ul> Unchanged: </li> Unchanged: </li> Unchanged: </ul> Unchanged: </ul> Unchanged: <hr /> Unchanged: <hr /> Unchanged: <h2><strong>Stage #2: Wiping Tech: Set up PCs for wiping</strong></h2> Unchanged: <h2><strong>Stage #2: Wiping Tech: Set up PCs for wiping</strong></h2> Unchanged: <strong>Most PCs will be erased through PXE boot.</strong> Unchanged: <strong>Most PCs will be erased through PXE boot.</strong> Unchanged: <strong>Some PCs can not boot to PXE for some reason and then need to use the Killdisk USB drive to erase the storage. </strong> Unchanged: <strong>Some PCs can not boot to PXE for some reason and then need to use the Killdisk USB drive to erase the storage. </strong> Unchanged: <strong>While going through the steps for wiping, mark the label accordingly. </strong> Unchanged: <strong>While going through the steps for wiping, mark the label accordingly. </strong> Unchanged: When you finish setting up one PC, set up the next one until the bench is filled out. Unchanged: When you finish setting up one PC, set up the next one until the bench is filled out. Unchanged: <h3><strong>Wipe through PXE</strong></h3> Unchanged: <h3><strong>Wipe through PXE</strong></h3> Unchanged: <strong>Connect the PC to the power supply, Video cable, keyboard, mouse, and Ethernet cable.</strong> Unchanged: <strong>Connect the PC to the power supply, Video cable, keyboard, mouse, and Ethernet cable.</strong> Unchanged: <ul> Unchanged: <ul> Unchanged: <li>Use the OEM brand AC adapter for the PC.</li> Unchanged: <li>Use the OEM brand AC adapter for the PC.</li> Unchanged: <li>If the PC has a bad Ethernet port, use an Ethernet dongle to connect to the Ethernet cable.</li> Unchanged: <li>If the PC has a bad Ethernet port, use an Ethernet dongle to connect to the Ethernet cable.</li> Unchanged: </ul> Unchanged: </ul> Unchanged: <strong>Based on the PC's power condition, determine the next step for the PC.</strong> Unchanged: <strong>Based on the PC's power condition, determine the next step for the PC.</strong> Unchanged: <ul> Unchanged: <ul> Unchanged: <li style="list-style-type: none;"> Unchanged: <li style="list-style-type: none;"> Unchanged: <ul> Unchanged: <ul> Unchanged: <li><strong>Scrap</strong>: Unchanged: <li><strong>Scrap</strong>: Unchanged: <ul> Unchanged: <ul> Unchanged: <li>Remove the RAM and storage, then initial on the Tech 1 field.</li> Unchanged: <li>Remove the RAM and storage, then initial on the Tech 1 field.</li> Unchanged: <li>Set it aside and accumulate until finished with all PCs for the day</li> Unchanged: <li>Set it aside and accumulate until finished with all PCs for the day</li> Unchanged: <li>Call a second person to verify the PC is good for scrap. The second person will be initialed on the Tech 2 field.</li> Unchanged: <li>Call a second person to verify the PC is good for scrap. The second person will be initialed on the Tech 2 field.</li> Unchanged: <li>Put away the scrap PCs by the end of the day.</li> Unchanged: <li>Put away the scrap PCs by the end of the day.</li> Unchanged: </ul> Unchanged: </ul> Unchanged: </li> Unchanged: </li> Unchanged: <li><strong>Good to set up for wiping</strong>: Unchanged: <li><strong>Good to set up for wiping</strong>: Unchanged: <ul> Unchanged: <ul> Unchanged: <li><strong>i series 6th Gen and older or dual-core PCs</strong></li> Unchanged: <li><strong>i series 6th Gen and older or dual-core PCs</strong></li> Unchanged: <li><strong>i series 7th gen and newer or AMD Ryzen</strong></li> Unchanged: <li><strong>i series 7th gen and newer or AMD Ryzen</strong></li> Unchanged: </ul> Unchanged: </ul> Unchanged: </li> Unchanged: </li> Unchanged: </ul> Unchanged: </ul> Unchanged: </li> Unchanged: </li> Unchanged: </ul> Unchanged: </ul> Unchanged: <strong>Power on the PC, then enter the BIOS settings.</strong> Unchanged: <strong>Power on the PC, then enter the BIOS settings.</strong> Unchanged: <ul> Unchanged: <ul> Unchanged: <li>Common Key for entering the BIOS setup. Unchanged: <li>Common Key for entering the BIOS setup. Unchanged: <ul> Unchanged: <ul> Unchanged: <li>Dell: F2</li> Unchanged: <li>Dell: F2</li> Unchanged: <li>Lenovo: Unchanged: <li>Lenovo: Unchanged: <ul> Unchanged: <ul> Unchanged: <li>F1</li> Unchanged: <li>F1</li> Unchanged: <li>Enter then F1</li> Unchanged: <li>Enter then F1</li> Unchanged: <li>F2</li> Unchanged: <li>F2</li> Unchanged: </ul> Unchanged: </ul> Unchanged: </li> Unchanged: </li> Unchanged: <li>HP: F10 or Esc then F10</li> Unchanged: <li>HP: F10 or Esc then F10</li> Unchanged: </ul> Unchanged: </ul> Unchanged: </li> Unchanged: </li> Unchanged: </ul> Unchanged: </ul> Unchanged: <strong>While booting, check for a splash screen(Owner tag, Asset tag, or Custom logo). Only the Dell splash screen can be removed or replaced.</strong> Unchanged: <strong>While booting, check for a splash screen(Owner tag, Asset tag, or Custom logo). Only the Dell splash screen can be removed or replaced.</strong> Unchanged: <strong>Refer to:</strong> Unchanged: <strong>Refer to:</strong> Unchanged: <ul> Unchanged: <ul> Unchanged: <li><strong><a href="https://www.dell.com/support/kbdoc/en-us/000129832/how-to-reset-a-custom-bios-splash-screen-to-the-dell-splash-screen" target="_blank" rel="noopener">How to reset a custom BIOS Splash screen to the Dell Splash Screen</a></strong></li> Unchanged: <li><strong><a href="https://www.dell.com/support/kbdoc/en-us/000129832/how-to-reset-a-custom-bios-splash-screen-to-the-dell-splash-screen" target="_blank" rel="noopener">How to reset a custom BIOS Splash screen to the Dell Splash Screen</a></strong></li> Unchanged: <li><strong><a href="https://xworxapp.wpenginepowered.com/?p=11884" target="_blank" rel="noopener">How to Use Dell DOS Asset Tag Utility to remove Asset tag and Owner Tag</a></strong></li> Unchanged: <li><strong><a href="https://xworxapp.wpenginepowered.com/?p=11884" target="_blank" rel="noopener">How to Use Dell DOS Asset Tag Utility to remove Asset tag and Owner Tag</a></strong></li> Unchanged: </ul> Unchanged: </ul> Unchanged: <strong>If the Splash Screen contains the customer's information(Company name or person's name, etc.) that can not be removed, the PC needs to be scrapped.</strong> Unchanged: <strong>If the Splash Screen contains the customer's information(Company name or person's name, etc.) that can not be removed, the PC needs to be scrapped.</strong> Unchanged: <strong>If you can remove the splash screen, go next. </strong> Unchanged: <strong>If you can remove the splash screen, go next. </strong> Unchanged: <strong>If the PC has a BIOS password, </strong> Unchanged: <strong>If the PC has a BIOS password, </strong> Unchanged: <ul> Unchanged: <ul> Unchanged: <li><strong>Use the <a href="https://beta.bios-pw.org/" target="_blank" rel="noopener">BIOS Master Password Generator</a> to generate a master password to unlock the BIOS.</strong></li> Unchanged: <li><strong>Use the <a href="https://beta.bios-pw.org/" target="_blank" rel="noopener">BIOS Master Password Generator</a> to generate a master password to unlock the BIOS.</strong></li> Unchanged: <li><strong>Find the PWSD jumper to reset the BIOS password.</strong></li> Unchanged: <li><strong>Find the PWSD jumper to reset the BIOS password.</strong></li> Unchanged: <li><a href="https://xworxapp.wpenginepowered.com/wp-content/uploads/2025/04/IMG_1466.jpg"><img class="alignnone size-medium wp-image-12086" src="https://xworxapp.wpenginepowered.com/wp-content/uploads/2025/04/IMG_1466-300x225.jpg" alt="" width="300" height="225" /></a></li> Unchanged: <li><a href="https://xworxapp.wpenginepowered.com/wp-content/uploads/2025/04/IMG_1466.jpg"><img class="alignnone size-medium wp-image-12086" src="https://xworxapp.wpenginepowered.com/wp-content/uploads/2025/04/IMG_1466-300x225.jpg" alt="" width="300" height="225" /></a></li> Unchanged: </ul> Unchanged: </ul> Unchanged: Example video for Lenovo micro PC. Use Google to learn what pins to use for your particular machine: Unchanged: Example video for Lenovo micro PC. Use Google to learn what pins to use for your particular machine: Unchanged: https://www.youtube.com/watch?v=wqRjWNAcicQ Unchanged: https://www.youtube.com/watch?v=wqRjWNAcicQ Unchanged: <strong>If the BIOS password can not be removed, refer to <a href="https://xworxapp.wpenginepowered.com/?p=11851" target="_blank" rel="noopener">How to bypass BIOS lock for booting to USB drive</a></strong> Unchanged: <strong>If the BIOS password can not be removed, refer to <a href="https://xworxapp.wpenginepowered.com/?p=11851" target="_blank" rel="noopener">How to bypass BIOS lock for booting to USB drive</a></strong> Unchanged: <strong>I</strong><strong>f the BIOS password is removed or the BIOS is not locked, go to the next step.</strong> Unchanged: <strong>I</strong><strong>f the BIOS password is removed or the BIOS is not locked, go to the next step.</strong> Unchanged: <strong>In the BIOS, locate the serial number, and compare it with the label to see if it matches. Record the serial number if the serial section on the label is blank.</strong> Unchanged: <strong>In the BIOS, locate the serial number, and compare it with the label to see if it matches. Record the serial number if the serial section on the label is blank.</strong> Unchanged: <strong>In the BIOS settings. Find the reset option. Reset the BIOS to Factory default or BIOS default. (This will eliminate some issues caused by the wrong BIOS setting.) </strong> Unchanged: <strong>In the BIOS settings. Find the reset option. Reset the BIOS to Factory default or BIOS default. (This will eliminate some issues caused by the wrong BIOS setting.) </strong> Unchanged: <a href="https://xworxapp.wpenginepowered.com/wp-content/uploads/2025/04/IMG_1468.jpg"><img class="alignnone size-medium wp-image-12087" src="https://xworxapp.wpenginepowered.com/wp-content/uploads/2025/04/IMG_1468-300x169.jpg" alt="" width="300" height="169" /></a> Unchanged: <a href="https://xworxapp.wpenginepowered.com/wp-content/uploads/2025/04/IMG_1468.jpg"><img class="alignnone size-medium wp-image-12087" src="https://xworxapp.wpenginepowered.com/wp-content/uploads/2025/04/IMG_1468-300x169.jpg" alt="" width="300" height="169" /></a> Unchanged: <strong>Reboot the PC and re-enter the BIOS settings.</strong> Unchanged: <strong>Reboot the PC and re-enter the BIOS settings.</strong> Unchanged: <strong>Disable Secure Boot. (With Secure Boot on, the PXE boot will not work.)</strong> Unchanged: <strong>Disable Secure Boot. (With Secure Boot on, the PXE boot will not work.)</strong> Unchanged: <a href="https://xworxapp.wpenginepowered.com/wp-content/uploads/2025/04/IMG_1470.jpg"><img class="alignnone size-medium wp-image-12088" src="https://xworxapp.wpenginepowered.com/wp-content/uploads/2025/04/IMG_1470-300x169.jpg" alt="" width="300" height="169" /></a> Unchanged: <a href="https://xworxapp.wpenginepowered.com/wp-content/uploads/2025/04/IMG_1470.jpg"><img class="alignnone size-medium wp-image-12088" src="https://xworxapp.wpenginepowered.com/wp-content/uploads/2025/04/IMG_1470-300x169.jpg" alt="" width="300" height="169" /></a> Unchanged: <strong>Enable Network boot or PXE boot in BIOS (IPv4). </strong> Unchanged: <strong>Enable Network boot or PXE boot in BIOS (IPv4). </strong> Unchanged: <strong>Change network boot to 1st boot in the boot order.</strong> Unchanged: <strong>Change network boot to 1st boot in the boot order.</strong> Unchanged: <a href="https://xworxapp.wpenginepowered.com/wp-content/uploads/2025/04/IMG_1471.jpg"><img class="alignnone size-medium wp-image-12089" src="https://xworxapp.wpenginepowered.com/wp-content/uploads/2025/04/IMG_1471-300x169.jpg" alt="" width="300" height="169" /></a> Unchanged: <a href="https://xworxapp.wpenginepowered.com/wp-content/uploads/2025/04/IMG_1471.jpg"><img class="alignnone size-medium wp-image-12089" src="https://xworxapp.wpenginepowered.com/wp-content/uploads/2025/04/IMG_1471-300x169.jpg" alt="" width="300" height="169" /></a> Unchanged: <strong>Change the SATA setting from RAID to AHCI for the Dell PC.</strong> Unchanged: <strong>Change the SATA setting from RAID to AHCI for the Dell PC.</strong> Unchanged: <strong>Disable Intel VMD and adjust SATA settings to AHCI for 11th Gen or newer PCs.</strong> Unchanged: <strong>Disable Intel VMD and adjust SATA settings to AHCI for 11th Gen or newer PCs.</strong> Unchanged: <strong>Save settings and reboot the PC.</strong> Unchanged: <strong>Save settings and reboot the PC.</strong> Unchanged: If everything is working correctly, the PC will PXE boot; this process can take a few minutes. Unchanged: If everything is working correctly, the PC will PXE boot; this process can take a few minutes. Unchanged: The first time the PXE menu is loaded on the PC, it will display “Host is NOT registered.” Unchanged: The first time the PXE menu is loaded on the PC, it will display “Host is NOT registered.” Unchanged: <a href="https://xworxapp.wpenginepowered.com/wp-content/uploads/2022/03/IMG_1475.jpg"><img class="alignnone size-medium wp-image-8132" src="https://xworxapp.wpenginepowered.com/wp-content/uploads/2022/03/IMG_1475-300x169.jpg" alt="" width="300" height="169" /></a> Unchanged: <a href="https://xworxapp.wpenginepowered.com/wp-content/uploads/2022/03/IMG_1475.jpg"><img class="alignnone size-medium wp-image-8132" src="https://xworxapp.wpenginepowered.com/wp-content/uploads/2022/03/IMG_1475-300x169.jpg" alt="" width="300" height="169" /></a> Unchanged: If the PC uses an Ethernet dongle to PXE boot, it might display (Host is registered as XXXXXXXXXX), just go to the step to load "Killdisk Active Boot Disk". Unchanged: If the PC uses an Ethernet dongle to PXE boot, it might display (Host is registered as XXXXXXXXXX), just go to the step to load "Killdisk Active Boot Disk". Unchanged: <strong><span style="color: #ff0000;">If a PC does not have storage, plug an empty USB drive into the PC. The PC will give a registration error if there is no storage media detected.</span></strong> Unchanged: <strong><span style="color: #ff0000;">If a PC does not have storage, plug an empty USB drive into the PC. The PC will give a registration error if there is no storage media detected.</span></strong> Unchanged: Select “Quick Registration and Inventory” from the menu. (Make sure the PC has a hard drive or USB drive.) Unchanged: Select “Quick Registration and Inventory” from the menu. (Make sure the PC has a hard drive or USB drive.) Unchanged: After letting the program run, the PC will be rebooted to the PXE screen again. This time will display "Host is registered as XXXXXXXXXX". (Check the section on the label) Unchanged: After letting the program run, the PC will be rebooted to the PXE screen again. This time will display "Host is registered as XXXXXXXXXX". (Check the section on the label) Unchanged: Then choose “Killdisk Active Boot Disk” Unchanged: Then choose “Killdisk Active Boot Disk” Unchanged: <a href="https://xworxapp.wpenginepowered.com/wp-content/uploads/2022/03/IMG_1476.jpg"><img class="alignnone size-medium wp-image-8133" src="https://xworxapp.wpenginepowered.com/wp-content/uploads/2022/03/IMG_1476-300x169.jpg" alt="" width="300" height="169" /></a> Unchanged: <a href="https://xworxapp.wpenginepowered.com/wp-content/uploads/2022/03/IMG_1476.jpg"><img class="alignnone size-medium wp-image-8133" src="https://xworxapp.wpenginepowered.com/wp-content/uploads/2022/03/IMG_1476-300x169.jpg" alt="" width="300" height="169" /></a> Unchanged: After KillDisk is loaded, click the NIC Logo in the system tray, then click the Initialize Network button. Unchanged: After KillDisk is loaded, click the NIC Logo in the system tray, then click the Initialize Network button. Unchanged: <a href="https://xworxapp.wpenginepowered.com/wp-content/uploads/2022/03/IMG_1478.jpg"><img class="alignnone size-medium wp-image-8135" src="https://xworxapp.wpenginepowered.com/wp-content/uploads/2022/03/IMG_1478-300x169.jpg" alt="" width="300" height="169" /></a> Unchanged: <a href="https://xworxapp.wpenginepowered.com/wp-content/uploads/2022/03/IMG_1478.jpg"><img class="alignnone size-medium wp-image-8135" src="https://xworxapp.wpenginepowered.com/wp-content/uploads/2022/03/IMG_1478-300x169.jpg" alt="" width="300" height="169" /></a> Unchanged: After initializing the network, Unchanged: After initializing the network, Unchanged: Open the <span lang="zxx"><u>Active@KillDisk</u></span> Unchanged: Open the <span lang="zxx"><u>Active@KillDisk</u></span> Unchanged: The system may give you an error about Active@KillDisk already being open. If this error pops up, press Alt + Tab and switch to Active@KillDisk. Unchanged: The system may give you an error about Active@KillDisk already being open. If this error pops up, press Alt + Tab and switch to Active@KillDisk. Unchanged: On the bottom right of the opened window, there is a network status icon. The green check mark means the PC is online. If the network status icon has a red x on it, that means the PC is offline. Unchanged: On the bottom right of the opened window, there is a network status icon. The green check mark means the PC is online. If the network status icon has a red x on it, that means the PC is offline. Unchanged: <a href="https://xworxapp.wpenginepowered.com/wp-content/uploads/2022/03/IMG_2267.jpg"><img class="alignnone size-medium wp-image-9190" src="https://xworxapp.wpenginepowered.com/wp-content/uploads/2022/03/IMG_2267-300x169.jpg" alt="" width="300" height="169" /></a><a href="https://xworxapp.wpenginepowered.com/wp-content/uploads/2022/03/IMG_2265.jpg"><img class="alignnone size-medium wp-image-9189" src="https://xworxapp.wpenginepowered.com/wp-content/uploads/2022/03/IMG_2265-300x169.jpg" alt="" width="300" height="169" /></a> Unchanged: <a href="https://xworxapp.wpenginepowered.com/wp-content/uploads/2022/03/IMG_2267.jpg"><img class="alignnone size-medium wp-image-9190" src="https://xworxapp.wpenginepowered.com/wp-content/uploads/2022/03/IMG_2267-300x169.jpg" alt="" width="300" height="169" /></a><a href="https://xworxapp.wpenginepowered.com/wp-content/uploads/2022/03/IMG_2265.jpg"><img class="alignnone size-medium wp-image-9189" src="https://xworxapp.wpenginepowered.com/wp-content/uploads/2022/03/IMG_2265-300x169.jpg" alt="" width="300" height="169" /></a> Unchanged: Then choose all Hard Drives that need to be wiped and click the “ERASE DISK” button. (Ctrl+clicked the drives that need to be wiped.) Unchanged: Then choose all Hard Drives that need to be wiped and click the “ERASE DISK” button. (Ctrl+clicked the drives that need to be wiped.) Unchanged: <strong>Wipe an empty USB drive if there is no storage in the PC.</strong> Unchanged: <strong>Wipe an empty USB drive if there is no storage in the PC.</strong> Unchanged: For the offline PC, expand the Erase Certificate option, choose Save to PDF, and change the save location to X:\ Unchanged: For the offline PC, expand the Erase Certificate option, choose Save to PDF, and change the save location to X:\ Unchanged: <a href="https://xworxapp.wpenginepowered.com/wp-content/uploads/2022/03/snap_153039.jpg"><img class="alignnone size-medium wp-image-11840" src="https://xworxapp.wpenginepowered.com/wp-content/uploads/2022/03/snap_153039-300x164.jpg" alt="" width="300" height="164" /></a> Unchanged: <a href="https://xworxapp.wpenginepowered.com/wp-content/uploads/2022/03/snap_153039.jpg"><img class="alignnone size-medium wp-image-11840" src="https://xworxapp.wpenginepowered.com/wp-content/uploads/2022/03/snap_153039-300x164.jpg" alt="" width="300" height="164" /></a> Unchanged: In the Disk Erase tab, make sure the Erase method is US DoD 5220.22-M 3 Pass. Verify is 100%, check the Initialize disk after erase, check the Write fingerprint to the first sector, and click Start. Unchanged: In the Disk Erase tab, make sure the Erase method is US DoD 5220.22-M 3 Pass. Verify is 100%, check the Initialize disk after erase, check the Write fingerprint to the first sector, and click Start. Unchanged: <a href="https://xworxapp.wpenginepowered.com/wp-content/uploads/2022/03/IMG_1485.jpg"><img class="alignnone size-medium wp-image-8136" src="https://xworxapp.wpenginepowered.com/wp-content/uploads/2022/03/IMG_1485-300x169.jpg" alt="" width="300" height="169" /></a> Unchanged: <a href="https://xworxapp.wpenginepowered.com/wp-content/uploads/2022/03/IMG_1485.jpg"><img class="alignnone size-medium wp-image-8136" src="https://xworxapp.wpenginepowered.com/wp-content/uploads/2022/03/IMG_1485-300x169.jpg" alt="" width="300" height="169" /></a> Unchanged: <hr /> Unchanged: <hr /> Unchanged: <h2><strong>Stage #3: Erase Certificate Matching</strong></h2> Unchanged: <h2><strong>Stage #3: Erase Certificate Matching</strong></h2> Unchanged: <h3><strong>The PC was wiped through the PXE Killdisk</strong></h3> Unchanged: <h3><strong>The PC was wiped through the PXE Killdisk</strong></h3> Unchanged: Collect Erase Certificates from the Printer. (Next day) Unchanged: Collect Erase Certificates from the Printer. (Next day) Unchanged: The printer is located in the PC tech area. Unchanged: The printer is located in the PC tech area. Unchanged: <a href="https://xworxapp.wpenginepowered.com/wp-content/uploads/2022/03/IMG_1016.jpg"><img class="alignnone wp-image-11841 size-medium" src="https://xworxapp.wpenginepowered.com/wp-content/uploads/2022/03/IMG_1016-300x266.jpg" alt="" width="300" height="266" /></a> Unchanged: <a href="https://xworxapp.wpenginepowered.com/wp-content/uploads/2022/03/IMG_1016.jpg"><img class="alignnone wp-image-11841 size-medium" src="https://xworxapp.wpenginepowered.com/wp-content/uploads/2022/03/IMG_1016-300x266.jpg" alt="" width="300" height="266" /></a> Unchanged: <h3><span style="text-decoration: line-through;"><strong>For the offline PC, you need to print the certificate manually.</strong></span></h3> Unchanged: <h3><span style="text-decoration: line-through;"><strong>For the offline PC, you need to print the certificate manually.</strong></span></h3> Unchanged: <span style="text-decoration: line-through;">Plug a<strong> formatted USB drive </strong>into the PC.</span> Unchanged: <span style="text-decoration: line-through;">Plug a<strong> formatted USB drive </strong>into the PC.</span> Unchanged: <span style="text-decoration: line-through;">On the wiping result window, click the <strong>Print</strong> button, and the <strong>Print Preview</strong> window will open.</span> Unchanged: <span style="text-decoration: line-through;">On the wiping result window, click the <strong>Print</strong> button, and the <strong>Print Preview</strong> window will open.</span> Unchanged: <span style="text-decoration: line-through;"><a href="https://xworxapp.wpenginepowered.com/wp-content/uploads/2022/03/Untitled.jpg" data-lb-type="grouped-post"><img class="alignnone size-medium wp-image-11844" src="https://xworxapp.wpenginepowered.com/wp-content/uploads/2022/03/Untitled-300x225.jpg" alt="" width="300" height="225" /></a></span> Unchanged: <span style="text-decoration: line-through;"><a href="https://xworxapp.wpenginepowered.com/wp-content/uploads/2022/03/Untitled.jpg" data-lb-type="grouped-post"><img class="alignnone size-medium wp-image-11844" src="https://xworxapp.wpenginepowered.com/wp-content/uploads/2022/03/Untitled-300x225.jpg" alt="" width="300" height="225" /></a></span> Unchanged: <span style="text-decoration: line-through;">Click the print icon on the Print Preview window, then save the <strong>Erase Certificate </strong>PDF file to the USB drive.</span> Unchanged: <span style="text-decoration: line-through;">Click the print icon on the Print Preview window, then save the <strong>Erase Certificate </strong>PDF file to the USB drive.</span> Unchanged: <span style="text-decoration: line-through;"><a href="https://xworxapp.wpenginepowered.com/wp-content/uploads/2022/03/IMG_1018.jpg" data-lb-type="grouped-post"><img class="alignnone size-medium wp-image-11845" src="https://xworxapp.wpenginepowered.com/wp-content/uploads/2022/03/IMG_1018-300x225.jpg" alt="" width="300" height="225" /></a></span> Unchanged: <span style="text-decoration: line-through;"><a href="https://xworxapp.wpenginepowered.com/wp-content/uploads/2022/03/IMG_1018.jpg" data-lb-type="grouped-post"><img class="alignnone size-medium wp-image-11845" src="https://xworxapp.wpenginepowered.com/wp-content/uploads/2022/03/IMG_1018-300x225.jpg" alt="" width="300" height="225" /></a></span> Unchanged: <span style="text-decoration: line-through;">Unplug the <strong>formatted USB</strong> and go to the next PC that needs to print the <strong>Erase Certificate </strong>manually.</span> Unchanged: <span style="text-decoration: line-through;">Unplug the <strong>formatted USB</strong> and go to the next PC that needs to print the <strong>Erase Certificate </strong>manually.</span> Unchanged: <span style="text-decoration: line-through;">After collecting all PDF files, go to a workstation to print out the <strong>Erase Certificate.</strong></span> Unchanged: <span style="text-decoration: line-through;">After collecting all PDF files, go to a workstation to print out the <strong>Erase Certificate.</strong></span> Unchanged: <h3><strong>Match the Erase Certificate with the wiped PC.</strong></h3> Unchanged: <h3><strong>Match the Erase Certificate with the wiped PC.</strong></h3> Unchanged: Match the PC serial number and put the certificate with the PC. The certificate will list the PC's serial number as “BIOS Serial.” Unchanged: Match the PC serial number and put the certificate with the PC. The certificate will list the PC's serial number as “BIOS Serial.” Unchanged: Use painter's tape to tape the folded certificate at the bottom of the PC. Display the Hardware Information for QC. Unchanged: Use painter's tape to tape the folded certificate at the bottom of the PC. Display the Hardware Information for QC. Unchanged: <a href="https://xworxapp.wpenginepowered.com/wp-content/uploads/2022/03/Screenshot-2022-03-09-085300-2.jpg"><img class="alignnone wp-image-11846 size-medium" src="https://xworxapp.wpenginepowered.com/wp-content/uploads/2022/03/Screenshot-2022-03-09-085300-2-216x300.jpg" alt="" width="216" height="300" /></a><a href="https://xworxapp.wpenginepowered.com/wp-content/uploads/2025/04/IMG_1473.jpg"><img class="alignnone size-medium wp-image-12091" src="https://xworxapp.wpenginepowered.com/wp-content/uploads/2025/04/IMG_1473-300x169.jpg" alt="" width="300" height="169" /></a> Unchanged: <a href="https://xworxapp.wpenginepowered.com/wp-content/uploads/2022/03/Screenshot-2022-03-09-085300-2.jpg"><img class="alignnone wp-image-11846 size-medium" src="https://xworxapp.wpenginepowered.com/wp-content/uploads/2022/03/Screenshot-2022-03-09-085300-2-216x300.jpg" alt="" width="216" height="300" /></a><a href="https://xworxapp.wpenginepowered.com/wp-content/uploads/2025/04/IMG_1473.jpg"><img class="alignnone size-medium wp-image-12091" src="https://xworxapp.wpenginepowered.com/wp-content/uploads/2025/04/IMG_1473-300x169.jpg" alt="" width="300" height="169" /></a> Unchanged: <span style="color: #ff0000;"><strong>Do not remove the wiped USB drive.</strong></span> Unchanged: <span style="color: #ff0000;"><strong>Do not remove the wiped USB drive.</strong></span> Unchanged: Mark the label based on the sanitizing status. Unchanged: Mark the label based on the sanitizing status. Unchanged: Record any defects that developed overnight, then initial on the Tech 1 field. Unchanged: Record any defects that developed overnight, then initial on the Tech 1 field. Unchanged: If wiping fails: Unchanged: If wiping fails: Unchanged: <ul> Unchanged: <ul> Unchanged: <li><strong>6th Gen i-series CPU:</strong> remove the hard drive, make the hard drive not included on the label, and mark off the hard drive information from the Erase Certificate.</li> Unchanged: <li><strong>6th Gen i-series CPU:</strong> remove the hard drive, make the hard drive not included on the label, and mark off the hard drive information from the Erase Certificate.</li> Unchanged: <li><strong>7th Gen i-series or newer and AMD Ryzen CPU:</strong> replace the hard drive and wipe the new drive.</li> Unchanged: <li><strong>7th Gen i-series or newer and AMD Ryzen CPU:</strong> replace the hard drive and wipe the new drive.</li> Unchanged: </ul> Unchanged: </ul> Unchanged: <h3><a href="https://xworxapp.wpenginepowered.com/wp-content/uploads/2022/03/2024-09-09-10_05_33-Laptop-Wiping_-Laptop-PEX-Boot-and-Registration.-–-Process-Database.jpg"><img class="alignnone size-medium wp-image-11716" src="https://xworxapp.wpenginepowered.com/wp-content/uploads/2022/03/2024-09-09-10_05_33-Laptop-Wiping_-Laptop-PEX-Boot-and-Registration.-–-Process-Database-151x300.jpg" alt="" width="151" height="300" /></a></h3> Unchanged: <h3><a href="https://xworxapp.wpenginepowered.com/wp-content/uploads/2022/03/2024-09-09-10_05_33-Laptop-Wiping_-Laptop-PEX-Boot-and-Registration.-–-Process-Database.jpg"><img class="alignnone size-medium wp-image-11716" src="https://xworxapp.wpenginepowered.com/wp-content/uploads/2022/03/2024-09-09-10_05_33-Laptop-Wiping_-Laptop-PEX-Boot-and-Registration.-–-Process-Database-151x300.jpg" alt="" width="151" height="300" /></a></h3> Unchanged: If the certificate did not print out for any reason, notify your supervisor. Unchanged: If the certificate did not print out for any reason, notify your supervisor. Unchanged: <hr /> Unchanged: <hr /> Unchanged: <h2><strong>Stage #4: PC wipe Quality Checker</strong></h2> Unchanged: <h2><strong>Stage #4: PC wipe Quality Checker</strong></h2> Unchanged: <strong>Check the PC's physical condition and compare it with the label.</strong> Unchanged: <strong>Check the PC's physical condition and compare it with the label.</strong> Unchanged: <strong>Double-check all sections on the label with the PC, and make sure all sections are checked and correct.</strong> Unchanged: <strong>Double-check all sections on the label with the PC, and make sure all sections are checked and correct.</strong> Unchanged: <strong>After QC the PCs,</strong> Unchanged: <strong>After QC the PCs,</strong> Unchanged: <ul> Unchanged: <ul> Unchanged: <li><strong>6th Gen i-series CPU:</strong> <strong>disconnect all the cables and the USB drive.</strong></li> Unchanged: <li><strong>6th Gen i-series CPU:</strong> <strong>disconnect all the cables and the USB drive.</strong></li> Unchanged: <li><strong>7th Gen i-series or newer and AMD Ryzen CPU:</strong> Unchanged: <li><strong>7th Gen i-series or newer and AMD Ryzen CPU:</strong> Unchanged: <ul> Unchanged: <ul> Unchanged: <li><strong>Check the Autopilot status. Refer to <a href="https://xworxapp.wpenginepowered.com/?p=11800" target="_blank" rel="noopener">How to check Autopilot status for a Windows machine</a></strong></li> Unchanged: <li><strong>Check the Autopilot status. Refer to <a href="https://xworxapp.wpenginepowered.com/?p=11800" target="_blank" rel="noopener">How to check Autopilot status for a Windows machine</a></strong></li> Unchanged: <li><strong> Mark the Label based on the Autopilot status. Circle the OS version on the label.</strong></li> Unchanged: <li><strong> Mark the Label based on the Autopilot status. Circle the OS version on the label.</strong></li> Unchanged: <li><strong>Disconnect all cables.</strong></li> Unchanged: <li><strong>Disconnect all cables.</strong></li> Unchanged: </ul> Unchanged: </ul> Unchanged: </li> Unchanged: </li> Unchanged: </ul> Unchanged: </ul> Added: Added: <h3>All machines on wipe stations must receive two PC Tech initials before being taken off station.</h3> Added: In effort to avoid backlogs of unQCed items piling up in bins, moving forward we cannot remove any machine from a wiping station until it receives two PC Tech initials. This policy will undoubtedly cause throttling of work that can be done on a wipe station because there will be limited space, but this is to be anticipated and the solution is that we will find alternate work to be done until Andy or Ze or anyone else authorized to QC reaches and clears the machine. A notable good outcome of this policy will be that you will received basically immediate feedback on your work instead of us discovering errors much later. Added: Added: Unchanged: <hr /> Unchanged: <hr /> Unchanged: <h2><strong>Stage #5: Micro PC put away</strong></h2> Unchanged: <h2><strong>Stage #5: Micro PC put away</strong></h2> Unchanged: Check the label for the PC's condition Unchanged: Check the label for the PC's condition Unchanged: Based on the PC's condition, sort the PCs. Unchanged: Based on the PC's condition, sort the PCs. Unchanged: Put away the PC in the destination vessel. Unchanged: Put away the PC in the destination vessel. Unchanged: <ul> Unchanged: <ul> Unchanged: <li><strong>PC that wipes successfully with no issue(Normal wear and tear allowed), put away: Wiped Micro PCs Unchanged: <li><strong>PC that wipes successfully with no issue(Normal wear and tear allowed), put away: Wiped Micro PCs Unchanged: </strong></li> Unchanged: </strong></li> Unchanged: <li><strong>PC Scrap: (anyone that applies) put away: #1009 SCRAP: PC COMPUTER (Remove RAM, and storage for all PCs)(Remove CPU for 6th Gen or newer CPU PCs) </strong> Unchanged: <li><strong>PC Scrap: (anyone that applies) put away: #1009 SCRAP: PC COMPUTER (Remove RAM, and storage for all PCs)(Remove CPU for 6th Gen or newer CPU PCs) </strong> Unchanged: <ul> Unchanged: <ul> Unchanged: <li><strong>PC that has a power issue. (Include does not power on, Power on no post, power on then off, or random shut off.)</strong></li> Unchanged: <li><strong>PC that has a power issue. (Include does not power on, Power on no post, power on then off, or random shut off.)</strong></li> Unchanged: <li><strong>The s</strong><strong>plash screen cannot be removed.</strong></li> Unchanged: <li><strong>The s</strong><strong>plash screen cannot be removed.</strong></li> Unchanged: <li><strong>Damaged motherboard.</strong></li> Unchanged: <li><strong>Damaged motherboard.</strong></li> Unchanged: <li><strong>Autopilot is locked or unable to check Autopilot status. (7th Gen or newer I series or AMD Ryzen CPUs.)</strong></li> Unchanged: <li><strong>Autopilot is locked or unable to check Autopilot status. (7th Gen or newer I series or AMD Ryzen CPUs.)</strong></li> Unchanged: <li><strong>More than 1 damaged port</strong></li> Unchanged: <li><strong>More than 1 damaged port</strong></li> Unchanged: </ul> Unchanged: </ul> Unchanged: </li> Unchanged: </li> Unchanged: </ul> Unchanged: </ul> Unchanged: <h2></h2> Unchanged: <h2></h2> Unchanged: Unchanged: Unchanged: <h3>Notating missing 2.5" drive caddies in micro PCs</h3> Unchanged: <h3>Notating missing 2.5" drive caddies in micro PCs</h3> Unchanged: You may encounter newer units that have both an m.2 nvme slot and a 2.5" sata slot, however,<strong> the caddy for the sata slot is missing</strong>. Unchanged: You may encounter newer units that have both an m.2 nvme slot and a 2.5" sata slot, however,<strong> the caddy for the sata slot is missing</strong>. Unchanged: Regardless of whether it is unclear if the machine originally came with a caddy since 2.5" SSDs are less common than m.2 drives these days, <strong>we need to mention in the notes that the caddy is missing if there is a SATA slot that is unusable without a caddy</strong>. According to Paul, we do not need to be overly descriptive when describing what caddy is missing. <strong>Simply writing “missing caddy” in the notes will be sufficient.</strong> Unchanged: Regardless of whether it is unclear if the machine originally came with a caddy since 2.5" SSDs are less common than m.2 drives these days, <strong>we need to mention in the notes that the caddy is missing if there is a SATA slot that is unusable without a caddy</strong>. According to Paul, we do not need to be overly descriptive when describing what caddy is missing. <strong>Simply writing “missing caddy” in the notes will be sufficient.</strong> Unchanged: <a href="https://www.xworx.app/wp-content/uploads/2025/12/20260204_163609-text.jpg"><img class="alignnone size-medium wp-image-13035" src="https://www.xworx.app/wp-content/uploads/2025/12/20260204_163609-text-169x300.jpg" alt="" width="169" height="300" /></a> Unchanged: <a href="https://www.xworx.app/wp-content/uploads/2025/12/20260204_163609-text.jpg"><img class="alignnone size-medium wp-image-13035" src="https://www.xworx.app/wp-content/uploads/2025/12/20260204_163609-text-169x300.jpg" alt="" width="169" height="300" /></a> Unchanged: Unchanged: Unchanged: Unchanged: Unchanged: <h3>Notating missing 2.5" drive caddies in micro PCs</h3> Unchanged: <h3>Notating missing 2.5" drive caddies in micro PCs</h3> Unchanged: <strong><span style="color: #6495ed;">PC Tech Level 3: All Other PC/Server Testing Instructions</span></strong> <a href="https://www.xworx.app/?p=4984" target="_blank" rel="noopener">https://www.xworx.app/?p=4984, </a><strong><span style="color: #6495ed;">PC Tech Level 3-Micro PC Wiping: Micro/Mini/Tiny PC PXE Boot and Registrations </span></strong><a href="https://www.xworx.app/?p=12082" target="_blank" rel="noopener">https://www.xworx.app/?p=12082</a> Unchanged: <strong><span style="color: #6495ed;">PC Tech Level 3: All Other PC/Server Testing Instructions</span></strong> <a href="https://www.xworx.app/?p=4984" target="_blank" rel="noopener">https://www.xworx.app/?p=4984, </a><strong><span style="color: #6495ed;">PC Tech Level 3-Micro PC Wiping: Micro/Mini/Tiny PC PXE Boot and Registrations </span></strong><a href="https://www.xworx.app/?p=12082" target="_blank" rel="noopener">https://www.xworx.app/?p=12082</a> Unchanged: You may encounter newer units that have both an m.2 nvme slot and a 2.5" sata slot, however,<strong> the caddy for the sata slot is missing</strong>. Unchanged: You may encounter newer units that have both an m.2 nvme slot and a 2.5" sata slot, however,<strong> the caddy for the sata slot is missing</strong>. Unchanged: Regardless of whether it is unclear if the machine originally came with a caddy since 2.5" SSDs are less common than m.2 drives these days, <strong>we need to mention in the notes that the caddy is missing if there is a SATA slot that is unusable without a caddy</strong>. According to Paul, we do not need to be overly descriptive when describing what caddy is missing. <strong>Simply writing “missing caddy” in the notes will be sufficient.</strong> Unchanged: Regardless of whether it is unclear if the machine originally came with a caddy since 2.5" SSDs are less common than m.2 drives these days, <strong>we need to mention in the notes that the caddy is missing if there is a SATA slot that is unusable without a caddy</strong>. According to Paul, we do not need to be overly descriptive when describing what caddy is missing. <strong>Simply writing “missing caddy” in the notes will be sufficient.</strong> Unchanged: <a href="https://www.xworx.app/wp-content/uploads/2025/12/20260204_163609-text.jpg"><img class="alignnone size-medium wp-image-13035" src="https://www.xworx.app/wp-content/uploads/2025/12/20260204_163609-text-169x300.jpg" alt="" width="169" height="300" /></a> Unchanged: <a href="https://www.xworx.app/wp-content/uploads/2025/12/20260204_163609-text.jpg"><img class="alignnone size-medium wp-image-13035" src="https://www.xworx.app/wp-content/uploads/2025/12/20260204_163609-text-169x300.jpg" alt="" width="169" height="300" /></a> Unchanged: <h1></h1> Unchanged: <h1></h1> Unchanged: <h3>A few quick a reminders and examples for micro PCs: Unchanged: <h3>A few quick a reminders and examples for micro PCs: Unchanged: 1) Please be sure not to cover up defects with labels. Unchanged: 1) Please be sure not to cover up defects with labels. Unchanged: 2) Be sure to notate subtle dents in meshing. Unchanged: 2) Be sure to notate subtle dents in meshing. Unchanged: 3) Look out for asset tags that blend in with the other manufacturer stickers.</h3> Unchanged: 3) Look out for asset tags that blend in with the other manufacturer stickers.</h3> Unchanged: Below is a photo of a machine that has dents on the metal meshing. These dents are significant enough where they need to be notated. But also, because this is a mini PC, it tech label was placed overtop of this dents. So please be sure to be on the lookout for these types of dents in machines and whenever you identify a flaw, be careful not to place a label over it so that other team members can inspect and verify the flaws as well. Unchanged: Below is a photo of a machine that has dents on the metal meshing. These dents are significant enough where they need to be notated. But also, because this is a mini PC, it tech label was placed overtop of this dents. So please be sure to be on the lookout for these types of dents in machines and whenever you identify a flaw, be careful not to place a label over it so that other team members can inspect and verify the flaws as well. Unchanged: <a href="https://www.xworx.app/wp-content/uploads/2025/12/20260205_095435.jpg"><img class="alignnone size-medium wp-image-13036" src="https://www.xworx.app/wp-content/uploads/2025/12/20260205_095435-214x300.jpg" alt="" width="214" height="300" /></a> Unchanged: <a href="https://www.xworx.app/wp-content/uploads/2025/12/20260205_095435.jpg"><img class="alignnone size-medium wp-image-13036" src="https://www.xworx.app/wp-content/uploads/2025/12/20260205_095435-214x300.jpg" alt="" width="214" height="300" /></a> Unchanged: Also, remember that not all asset tags jump out at you and often they are placed somewhat hidden or they look a bit like other manufacturer stickers. So identify these asset tags by their company names, and also be sure to scan QR codes that do not identify themselves because we've seen asset tags that are simply unmarked QR codes that link back to the original purchaser's company website. Unchanged: Also, remember that not all asset tags jump out at you and often they are placed somewhat hidden or they look a bit like other manufacturer stickers. So identify these asset tags by their company names, and also be sure to scan QR codes that do not identify themselves because we've seen asset tags that are simply unmarked QR codes that link back to the original purchaser's company website. Unchanged: <a href="https://www.xworx.app/wp-content/uploads/2025/12/Capture1.jpg"><img class="alignnone size-medium wp-image-13037" src="https://www.xworx.app/wp-content/uploads/2025/12/Capture1-300x221.jpg" alt="" width="300" height="221" /></a> Unchanged: <a href="https://www.xworx.app/wp-content/uploads/2025/12/Capture1.jpg"><img class="alignnone size-medium wp-image-13037" src="https://www.xworx.app/wp-content/uploads/2025/12/Capture1-300x221.jpg" alt="" width="300" height="221" /></a> Unchanged: Unchanged: Unchanged: Unchanged: Unchanged: <h2>Absolute Persistence in Dells - important BIOS area to now check in every Dell machine</h2> Unchanged: <h2>Absolute Persistence in Dells - important BIOS area to now check in every Dell machine</h2> Unchanged: We've recently come across and began processing<strong> Dell laptops with Absolute Persistence activated. It is now going to require us to check for this being present and active in all the Dell laptops moving forward</strong> because it does not reveal itself until very, very late in the process where we need to leave it plugged into the ethernet for several minutes after autopilot checking before the lock-out screen activates itself. Unchanged: We've recently come across and began processing<strong> Dell laptops with Absolute Persistence activated. It is now going to require us to check for this being present and active in all the Dell laptops moving forward</strong> because it does not reveal itself until very, very late in the process where we need to leave it plugged into the ethernet for several minutes after autopilot checking before the lock-out screen activates itself. Unchanged: Please take a look at the screenshot below: Unchanged: Please take a look at the screenshot below: Unchanged: <a href="https://www.xworx.app/wp-content/uploads/2025/02/20251027_140250.jpg"><img class="alignnone size-thumbnail wp-image-12701" src="https://www.xworx.app/wp-content/uploads/2025/02/20251027_140250-150x150.jpg" alt="" width="150" height="150" /></a> Unchanged: <a href="https://www.xworx.app/wp-content/uploads/2025/02/20251027_140250.jpg"><img class="alignnone size-thumbnail wp-image-12701" src="https://www.xworx.app/wp-content/uploads/2025/02/20251027_140250-150x150.jpg" alt="" width="150" height="150" /></a> Unchanged: Note how the <strong>options for Absolute Persistence are greyed out. This means that Absolute Persistence is activated</strong>. We cannot set this device as is. Hand it off to the PC Tech Team Lead and it will be recorded and sorted away for now. Unchanged: Note how the <strong>options for Absolute Persistence are greyed out. This means that Absolute Persistence is activated</strong>. We cannot set this device as is. Hand it off to the PC Tech Team Lead and it will be recorded and sorted away for now. Unchanged: There is <strong>one extra complication:</strong> <strong>all the BIOS options will be greyed out when the system is BIOS locked</strong> so that means there will be no way to know if Absolute Persistence is active or not, and <strong>you will need to let it sit connected to the internet after autopilot checking it. Ze has asked that we let it sit overnight or at least until the lock out screen shows up</strong>. If a lock out screen does not show up by morning, it should be all clear to sell. Unchanged: There is <strong>one extra complication:</strong> <strong>all the BIOS options will be greyed out when the system is BIOS locked</strong> so that means there will be no way to know if Absolute Persistence is active or not, and <strong>you will need to let it sit connected to the internet after autopilot checking it. Ze has asked that we let it sit overnight or at least until the lock out screen shows up</strong>. If a lock out screen does not show up by morning, it should be all clear to sell. Unchanged: Unchanged: Unchanged: <h2>HPs can have Absolute Persistence. Here is where to look:</h2> Unchanged: <h2>HPs can have Absolute Persistence. Here is where to look:</h2> Unchanged: Dell and HPs do not announce if they have Absolute Persistence active when you load into the BIOS. You have to go looking for it. <strong>Be sure to look for Absolute Persistence in the BIOS/UEFI of all laptops and computers</strong>. There is no way to tell if they have their Absolute Persistence active until you specifically go looking for it. Unchanged: Dell and HPs do not announce if they have Absolute Persistence active when you load into the BIOS. You have to go looking for it. <strong>Be sure to look for Absolute Persistence in the BIOS/UEFI of all laptops and computers</strong>. There is no way to tell if they have their Absolute Persistence active until you specifically go looking for it. Unchanged: See the photo below for what it looks like in the HP UEFI. Unchanged: See the photo below for what it looks like in the HP UEFI. Unchanged: <a href="https://www.xworx.app/wp-content/uploads/2025/02/Capture-3.jpg"><img class="alignnone size-thumbnail wp-image-12783" src="https://www.xworx.app/wp-content/uploads/2025/02/Capture-3-150x150.jpg" alt="" width="150" height="150" /></a> Unchanged: <a href="https://www.xworx.app/wp-content/uploads/2025/02/Capture-3.jpg"><img class="alignnone size-thumbnail wp-image-12783" src="https://www.xworx.app/wp-content/uploads/2025/02/Capture-3-150x150.jpg" alt="" width="150" height="150" /></a> Unchanged: Unchanged: Unchanged: <h2>Do not notate on your labels any asset tags remaining on systems</h2> Unchanged: <h2>Do not notate on your labels any asset tags remaining on systems</h2> Unchanged: Depending on what an asset tag says, we may choose to sell systems with asset tags that are non-removable assuming that the asset tag in no way implies or reveals who was the original owner.<strong> For the reason of trying to not draw any attention to something the previous owner wrote in the system, please do not mention the asset tags on labels</strong>. As an important reminder, the <strong>PC Tech Team Lead or any other supervisor needs to review any asset tags being intentionally left in machines</strong>, even if you deem it indecipherable yourself. Unchanged: Depending on what an asset tag says, we may choose to sell systems with asset tags that are non-removable assuming that the asset tag in no way implies or reveals who was the original owner.<strong> For the reason of trying to not draw any attention to something the previous owner wrote in the system, please do not mention the asset tags on labels</strong>. As an important reminder, the <strong>PC Tech Team Lead or any other supervisor needs to review any asset tags being intentionally left in machines</strong>, even if you deem it indecipherable yourself. Unchanged: Unchanged: Unchanged: <h2>New type of asset tag to look out for! Will require a closer look at labels across all machines.</h2> Unchanged: <h2>New type of asset tag to look out for! Will require a closer look at labels across all machines.</h2> Unchanged: An <strong>asset tag</strong> was recently discovered <strong>within a manufacturer label itself</strong>. We will need to begin visually scanning over manufacturer labels to look out for labels in this in the future. If you see a manufacture label like this, the <strong>preferred solution to keep the manufacturer label intact</strong> if possible if it contains important product information like the model number, serial number, or other details important for identifying the product, and to <strong>use scissors and cut out the offending asset tag portion. If that isn't possible, then it would be ok to fully remove the label.</strong> Unchanged: An <strong>asset tag</strong> was recently discovered <strong>within a manufacturer label itself</strong>. We will need to begin visually scanning over manufacturer labels to look out for labels in this in the future. If you see a manufacture label like this, the <strong>preferred solution to keep the manufacturer label intact</strong> if possible if it contains important product information like the model number, serial number, or other details important for identifying the product, and to <strong>use scissors and cut out the offending asset tag portion. If that isn't possible, then it would be ok to fully remove the label.</strong> Unchanged: It is going to require us to be even more detail oriented, but <strong>do not let this destroy your productivity output.</strong> <strong>Just quickly visually scan over the labels</strong> on the machines and look for brand names that should not be there. Unchanged: It is going to require us to be even more detail oriented, but <strong>do not let this destroy your productivity output.</strong> <strong>Just quickly visually scan over the labels</strong> on the machines and look for brand names that should not be there. Unchanged: Please click on the photo below to see an example. Unchanged: Please click on the photo below to see an example. Unchanged: <a href="https://www.xworx.app/wp-content/uploads/2025/02/IMG_1800.jpg"><img class="alignnone size-thumbnail wp-image-12747" src="https://www.xworx.app/wp-content/uploads/2025/02/IMG_1800-150x150.jpg" alt="" width="150" height="150" /></a> Unchanged: <a href="https://www.xworx.app/wp-content/uploads/2025/02/IMG_1800.jpg"><img class="alignnone size-thumbnail wp-image-12747" src="https://www.xworx.app/wp-content/uploads/2025/02/IMG_1800-150x150.jpg" alt="" width="150" height="150" /></a> Unchanged: Unchanged: Unchanged: <h2>Another example of a tricky asset tag</h2> Unchanged: <h2>Another example of a tricky asset tag</h2> Unchanged: <strong>This looks somewhat like a manufacturer tag at first glance</strong> as it only has this machine's serial number and an QR code. <strong>Unfortunately this is a QR link to rhinofamilyofcompanies.samanage.com.</strong> So here is a general overarching policy for asset tags: Be very suspicious and remove any sticker that is not 100% conclusively a manufacturer sticker, and in fact, you can <strong>remove any label that is deemed removable, meaning it isn't absolutely necessary to identify the product.</strong> Anything that looks out of place compared to similar models or anything that sticker that looks out of place in general, investigate it before assuming it is OK. <strong>Scan QR codes to verify them if you plan on leaving them on the machines.</strong> Unchanged: <strong>This looks somewhat like a manufacturer tag at first glance</strong> as it only has this machine's serial number and an QR code. <strong>Unfortunately this is a QR link to rhinofamilyofcompanies.samanage.com.</strong> So here is a general overarching policy for asset tags: Be very suspicious and remove any sticker that is not 100% conclusively a manufacturer sticker, and in fact, you can <strong>remove any label that is deemed removable, meaning it isn't absolutely necessary to identify the product.</strong> Anything that looks out of place compared to similar models or anything that sticker that looks out of place in general, investigate it before assuming it is OK. <strong>Scan QR codes to verify them if you plan on leaving them on the machines.</strong> Unchanged: <a href="https://www.xworx.app/wp-content/uploads/2025/02/20251112_144243-rotated.jpg"><img class="alignnone size-thumbnail wp-image-12765" src="https://www.xworx.app/wp-content/uploads/2025/02/20251112_144243-150x150.jpg" alt="" width="150" height="150" /></a> Unchanged: <a href="https://www.xworx.app/wp-content/uploads/2025/02/20251112_144243-rotated.jpg"><img class="alignnone size-thumbnail wp-image-12765" src="https://www.xworx.app/wp-content/uploads/2025/02/20251112_144243-150x150.jpg" alt="" width="150" height="150" /></a> Unchanged: Unchanged: Unchanged: <h2>Inspect ports closely and notate damage even if very minor</h2> Unchanged: <h2>Inspect ports closely and notate damage even if very minor</h2> Unchanged: Minor damage within ports is still enough damage where we need to mention it to the customer. The concern is that it is in a state that could get worse, like the port pins could break off when a cable is connected which has happened before even to us while working here at the warehouse. There is also a chance the port could be sensitive/finicky or stop working later. So please inspect all ports very closely for this reason to make sure you don't miss subtle damage. Thanks! Unchanged: Minor damage within ports is still enough damage where we need to mention it to the customer. The concern is that it is in a state that could get worse, like the port pins could break off when a cable is connected which has happened before even to us while working here at the warehouse. There is also a chance the port could be sensitive/finicky or stop working later. So please inspect all ports very closely for this reason to make sure you don't miss subtle damage. Thanks! Unchanged: <a href="https://www.xworx.app/wp-content/uploads/2025/02/Damaged-pin-within-DP-port.jpg"><img class="alignnone size-thumbnail wp-image-12761" src="https://www.xworx.app/wp-content/uploads/2025/02/Damaged-pin-within-DP-port-150x150.jpg" alt="" width="150" height="150" /> </a><a href="https://www.xworx.app/wp-content/uploads/2025/02/Capture-2.jpg"><img class="alignnone size-thumbnail wp-image-12762" src="https://www.xworx.app/wp-content/uploads/2025/02/Capture-2-150x150.jpg" alt="" width="150" height="150" /></a> Unchanged: <a href="https://www.xworx.app/wp-content/uploads/2025/02/Damaged-pin-within-DP-port.jpg"><img class="alignnone size-thumbnail wp-image-12761" src="https://www.xworx.app/wp-content/uploads/2025/02/Damaged-pin-within-DP-port-150x150.jpg" alt="" width="150" height="150" /> </a><a href="https://www.xworx.app/wp-content/uploads/2025/02/Capture-2.jpg"><img class="alignnone size-thumbnail wp-image-12762" src="https://www.xworx.app/wp-content/uploads/2025/02/Capture-2-150x150.jpg" alt="" width="150" height="150" /></a> Unchanged: Unchanged: Unchanged: <h2><em>Common issues to avoid found during micro PC QCing</em></h2> Unchanged: <h2><em>Common issues to avoid found during micro PC QCing</em></h2> Unchanged: <ul> Unchanged: <ul> Unchanged: <li>Wipe paper placement: try to<strong> not put wipe paper or sticker label on top of any manufacturer info</strong>. Find a spot on the machine where the wipe paper doesn't overlap anything.</li> Unchanged: <li>Wipe paper placement: try to<strong> not put wipe paper or sticker label on top of any manufacturer info</strong>. Find a spot on the machine where the wipe paper doesn't overlap anything.</li> Unchanged: <li>We need to begin<strong> checking for wifi cards.</strong></li> Unchanged: <li>We need to begin<strong> checking for wifi cards.</strong></li> Unchanged: <li>Don’t put painters <strong>tape over words on the wipe paper</strong>, just carefully tape over the corners.</li> Unchanged: <li>Don’t put painters <strong>tape over words on the wipe paper</strong>, just carefully tape over the corners.</li> Unchanged: <li><strong>Use a minimal amount of painters tape</strong> and make the presentation not look sloppy</li> Unchanged: <li><strong>Use a minimal amount of painters tape</strong> and make the presentation not look sloppy</li> Unchanged: <li>remove any <strong>serial numbers on case that do not match BIOS</strong> (meaning all BIOS and case serial numbers need to be cross-checked against each other every time)</li> Unchanged: <li>remove any <strong>serial numbers on case that do not match BIOS</strong> (meaning all BIOS and case serial numbers need to be cross-checked against each other every time)</li> Unchanged: <li>Use your finger to check the front panels to <strong>see if the plastic front clips are busted</strong> and the front panel may get ripped off on accident.</li> Unchanged: <li>Use your finger to check the front panels to <strong>see if the plastic front clips are busted</strong> and the front panel may get ripped off on accident.</li> Unchanged: <li>While checking the motherboard, if you <strong>notice any busted RAM clips</strong>, RAM slots, or other device slots damaged, please add that to the notes.</li> Unchanged: <li>While checking the motherboard, if you <strong>notice any busted RAM clips</strong>, RAM slots, or other device slots damaged, please add that to the notes.</li> Unchanged: <li><strong>Please begin referring to the antennae nub attached to the back of the case as the "antennae port"</strong> as the actual antenna would be a device we would attach to this nub, so we want to describe the computer as accurately as possible.</li> Unchanged: <li><strong>Please begin referring to the antennae nub attached to the back of the case as the "antennae port"</strong> as the actual antenna would be a device we would attach to this nub, so we want to describe the computer as accurately as possible.</li> Unchanged: <li>Don't forget to also leave a note in the <strong>notes section to indicate that the machines is BIOS locked</strong>, don't just put a check mark on the label! They are harder to see, and it is an important detail to the customer that we don't want to overlook.</li> Unchanged: <li>Don't forget to also leave a note in the <strong>notes section to indicate that the machines is BIOS locked</strong>, don't just put a check mark on the label! They are harder to see, and it is an important detail to the customer that we don't want to overlook.</li> Unchanged: </ul> Unchanged: </ul> Unchanged: <a href="https://www.xworx.app/wp-content/uploads/2025/02/IMG_3915.webp"><img class="alignnone size-thumbnail wp-image-12767" src="https://www.xworx.app/wp-content/uploads/2025/02/IMG_3915-150x150.webp" alt="" width="150" height="150" /></a> <a href="https://www.xworx.app/wp-content/uploads/2025/02/IMG_3911.webp"><img class="alignnone size-thumbnail wp-image-12768" src="https://www.xworx.app/wp-content/uploads/2025/02/IMG_3911-150x150.webp" alt="" width="150" height="150" /></a> <a href="https://www.xworx.app/wp-content/uploads/2025/02/IMG_3910.webp"><img class="alignnone size-thumbnail wp-image-12769" src="https://www.xworx.app/wp-content/uploads/2025/02/IMG_3910-150x150.webp" alt="" width="150" height="150" /></a> <a href="https://www.xworx.app/wp-content/uploads/2025/02/Broken_bezel.webp"><img class="alignnone size-thumbnail wp-image-12770" src="https://www.xworx.app/wp-content/uploads/2025/02/Broken_bezel-150x150.webp" alt="" width="150" height="150" /></a> <a href="https://www.xworx.app/wp-content/uploads/2025/02/Tape_covering_manufacturer.webp"><img class="alignnone size-thumbnail wp-image-12771" src="https://www.xworx.app/wp-content/uploads/2025/02/Tape_covering_manufacturer-150x150.webp" alt="" width="150" height="150" /></a> Unchanged: <a href="https://www.xworx.app/wp-content/uploads/2025/02/IMG_3915.webp"><img class="alignnone size-thumbnail wp-image-12767" src="https://www.xworx.app/wp-content/uploads/2025/02/IMG_3915-150x150.webp" alt="" width="150" height="150" /></a> <a href="https://www.xworx.app/wp-content/uploads/2025/02/IMG_3911.webp"><img class="alignnone size-thumbnail wp-image-12768" src="https://www.xworx.app/wp-content/uploads/2025/02/IMG_3911-150x150.webp" alt="" width="150" height="150" /></a> <a href="https://www.xworx.app/wp-content/uploads/2025/02/IMG_3910.webp"><img class="alignnone size-thumbnail wp-image-12769" src="https://www.xworx.app/wp-content/uploads/2025/02/IMG_3910-150x150.webp" alt="" width="150" height="150" /></a> <a href="https://www.xworx.app/wp-content/uploads/2025/02/Broken_bezel.webp"><img class="alignnone size-thumbnail wp-image-12770" src="https://www.xworx.app/wp-content/uploads/2025/02/Broken_bezel-150x150.webp" alt="" width="150" height="150" /></a> <a href="https://www.xworx.app/wp-content/uploads/2025/02/Tape_covering_manufacturer.webp"><img class="alignnone size-thumbnail wp-image-12771" src="https://www.xworx.app/wp-content/uploads/2025/02/Tape_covering_manufacturer-150x150.webp" alt="" width="150" height="150" /></a> Unchanged: Unchanged: Unchanged: Unchanged: Unchanged: <h3>Minimum size of SSDs to include/wipe in your devices: 128GB</h3> Unchanged: <h3>Minimum size of SSDs to include/wipe in your devices: 128GB</h3> Unchanged: Anything SSD storage underneath 128GB should be given to your supervisor to be taken out of normal circulation. Unchanged: Anything SSD storage underneath 128GB should be given to your supervisor to be taken out of normal circulation. Unchanged: Unchanged: Unchanged: <h2>P.S.</h2> Unchanged: <h2>P.S.</h2> Unchanged: <ul> Unchanged: <ul> Unchanged: <li>All PCs must be registered if possible. If a PC can not be registered, leave a note explaining the reason.</li> Unchanged: <li>All PCs must be registered if possible. If a PC can not be registered, leave a note explaining the reason.</li> Unchanged: <li>If a PC does not have a hard drive, plug a USB drive for wiping in Killdisk Active Boot Disk only, so it can print out an erase report.</li> Unchanged: <li>If a PC does not have a hard drive, plug a USB drive for wiping in Killdisk Active Boot Disk only, so it can print out an erase report.</li> Unchanged: <li>Remove the HDD and RAM from all scrap PCs.</li> Unchanged: <li>Remove the HDD and RAM from all scrap PCs.</li> Unchanged: <li>Remove the 6th Gen or newer CPU from scrap PCs.</li> Unchanged: <li>Remove the 6th Gen or newer CPU from scrap PCs.</li> Unchanged: </ul> Unchanged: </ul> - — pctechlead@beyondsurplus.com: Updated post "PC Tech Level 3-Micro PC Wiping: Micro/Mini/Tiny PC PXE Boot and Registration"
— pctechlead@beyondsurplus.com: Updated post "PC Tech Level 3-Micro PC Wiping: Micro/Mini/Tiny PC PXE Boot and Registration" Show details
Content
Before After Unchanged: <strong>PXE boot, or Preboot Execution Environment, is a network booting process that allows computers to boot from a network instead of a local disk. PXE is a client-server protocol that uses a DHCP or TFTP server to download software for booting.</strong> Unchanged: <strong>PXE boot, or Preboot Execution Environment, is a network booting process that allows computers to boot from a network instead of a local disk. PXE is a client-server protocol that uses a DHCP or TFTP server to download software for booting.</strong> Unchanged: <strong>PXE boot is commonly used for:</strong> Unchanged: <strong>PXE boot is commonly used for:</strong> Unchanged: <ul> Unchanged: <ul> Unchanged: <li><strong>Mass deployment: Installing the same operating system (OS) on many computers at once</strong></li> Unchanged: <li><strong>Mass deployment: Installing the same operating system (OS) on many computers at once</strong></li> Unchanged: <li><strong>Disaster recovery: Recovering from a disaster by installing a new OS</strong></li> Unchanged: <li><strong>Disaster recovery: Recovering from a disaster by installing a new OS</strong></li> Unchanged: <li><strong>Remote maintenance: Performing maintenance tasks on systems without physically accessing them.</strong></li> Unchanged: <li><strong>Remote maintenance: Performing maintenance tasks on systems without physically accessing them.</strong></li> Unchanged: </ul> Unchanged: </ul> Unchanged: <h2>Tech Requirements</h2> Unchanged: <h2>Tech Requirements</h2> Unchanged: <ul> Unchanged: <ul> Unchanged: <li>Finish PC tech level 1 training and maintain a good performance.</li> Unchanged: <li>Finish PC tech level 1 training and maintain a good performance.</li> Unchanged: <li>Test the i series PC wholesale with minimal or no errors.</li> Unchanged: <li>Test the i series PC wholesale with minimal or no errors.</li> Unchanged: </ul> Unchanged: </ul> Unchanged: <h2><strong>Tools</strong></h2> Unchanged: <h2><strong>Tools</strong></h2> Unchanged: <ul> Unchanged: <ul> Unchanged: <li>Ballpoint Pen. (Do not use a Gel Pen)</li> Unchanged: <li>Ballpoint Pen. (Do not use a Gel Pen)</li> Unchanged: <li>The electric screwdriver set the torque at 1.</li> Unchanged: <li>The electric screwdriver set the torque at 1.</li> Unchanged: <li>Driver bits.</li> Unchanged: <li>Driver bits.</li> Unchanged: <li>Screwdriver set.</li> Unchanged: <li>Screwdriver set.</li> Unchanged: </ul> Unchanged: </ul> Unchanged: <h2><strong>Stage #1: Physical Condition Checker</strong></h2> Unchanged: <h2><strong>Stage #1: Physical Condition Checker</strong></h2> Unchanged: [embeddoc url="https://xworxapp.wpenginepowered.com/wp-content/uploads/2025/04/Desktop-wiping-checklist-1-1.pdf" width="600px" Height="800px" viewer="browser"] Unchanged: [embeddoc url="https://xworxapp.wpenginepowered.com/wp-content/uploads/2025/04/Desktop-wiping-checklist-1-1.pdf" width="600px" Height="800px" viewer="browser"] Unchanged: <ul> Unchanged: <ul> Unchanged: <li><strong>Scan the serial number </strong><strong>on the label to avoid human error.</strong></li> Unchanged: <li><strong>Scan the serial number </strong><strong>on the label to avoid human error.</strong></li> Unchanged: <li><strong>If the serial number is damaged, leave the section blank.</strong></li> Unchanged: <li><strong>If the serial number is damaged, leave the section blank.</strong></li> Unchanged: <li><b>Record the pickup number on the label. (<strong>#1126 for drop-off, #0000 for PC that does not have the pickup#)</strong></b></li> Unchanged: <li><b>Record the pickup number on the label. (<strong>#1126 for drop-off, #0000 for PC that does not have the pickup#)</strong></b></li> Unchanged: <li><strong>Print out the label.</strong></li> Unchanged: <li><strong>Print out the label.</strong></li> Unchanged: <li><strong>Apply the label to the PC.</strong></li> Unchanged: <li><strong>Apply the label to the PC.</strong></li> Unchanged: <li><a href="https://xworxapp.wpenginepowered.com/wp-content/uploads/2025/04/IMG_1463.jpg"><img class="alignnone size-medium wp-image-12084" src="https://xworxapp.wpenginepowered.com/wp-content/uploads/2025/04/IMG_1463-300x225.jpg" alt="" width="300" height="225" /></a></li> Unchanged: <li><a href="https://xworxapp.wpenginepowered.com/wp-content/uploads/2025/04/IMG_1463.jpg"><img class="alignnone size-medium wp-image-12084" src="https://xworxapp.wpenginepowered.com/wp-content/uploads/2025/04/IMG_1463-300x225.jpg" alt="" width="300" height="225" /></a></li> Unchanged: <li><strong>Inspect the PC's physical condition and record on the label</strong> Unchanged: <li><strong>Inspect the PC's physical condition and record on the label</strong> Unchanged: <ul> Unchanged: <ul> Unchanged: <li>Open the case and check the motherboard condition.</li> Unchanged: <li>Open the case and check the motherboard condition.</li> Unchanged: <li>Remove any loose screws inside.</li> Unchanged: <li>Remove any loose screws inside.</li> Unchanged: <li>Add RAM or storage as needed.</li> Unchanged: <li>Add RAM or storage as needed.</li> Unchanged: </ul> Unchanged: </ul> Unchanged: </li> Unchanged: </li> Unchanged: <li><strong>Based on the PC's physical condition, determine the next step for the PC. (</strong>Refer to the<strong> Micro PC put away </strong>section<strong>)</strong> Unchanged: <li><strong>Based on the PC's physical condition, determine the next step for the PC. (</strong>Refer to the<strong> Micro PC put away </strong>section<strong>)</strong> Unchanged: <ul> Unchanged: <ul> Unchanged: <li><strong>Scrap</strong>: Unchanged: <li><strong>Scrap</strong>: Unchanged: <ul> Unchanged: <ul> Unchanged: <li>Remove the RAM and storage, then initial on the Tech 1 field.</li> Unchanged: <li>Remove the RAM and storage, then initial on the Tech 1 field.</li> Unchanged: <li>Remove the CPU, then put the CPU in the CPU tray.</li> Unchanged: <li>Remove the CPU, then put the CPU in the CPU tray.</li> Unchanged: <li>Set it aside and accumulate until finished with all PCs for the day</li> Unchanged: <li>Set it aside and accumulate until finished with all PCs for the day</li> Unchanged: <li>Call a second person to verify the PC is good for scrap. The second person will be initialed on the Tech 2 field.</li> Unchanged: <li>Call a second person to verify the PC is good for scrap. The second person will be initialed on the Tech 2 field.</li> Unchanged: <li>Put away the scrap PCs by the end of the day.</li> Unchanged: <li>Put away the scrap PCs by the end of the day.</li> Unchanged: </ul> Unchanged: </ul> Unchanged: </li> Unchanged: </li> Unchanged: <li><strong>Need to set up for wiping</strong>: Unchanged: <li><strong>Need to set up for wiping</strong>: Unchanged: <ul> Unchanged: <ul> Unchanged: <li><strong>i series 6th Gen i-series or dual core:</strong> Remove M.2 NVME drive. Other types of hard drives leave AS-IS. Make sure RAM is 2GB or more.</li> Unchanged: <li><strong>i series 6th Gen i-series or dual core:</strong> Remove M.2 NVME drive. Other types of hard drives leave AS-IS. Make sure RAM is 2GB or more.</li> Unchanged: <li><strong>i series 7th gen and newer or AMD Ryzen:</strong> make sure all PCs are included with hard drives and RAM. Make sure to remove the asset tag from the hard drive if you add a hard drive to a PC.</li> Unchanged: <li><strong>i series 7th gen and newer or AMD Ryzen:</strong> make sure all PCs are included with hard drives and RAM. Make sure to remove the asset tag from the hard drive if you add a hard drive to a PC.</li> Unchanged: </ul> Unchanged: </ul> Unchanged: </li> Unchanged: </li> Unchanged: </ul> Unchanged: </ul> Unchanged: </li> Unchanged: </li> Unchanged: </ul> Unchanged: </ul> Unchanged: <hr /> Unchanged: <hr /> Unchanged: <h2><strong>Stage #2: Wiping Tech: Set up PCs for wiping</strong></h2> Unchanged: <h2><strong>Stage #2: Wiping Tech: Set up PCs for wiping</strong></h2> Unchanged: <strong>Most PCs will be erased through PXE boot.</strong> Unchanged: <strong>Most PCs will be erased through PXE boot.</strong> Unchanged: <strong>Some PCs can not boot to PXE for some reason and then need to use the Killdisk USB drive to erase the storage. </strong> Unchanged: <strong>Some PCs can not boot to PXE for some reason and then need to use the Killdisk USB drive to erase the storage. </strong> Unchanged: <strong>While going through the steps for wiping, mark the label accordingly. </strong> Unchanged: <strong>While going through the steps for wiping, mark the label accordingly. </strong> Unchanged: When you finish setting up one PC, set up the next one until the bench is filled out. Unchanged: When you finish setting up one PC, set up the next one until the bench is filled out. Unchanged: <h3><strong>Wipe through PXE</strong></h3> Unchanged: <h3><strong>Wipe through PXE</strong></h3> Unchanged: <strong>Connect the PC to the power supply, Video cable, keyboard, mouse, and Ethernet cable.</strong> Unchanged: <strong>Connect the PC to the power supply, Video cable, keyboard, mouse, and Ethernet cable.</strong> Unchanged: <ul> Unchanged: <ul> Unchanged: <li>Use the OEM brand AC adapter for the PC.</li> Unchanged: <li>Use the OEM brand AC adapter for the PC.</li> Unchanged: <li>If the PC has a bad Ethernet port, use an Ethernet dongle to connect to the Ethernet cable.</li> Unchanged: <li>If the PC has a bad Ethernet port, use an Ethernet dongle to connect to the Ethernet cable.</li> Unchanged: </ul> Unchanged: </ul> Unchanged: <strong>Based on the PC's power condition, determine the next step for the PC.</strong> Unchanged: <strong>Based on the PC's power condition, determine the next step for the PC.</strong> Unchanged: <ul> Unchanged: <ul> Unchanged: <li style="list-style-type: none;"> Unchanged: <li style="list-style-type: none;"> Unchanged: <ul> Unchanged: <ul> Unchanged: <li><strong>Scrap</strong>: Unchanged: <li><strong>Scrap</strong>: Unchanged: <ul> Unchanged: <ul> Unchanged: <li>Remove the RAM and storage, then initial on the Tech 1 field.</li> Unchanged: <li>Remove the RAM and storage, then initial on the Tech 1 field.</li> Unchanged: <li>Set it aside and accumulate until finished with all PCs for the day</li> Unchanged: <li>Set it aside and accumulate until finished with all PCs for the day</li> Unchanged: <li>Call a second person to verify the PC is good for scrap. The second person will be initialed on the Tech 2 field.</li> Unchanged: <li>Call a second person to verify the PC is good for scrap. The second person will be initialed on the Tech 2 field.</li> Unchanged: <li>Put away the scrap PCs by the end of the day.</li> Unchanged: <li>Put away the scrap PCs by the end of the day.</li> Unchanged: </ul> Unchanged: </ul> Unchanged: </li> Unchanged: </li> Unchanged: <li><strong>Good to set up for wiping</strong>: Unchanged: <li><strong>Good to set up for wiping</strong>: Unchanged: <ul> Unchanged: <ul> Unchanged: <li><strong>i series 6th Gen and older or dual-core PCs</strong></li> Unchanged: <li><strong>i series 6th Gen and older or dual-core PCs</strong></li> Unchanged: <li><strong>i series 7th gen and newer or AMD Ryzen</strong></li> Unchanged: <li><strong>i series 7th gen and newer or AMD Ryzen</strong></li> Unchanged: </ul> Unchanged: </ul> Unchanged: </li> Unchanged: </li> Unchanged: </ul> Unchanged: </ul> Unchanged: </li> Unchanged: </li> Unchanged: </ul> Unchanged: </ul> Unchanged: <strong>Power on the PC, then enter the BIOS settings.</strong> Unchanged: <strong>Power on the PC, then enter the BIOS settings.</strong> Unchanged: <ul> Unchanged: <ul> Unchanged: <li>Common Key for entering the BIOS setup. Unchanged: <li>Common Key for entering the BIOS setup. Unchanged: <ul> Unchanged: <ul> Unchanged: <li>Dell: F2</li> Unchanged: <li>Dell: F2</li> Unchanged: <li>Lenovo: Unchanged: <li>Lenovo: Unchanged: <ul> Unchanged: <ul> Unchanged: <li>F1</li> Unchanged: <li>F1</li> Unchanged: <li>Enter then F1</li> Unchanged: <li>Enter then F1</li> Unchanged: <li>F2</li> Unchanged: <li>F2</li> Unchanged: </ul> Unchanged: </ul> Unchanged: </li> Unchanged: </li> Unchanged: <li>HP: F10 or Esc then F10</li> Unchanged: <li>HP: F10 or Esc then F10</li> Unchanged: </ul> Unchanged: </ul> Unchanged: </li> Unchanged: </li> Unchanged: </ul> Unchanged: </ul> Unchanged: <strong>While booting, check for a splash screen(Owner tag, Asset tag, or Custom logo). Only the Dell splash screen can be removed or replaced.</strong> Unchanged: <strong>While booting, check for a splash screen(Owner tag, Asset tag, or Custom logo). Only the Dell splash screen can be removed or replaced.</strong> Unchanged: <strong>Refer to:</strong> Unchanged: <strong>Refer to:</strong> Unchanged: <ul> Unchanged: <ul> Unchanged: <li><strong><a href="https://www.dell.com/support/kbdoc/en-us/000129832/how-to-reset-a-custom-bios-splash-screen-to-the-dell-splash-screen" target="_blank" rel="noopener">How to reset a custom BIOS Splash screen to the Dell Splash Screen</a></strong></li> Unchanged: <li><strong><a href="https://www.dell.com/support/kbdoc/en-us/000129832/how-to-reset-a-custom-bios-splash-screen-to-the-dell-splash-screen" target="_blank" rel="noopener">How to reset a custom BIOS Splash screen to the Dell Splash Screen</a></strong></li> Unchanged: <li><strong><a href="https://xworxapp.wpenginepowered.com/?p=11884" target="_blank" rel="noopener">How to Use Dell DOS Asset Tag Utility to remove Asset tag and Owner Tag</a></strong></li> Unchanged: <li><strong><a href="https://xworxapp.wpenginepowered.com/?p=11884" target="_blank" rel="noopener">How to Use Dell DOS Asset Tag Utility to remove Asset tag and Owner Tag</a></strong></li> Unchanged: </ul> Unchanged: </ul> Unchanged: <strong>If the Splash Screen contains the customer's information(Company name or person's name, etc.) that can not be removed, the PC needs to be scrapped.</strong> Unchanged: <strong>If the Splash Screen contains the customer's information(Company name or person's name, etc.) that can not be removed, the PC needs to be scrapped.</strong> Unchanged: <strong>If you can remove the splash screen, go next. </strong> Unchanged: <strong>If you can remove the splash screen, go next. </strong> Unchanged: <strong>If the PC has a BIOS password, </strong> Unchanged: <strong>If the PC has a BIOS password, </strong> Unchanged: <ul> Unchanged: <ul> Unchanged: <li><strong>Use the <a href="https://beta.bios-pw.org/" target="_blank" rel="noopener">BIOS Master Password Generator</a> to generate a master password to unlock the BIOS.</strong></li> Unchanged: <li><strong>Use the <a href="https://beta.bios-pw.org/" target="_blank" rel="noopener">BIOS Master Password Generator</a> to generate a master password to unlock the BIOS.</strong></li> Unchanged: <li><strong>Find the PWSD jumper to reset the BIOS password.</strong></li> Unchanged: <li><strong>Find the PWSD jumper to reset the BIOS password.</strong></li> Unchanged: <li><a href="https://xworxapp.wpenginepowered.com/wp-content/uploads/2025/04/IMG_1466.jpg"><img class="alignnone size-medium wp-image-12086" src="https://xworxapp.wpenginepowered.com/wp-content/uploads/2025/04/IMG_1466-300x225.jpg" alt="" width="300" height="225" /></a></li> Unchanged: <li><a href="https://xworxapp.wpenginepowered.com/wp-content/uploads/2025/04/IMG_1466.jpg"><img class="alignnone size-medium wp-image-12086" src="https://xworxapp.wpenginepowered.com/wp-content/uploads/2025/04/IMG_1466-300x225.jpg" alt="" width="300" height="225" /></a></li> Unchanged: </ul> Unchanged: </ul> Unchanged: Example video for Lenovo micro PC. Use Google to learn what pins to use for your particular machine: Unchanged: Example video for Lenovo micro PC. Use Google to learn what pins to use for your particular machine: Unchanged: https://www.youtube.com/watch?v=wqRjWNAcicQ Unchanged: https://www.youtube.com/watch?v=wqRjWNAcicQ Unchanged: <strong>If the BIOS password can not be removed, refer to <a href="https://xworxapp.wpenginepowered.com/?p=11851" target="_blank" rel="noopener">How to bypass BIOS lock for booting to USB drive</a></strong> Unchanged: <strong>If the BIOS password can not be removed, refer to <a href="https://xworxapp.wpenginepowered.com/?p=11851" target="_blank" rel="noopener">How to bypass BIOS lock for booting to USB drive</a></strong> Unchanged: <strong>I</strong><strong>f the BIOS password is removed or the BIOS is not locked, go to the next step.</strong> Unchanged: <strong>I</strong><strong>f the BIOS password is removed or the BIOS is not locked, go to the next step.</strong> Unchanged: <strong>In the BIOS, locate the serial number, and compare it with the label to see if it matches. Record the serial number if the serial section on the label is blank.</strong> Unchanged: <strong>In the BIOS, locate the serial number, and compare it with the label to see if it matches. Record the serial number if the serial section on the label is blank.</strong> Unchanged: <strong>In the BIOS settings. Find the reset option. Reset the BIOS to Factory default or BIOS default. (This will eliminate some issues caused by the wrong BIOS setting.) </strong> Unchanged: <strong>In the BIOS settings. Find the reset option. Reset the BIOS to Factory default or BIOS default. (This will eliminate some issues caused by the wrong BIOS setting.) </strong> Unchanged: <a href="https://xworxapp.wpenginepowered.com/wp-content/uploads/2025/04/IMG_1468.jpg"><img class="alignnone size-medium wp-image-12087" src="https://xworxapp.wpenginepowered.com/wp-content/uploads/2025/04/IMG_1468-300x169.jpg" alt="" width="300" height="169" /></a> Unchanged: <a href="https://xworxapp.wpenginepowered.com/wp-content/uploads/2025/04/IMG_1468.jpg"><img class="alignnone size-medium wp-image-12087" src="https://xworxapp.wpenginepowered.com/wp-content/uploads/2025/04/IMG_1468-300x169.jpg" alt="" width="300" height="169" /></a> Unchanged: <strong>Reboot the PC and re-enter the BIOS settings.</strong> Unchanged: <strong>Reboot the PC and re-enter the BIOS settings.</strong> Unchanged: <strong>Disable Secure Boot. (With Secure Boot on, the PXE boot will not work.)</strong> Unchanged: <strong>Disable Secure Boot. (With Secure Boot on, the PXE boot will not work.)</strong> Unchanged: <a href="https://xworxapp.wpenginepowered.com/wp-content/uploads/2025/04/IMG_1470.jpg"><img class="alignnone size-medium wp-image-12088" src="https://xworxapp.wpenginepowered.com/wp-content/uploads/2025/04/IMG_1470-300x169.jpg" alt="" width="300" height="169" /></a> Unchanged: <a href="https://xworxapp.wpenginepowered.com/wp-content/uploads/2025/04/IMG_1470.jpg"><img class="alignnone size-medium wp-image-12088" src="https://xworxapp.wpenginepowered.com/wp-content/uploads/2025/04/IMG_1470-300x169.jpg" alt="" width="300" height="169" /></a> Unchanged: <strong>Enable Network boot or PXE boot in BIOS (IPv4). </strong> Unchanged: <strong>Enable Network boot or PXE boot in BIOS (IPv4). </strong> Unchanged: <strong>Change network boot to 1st boot in the boot order.</strong> Unchanged: <strong>Change network boot to 1st boot in the boot order.</strong> Unchanged: <a href="https://xworxapp.wpenginepowered.com/wp-content/uploads/2025/04/IMG_1471.jpg"><img class="alignnone size-medium wp-image-12089" src="https://xworxapp.wpenginepowered.com/wp-content/uploads/2025/04/IMG_1471-300x169.jpg" alt="" width="300" height="169" /></a> Unchanged: <a href="https://xworxapp.wpenginepowered.com/wp-content/uploads/2025/04/IMG_1471.jpg"><img class="alignnone size-medium wp-image-12089" src="https://xworxapp.wpenginepowered.com/wp-content/uploads/2025/04/IMG_1471-300x169.jpg" alt="" width="300" height="169" /></a> Unchanged: <strong>Change the SATA setting from RAID to AHCI for the Dell PC.</strong> Unchanged: <strong>Change the SATA setting from RAID to AHCI for the Dell PC.</strong> Unchanged: <strong>Disable Intel VMD and adjust SATA settings to AHCI for 11th Gen or newer PCs.</strong> Unchanged: <strong>Disable Intel VMD and adjust SATA settings to AHCI for 11th Gen or newer PCs.</strong> Unchanged: <strong>Save settings and reboot the PC.</strong> Unchanged: <strong>Save settings and reboot the PC.</strong> Unchanged: If everything is working correctly, the PC will PXE boot; this process can take a few minutes. Unchanged: If everything is working correctly, the PC will PXE boot; this process can take a few minutes. Unchanged: The first time the PXE menu is loaded on the PC, it will display “Host is NOT registered.” Unchanged: The first time the PXE menu is loaded on the PC, it will display “Host is NOT registered.” Unchanged: <a href="https://xworxapp.wpenginepowered.com/wp-content/uploads/2022/03/IMG_1475.jpg"><img class="alignnone size-medium wp-image-8132" src="https://xworxapp.wpenginepowered.com/wp-content/uploads/2022/03/IMG_1475-300x169.jpg" alt="" width="300" height="169" /></a> Unchanged: <a href="https://xworxapp.wpenginepowered.com/wp-content/uploads/2022/03/IMG_1475.jpg"><img class="alignnone size-medium wp-image-8132" src="https://xworxapp.wpenginepowered.com/wp-content/uploads/2022/03/IMG_1475-300x169.jpg" alt="" width="300" height="169" /></a> Unchanged: If the PC uses an Ethernet dongle to PXE boot, it might display (Host is registered as XXXXXXXXXX), just go to the step to load "Killdisk Active Boot Disk". Unchanged: If the PC uses an Ethernet dongle to PXE boot, it might display (Host is registered as XXXXXXXXXX), just go to the step to load "Killdisk Active Boot Disk". Unchanged: <strong><span style="color: #ff0000;">If a PC does not have storage, plug an empty USB drive into the PC. The PC will give a registration error if there is no storage media detected.</span></strong> Unchanged: <strong><span style="color: #ff0000;">If a PC does not have storage, plug an empty USB drive into the PC. The PC will give a registration error if there is no storage media detected.</span></strong> Unchanged: Select “Quick Registration and Inventory” from the menu. (Make sure the PC has a hard drive or USB drive.) Unchanged: Select “Quick Registration and Inventory” from the menu. (Make sure the PC has a hard drive or USB drive.) Unchanged: After letting the program run, the PC will be rebooted to the PXE screen again. This time will display "Host is registered as XXXXXXXXXX". (Check the section on the label) Unchanged: After letting the program run, the PC will be rebooted to the PXE screen again. This time will display "Host is registered as XXXXXXXXXX". (Check the section on the label) Unchanged: Then choose “Killdisk Active Boot Disk” Unchanged: Then choose “Killdisk Active Boot Disk” Unchanged: <a href="https://xworxapp.wpenginepowered.com/wp-content/uploads/2022/03/IMG_1476.jpg"><img class="alignnone size-medium wp-image-8133" src="https://xworxapp.wpenginepowered.com/wp-content/uploads/2022/03/IMG_1476-300x169.jpg" alt="" width="300" height="169" /></a> Unchanged: <a href="https://xworxapp.wpenginepowered.com/wp-content/uploads/2022/03/IMG_1476.jpg"><img class="alignnone size-medium wp-image-8133" src="https://xworxapp.wpenginepowered.com/wp-content/uploads/2022/03/IMG_1476-300x169.jpg" alt="" width="300" height="169" /></a> Unchanged: After KillDisk is loaded, click the NIC Logo in the system tray, then click the Initialize Network button. Unchanged: After KillDisk is loaded, click the NIC Logo in the system tray, then click the Initialize Network button. Unchanged: <a href="https://xworxapp.wpenginepowered.com/wp-content/uploads/2022/03/IMG_1478.jpg"><img class="alignnone size-medium wp-image-8135" src="https://xworxapp.wpenginepowered.com/wp-content/uploads/2022/03/IMG_1478-300x169.jpg" alt="" width="300" height="169" /></a> Unchanged: <a href="https://xworxapp.wpenginepowered.com/wp-content/uploads/2022/03/IMG_1478.jpg"><img class="alignnone size-medium wp-image-8135" src="https://xworxapp.wpenginepowered.com/wp-content/uploads/2022/03/IMG_1478-300x169.jpg" alt="" width="300" height="169" /></a> Unchanged: After initializing the network, Unchanged: After initializing the network, Unchanged: Open the <span lang="zxx"><u>Active@KillDisk</u></span> Unchanged: Open the <span lang="zxx"><u>Active@KillDisk</u></span> Unchanged: The system may give you an error about Active@KillDisk already being open. If this error pops up, press Alt + Tab and switch to Active@KillDisk. Unchanged: The system may give you an error about Active@KillDisk already being open. If this error pops up, press Alt + Tab and switch to Active@KillDisk. Unchanged: On the bottom right of the opened window, there is a network status icon. The green check mark means the PC is online. If the network status icon has a red x on it, that means the PC is offline. Unchanged: On the bottom right of the opened window, there is a network status icon. The green check mark means the PC is online. If the network status icon has a red x on it, that means the PC is offline. Unchanged: <a href="https://xworxapp.wpenginepowered.com/wp-content/uploads/2022/03/IMG_2267.jpg"><img class="alignnone size-medium wp-image-9190" src="https://xworxapp.wpenginepowered.com/wp-content/uploads/2022/03/IMG_2267-300x169.jpg" alt="" width="300" height="169" /></a><a href="https://xworxapp.wpenginepowered.com/wp-content/uploads/2022/03/IMG_2265.jpg"><img class="alignnone size-medium wp-image-9189" src="https://xworxapp.wpenginepowered.com/wp-content/uploads/2022/03/IMG_2265-300x169.jpg" alt="" width="300" height="169" /></a> Unchanged: <a href="https://xworxapp.wpenginepowered.com/wp-content/uploads/2022/03/IMG_2267.jpg"><img class="alignnone size-medium wp-image-9190" src="https://xworxapp.wpenginepowered.com/wp-content/uploads/2022/03/IMG_2267-300x169.jpg" alt="" width="300" height="169" /></a><a href="https://xworxapp.wpenginepowered.com/wp-content/uploads/2022/03/IMG_2265.jpg"><img class="alignnone size-medium wp-image-9189" src="https://xworxapp.wpenginepowered.com/wp-content/uploads/2022/03/IMG_2265-300x169.jpg" alt="" width="300" height="169" /></a> Unchanged: Then choose all Hard Drives that need to be wiped and click the “ERASE DISK” button. (Ctrl+clicked the drives that need to be wiped.) Unchanged: Then choose all Hard Drives that need to be wiped and click the “ERASE DISK” button. (Ctrl+clicked the drives that need to be wiped.) Unchanged: <strong>Wipe an empty USB drive if there is no storage in the PC.</strong> Unchanged: <strong>Wipe an empty USB drive if there is no storage in the PC.</strong> Unchanged: For the offline PC, expand the Erase Certificate option, choose Save to PDF, and change the save location to X:\ Unchanged: For the offline PC, expand the Erase Certificate option, choose Save to PDF, and change the save location to X:\ Unchanged: <a href="https://xworxapp.wpenginepowered.com/wp-content/uploads/2022/03/snap_153039.jpg"><img class="alignnone size-medium wp-image-11840" src="https://xworxapp.wpenginepowered.com/wp-content/uploads/2022/03/snap_153039-300x164.jpg" alt="" width="300" height="164" /></a> Unchanged: <a href="https://xworxapp.wpenginepowered.com/wp-content/uploads/2022/03/snap_153039.jpg"><img class="alignnone size-medium wp-image-11840" src="https://xworxapp.wpenginepowered.com/wp-content/uploads/2022/03/snap_153039-300x164.jpg" alt="" width="300" height="164" /></a> Unchanged: In the Disk Erase tab, make sure the Erase method is US DoD 5220.22-M 3 Pass. Verify is 100%, check the Initialize disk after erase, check the Write fingerprint to the first sector, and click Start. Unchanged: In the Disk Erase tab, make sure the Erase method is US DoD 5220.22-M 3 Pass. Verify is 100%, check the Initialize disk after erase, check the Write fingerprint to the first sector, and click Start. Unchanged: <a href="https://xworxapp.wpenginepowered.com/wp-content/uploads/2022/03/IMG_1485.jpg"><img class="alignnone size-medium wp-image-8136" src="https://xworxapp.wpenginepowered.com/wp-content/uploads/2022/03/IMG_1485-300x169.jpg" alt="" width="300" height="169" /></a> Unchanged: <a href="https://xworxapp.wpenginepowered.com/wp-content/uploads/2022/03/IMG_1485.jpg"><img class="alignnone size-medium wp-image-8136" src="https://xworxapp.wpenginepowered.com/wp-content/uploads/2022/03/IMG_1485-300x169.jpg" alt="" width="300" height="169" /></a> Unchanged: <hr /> Unchanged: <hr /> Unchanged: <h2><strong>Stage #3: Erase Certificate Matching</strong></h2> Unchanged: <h2><strong>Stage #3: Erase Certificate Matching</strong></h2> Unchanged: <h3><strong>The PC was wiped through the PXE Killdisk</strong></h3> Unchanged: <h3><strong>The PC was wiped through the PXE Killdisk</strong></h3> Unchanged: Collect Erase Certificates from the Printer. (Next day) Unchanged: Collect Erase Certificates from the Printer. (Next day) Unchanged: The printer is located in the PC tech area. Unchanged: The printer is located in the PC tech area. Unchanged: <a href="https://xworxapp.wpenginepowered.com/wp-content/uploads/2022/03/IMG_1016.jpg"><img class="alignnone wp-image-11841 size-medium" src="https://xworxapp.wpenginepowered.com/wp-content/uploads/2022/03/IMG_1016-300x266.jpg" alt="" width="300" height="266" /></a> Unchanged: <a href="https://xworxapp.wpenginepowered.com/wp-content/uploads/2022/03/IMG_1016.jpg"><img class="alignnone wp-image-11841 size-medium" src="https://xworxapp.wpenginepowered.com/wp-content/uploads/2022/03/IMG_1016-300x266.jpg" alt="" width="300" height="266" /></a> Deleted: <h3><strong>For the offline PC, you need to print the certificate manually.</strong></h3> Deleted: Plug a<strong> formatted USB drive </strong>into the PC. Added: <h3><span style="text-decoration: line-through;"><strong>For the offline PC, you need to print the certificate manually.</strong></span></h3> Added: <span style="text-decoration: line-through;">Plug a<strong> formatted USB drive </strong>into the PC.</span> Deleted: On the wiping result window, click the <strong>Print</strong> button, and the <strong>Print Preview</strong> window will open. Added: <span style="text-decoration: line-through;">On the wiping result window, click the <strong>Print</strong> button, and the <strong>Print Preview</strong> window will open.</span> Deleted: <a href="https://xworxapp.wpenginepowered.com/wp-content/uploads/2022/03/Untitled.jpg" data-lb-type="grouped-post"><img class="alignnone size-medium wp-image-11844" src="https://xworxapp.wpenginepowered.com/wp-content/uploads/2022/03/Untitled-300x225.jpg" alt="" width="300" height="225" /></a> Added: <span style="text-decoration: line-through;"><a href="https://xworxapp.wpenginepowered.com/wp-content/uploads/2022/03/Untitled.jpg" data-lb-type="grouped-post"><img class="alignnone size-medium wp-image-11844" src="https://xworxapp.wpenginepowered.com/wp-content/uploads/2022/03/Untitled-300x225.jpg" alt="" width="300" height="225" /></a></span> Deleted: Click the print icon on the Print Preview window, then save the <strong>Erase Certificate </strong>PDF file to the USB drive. Added: <span style="text-decoration: line-through;">Click the print icon on the Print Preview window, then save the <strong>Erase Certificate </strong>PDF file to the USB drive.</span> Deleted: <a href="https://xworxapp.wpenginepowered.com/wp-content/uploads/2022/03/IMG_1018.jpg" data-lb-type="grouped-post"><img class="alignnone size-medium wp-image-11845" src="https://xworxapp.wpenginepowered.com/wp-content/uploads/2022/03/IMG_1018-300x225.jpg" alt="" width="300" height="225" /></a> Added: <span style="text-decoration: line-through;"><a href="https://xworxapp.wpenginepowered.com/wp-content/uploads/2022/03/IMG_1018.jpg" data-lb-type="grouped-post"><img class="alignnone size-medium wp-image-11845" src="https://xworxapp.wpenginepowered.com/wp-content/uploads/2022/03/IMG_1018-300x225.jpg" alt="" width="300" height="225" /></a></span> Deleted: Unplug the <strong>formatted USB</strong> and go to the next PC that needs to print the <strong>Erase Certificate </strong>manually. Deleted: After collecting all PDF files, go to a workstation to print out the <strong>Erase Certificate.</strong> Added: <span style="text-decoration: line-through;">Unplug the <strong>formatted USB</strong> and go to the next PC that needs to print the <strong>Erase Certificate </strong>manually.</span> Added: <span style="text-decoration: line-through;">After collecting all PDF files, go to a workstation to print out the <strong>Erase Certificate.</strong></span> Unchanged: <h3><strong>Match the Erase Certificate with the wiped PC.</strong></h3> Unchanged: <h3><strong>Match the Erase Certificate with the wiped PC.</strong></h3> Unchanged: Match the PC serial number and put the certificate with the PC. The certificate will list the PC's serial number as “BIOS Serial.” Unchanged: Match the PC serial number and put the certificate with the PC. The certificate will list the PC's serial number as “BIOS Serial.” Unchanged: Use painter's tape to tape the folded certificate at the bottom of the PC. Display the Hardware Information for QC. Unchanged: Use painter's tape to tape the folded certificate at the bottom of the PC. Display the Hardware Information for QC. Unchanged: <a href="https://xworxapp.wpenginepowered.com/wp-content/uploads/2022/03/Screenshot-2022-03-09-085300-2.jpg"><img class="alignnone wp-image-11846 size-medium" src="https://xworxapp.wpenginepowered.com/wp-content/uploads/2022/03/Screenshot-2022-03-09-085300-2-216x300.jpg" alt="" width="216" height="300" /></a><a href="https://xworxapp.wpenginepowered.com/wp-content/uploads/2025/04/IMG_1473.jpg"><img class="alignnone size-medium wp-image-12091" src="https://xworxapp.wpenginepowered.com/wp-content/uploads/2025/04/IMG_1473-300x169.jpg" alt="" width="300" height="169" /></a> Unchanged: <a href="https://xworxapp.wpenginepowered.com/wp-content/uploads/2022/03/Screenshot-2022-03-09-085300-2.jpg"><img class="alignnone wp-image-11846 size-medium" src="https://xworxapp.wpenginepowered.com/wp-content/uploads/2022/03/Screenshot-2022-03-09-085300-2-216x300.jpg" alt="" width="216" height="300" /></a><a href="https://xworxapp.wpenginepowered.com/wp-content/uploads/2025/04/IMG_1473.jpg"><img class="alignnone size-medium wp-image-12091" src="https://xworxapp.wpenginepowered.com/wp-content/uploads/2025/04/IMG_1473-300x169.jpg" alt="" width="300" height="169" /></a> Unchanged: <span style="color: #ff0000;"><strong>Do not remove the wiped USB drive.</strong></span> Unchanged: <span style="color: #ff0000;"><strong>Do not remove the wiped USB drive.</strong></span> Unchanged: Mark the label based on the sanitizing status. Unchanged: Mark the label based on the sanitizing status. Unchanged: Record any defects that developed overnight, then initial on the Tech 1 field. Unchanged: Record any defects that developed overnight, then initial on the Tech 1 field. Unchanged: If wiping fails: Unchanged: If wiping fails: Unchanged: <ul> Unchanged: <ul> Unchanged: <li><strong>6th Gen i-series CPU:</strong> remove the hard drive, make the hard drive not included on the label, and mark off the hard drive information from the Erase Certificate.</li> Unchanged: <li><strong>6th Gen i-series CPU:</strong> remove the hard drive, make the hard drive not included on the label, and mark off the hard drive information from the Erase Certificate.</li> Unchanged: <li><strong>7th Gen i-series or newer and AMD Ryzen CPU:</strong> replace the hard drive and wipe the new drive.</li> Unchanged: <li><strong>7th Gen i-series or newer and AMD Ryzen CPU:</strong> replace the hard drive and wipe the new drive.</li> Unchanged: </ul> Unchanged: </ul> Unchanged: <h3><a href="https://xworxapp.wpenginepowered.com/wp-content/uploads/2022/03/2024-09-09-10_05_33-Laptop-Wiping_-Laptop-PEX-Boot-and-Registration.-–-Process-Database.jpg"><img class="alignnone size-medium wp-image-11716" src="https://xworxapp.wpenginepowered.com/wp-content/uploads/2022/03/2024-09-09-10_05_33-Laptop-Wiping_-Laptop-PEX-Boot-and-Registration.-–-Process-Database-151x300.jpg" alt="" width="151" height="300" /></a></h3> Unchanged: <h3><a href="https://xworxapp.wpenginepowered.com/wp-content/uploads/2022/03/2024-09-09-10_05_33-Laptop-Wiping_-Laptop-PEX-Boot-and-Registration.-–-Process-Database.jpg"><img class="alignnone size-medium wp-image-11716" src="https://xworxapp.wpenginepowered.com/wp-content/uploads/2022/03/2024-09-09-10_05_33-Laptop-Wiping_-Laptop-PEX-Boot-and-Registration.-–-Process-Database-151x300.jpg" alt="" width="151" height="300" /></a></h3> Unchanged: If the certificate did not print out for any reason, notify your supervisor. Unchanged: If the certificate did not print out for any reason, notify your supervisor. Unchanged: <hr /> Unchanged: <hr /> Unchanged: <h2><strong>Stage #4: PC wipe Quality Checker</strong></h2> Unchanged: <h2><strong>Stage #4: PC wipe Quality Checker</strong></h2> Unchanged: <strong>Check the PC's physical condition and compare it with the label.</strong> Unchanged: <strong>Check the PC's physical condition and compare it with the label.</strong> Unchanged: <strong>Double-check all sections on the label with the PC, and make sure all sections are checked and correct.</strong> Unchanged: <strong>Double-check all sections on the label with the PC, and make sure all sections are checked and correct.</strong> Unchanged: <strong>After QC the PCs,</strong> Unchanged: <strong>After QC the PCs,</strong> Unchanged: <ul> Unchanged: <ul> Unchanged: <li><strong>6th Gen i-series CPU:</strong> <strong>disconnect all the cables and the USB drive.</strong></li> Unchanged: <li><strong>6th Gen i-series CPU:</strong> <strong>disconnect all the cables and the USB drive.</strong></li> Unchanged: <li><strong>7th Gen i-series or newer and AMD Ryzen CPU:</strong> Unchanged: <li><strong>7th Gen i-series or newer and AMD Ryzen CPU:</strong> Unchanged: <ul> Unchanged: <ul> Unchanged: <li><strong>Check the Autopilot status. Refer to <a href="https://xworxapp.wpenginepowered.com/?p=11800" target="_blank" rel="noopener">How to check Autopilot status for a Windows machine</a></strong></li> Unchanged: <li><strong>Check the Autopilot status. Refer to <a href="https://xworxapp.wpenginepowered.com/?p=11800" target="_blank" rel="noopener">How to check Autopilot status for a Windows machine</a></strong></li> Unchanged: <li><strong> Mark the Label based on the Autopilot status. Circle the OS version on the label.</strong></li> Unchanged: <li><strong> Mark the Label based on the Autopilot status. Circle the OS version on the label.</strong></li> Unchanged: <li><strong>Disconnect all cables.</strong></li> Unchanged: <li><strong>Disconnect all cables.</strong></li> Unchanged: </ul> Unchanged: </ul> Unchanged: </li> Unchanged: </li> Unchanged: </ul> Unchanged: </ul> Unchanged: <hr /> Unchanged: <hr /> Unchanged: <h2><strong>Stage #5: Micro PC put away</strong></h2> Unchanged: <h2><strong>Stage #5: Micro PC put away</strong></h2> Unchanged: Check the label for the PC's condition Unchanged: Check the label for the PC's condition Unchanged: Based on the PC's condition, sort the PCs. Unchanged: Based on the PC's condition, sort the PCs. Unchanged: Put away the PC in the destination vessel. Unchanged: Put away the PC in the destination vessel. Unchanged: <ul> Unchanged: <ul> Unchanged: <li><strong>PC that wipes successfully with no issue(Normal wear and tear allowed), put away: Wiped Micro PCs Unchanged: <li><strong>PC that wipes successfully with no issue(Normal wear and tear allowed), put away: Wiped Micro PCs Unchanged: </strong></li> Unchanged: </strong></li> Unchanged: <li><strong>PC Scrap: (anyone that applies) put away: #1009 SCRAP: PC COMPUTER (Remove RAM, and storage for all PCs)(Remove CPU for 6th Gen or newer CPU PCs) </strong> Unchanged: <li><strong>PC Scrap: (anyone that applies) put away: #1009 SCRAP: PC COMPUTER (Remove RAM, and storage for all PCs)(Remove CPU for 6th Gen or newer CPU PCs) </strong> Unchanged: <ul> Unchanged: <ul> Unchanged: <li><strong>PC that has a power issue. (Include does not power on, Power on no post, power on then off, or random shut off.)</strong></li> Unchanged: <li><strong>PC that has a power issue. (Include does not power on, Power on no post, power on then off, or random shut off.)</strong></li> Unchanged: <li><strong>The s</strong><strong>plash screen cannot be removed.</strong></li> Unchanged: <li><strong>The s</strong><strong>plash screen cannot be removed.</strong></li> Unchanged: <li><strong>Damaged motherboard.</strong></li> Unchanged: <li><strong>Damaged motherboard.</strong></li> Unchanged: <li><strong>Autopilot is locked or unable to check Autopilot status. (7th Gen or newer I series or AMD Ryzen CPUs.)</strong></li> Unchanged: <li><strong>Autopilot is locked or unable to check Autopilot status. (7th Gen or newer I series or AMD Ryzen CPUs.)</strong></li> Unchanged: <li><strong>More than 1 damaged port</strong></li> Unchanged: <li><strong>More than 1 damaged port</strong></li> Unchanged: </ul> Unchanged: </ul> Unchanged: </li> Unchanged: </li> Unchanged: </ul> Unchanged: </ul> Unchanged: <h2></h2> Unchanged: <h2></h2> Unchanged: Unchanged: Unchanged: <h3>Notating missing 2.5" drive caddies in micro PCs</h3> Unchanged: <h3>Notating missing 2.5" drive caddies in micro PCs</h3> Unchanged: You may encounter newer units that have both an m.2 nvme slot and a 2.5" sata slot, however,<strong> the caddy for the sata slot is missing</strong>. Unchanged: You may encounter newer units that have both an m.2 nvme slot and a 2.5" sata slot, however,<strong> the caddy for the sata slot is missing</strong>. Unchanged: Regardless of whether it is unclear if the machine originally came with a caddy since 2.5" SSDs are less common than m.2 drives these days, <strong>we need to mention in the notes that the caddy is missing if there is a SATA slot that is unusable without a caddy</strong>. According to Paul, we do not need to be overly descriptive when describing what caddy is missing. <strong>Simply writing “missing caddy” in the notes will be sufficient.</strong> Unchanged: Regardless of whether it is unclear if the machine originally came with a caddy since 2.5" SSDs are less common than m.2 drives these days, <strong>we need to mention in the notes that the caddy is missing if there is a SATA slot that is unusable without a caddy</strong>. According to Paul, we do not need to be overly descriptive when describing what caddy is missing. <strong>Simply writing “missing caddy” in the notes will be sufficient.</strong> Unchanged: <a href="https://www.xworx.app/wp-content/uploads/2025/12/20260204_163609-text.jpg"><img class="alignnone size-medium wp-image-13035" src="https://www.xworx.app/wp-content/uploads/2025/12/20260204_163609-text-169x300.jpg" alt="" width="169" height="300" /></a> Unchanged: <a href="https://www.xworx.app/wp-content/uploads/2025/12/20260204_163609-text.jpg"><img class="alignnone size-medium wp-image-13035" src="https://www.xworx.app/wp-content/uploads/2025/12/20260204_163609-text-169x300.jpg" alt="" width="169" height="300" /></a> Unchanged: Unchanged: Unchanged: Unchanged: Unchanged: <h3>Notating missing 2.5" drive caddies in micro PCs</h3> Unchanged: <h3>Notating missing 2.5" drive caddies in micro PCs</h3> Unchanged: <strong><span style="color: #6495ed;">PC Tech Level 3: All Other PC/Server Testing Instructions</span></strong> <a href="https://www.xworx.app/?p=4984" target="_blank" rel="noopener">https://www.xworx.app/?p=4984, </a><strong><span style="color: #6495ed;">PC Tech Level 3-Micro PC Wiping: Micro/Mini/Tiny PC PXE Boot and Registrations </span></strong><a href="https://www.xworx.app/?p=12082" target="_blank" rel="noopener">https://www.xworx.app/?p=12082</a> Unchanged: <strong><span style="color: #6495ed;">PC Tech Level 3: All Other PC/Server Testing Instructions</span></strong> <a href="https://www.xworx.app/?p=4984" target="_blank" rel="noopener">https://www.xworx.app/?p=4984, </a><strong><span style="color: #6495ed;">PC Tech Level 3-Micro PC Wiping: Micro/Mini/Tiny PC PXE Boot and Registrations </span></strong><a href="https://www.xworx.app/?p=12082" target="_blank" rel="noopener">https://www.xworx.app/?p=12082</a> Unchanged: You may encounter newer units that have both an m.2 nvme slot and a 2.5" sata slot, however,<strong> the caddy for the sata slot is missing</strong>. Unchanged: You may encounter newer units that have both an m.2 nvme slot and a 2.5" sata slot, however,<strong> the caddy for the sata slot is missing</strong>. Unchanged: Regardless of whether it is unclear if the machine originally came with a caddy since 2.5" SSDs are less common than m.2 drives these days, <strong>we need to mention in the notes that the caddy is missing if there is a SATA slot that is unusable without a caddy</strong>. According to Paul, we do not need to be overly descriptive when describing what caddy is missing. <strong>Simply writing “missing caddy” in the notes will be sufficient.</strong> Unchanged: Regardless of whether it is unclear if the machine originally came with a caddy since 2.5" SSDs are less common than m.2 drives these days, <strong>we need to mention in the notes that the caddy is missing if there is a SATA slot that is unusable without a caddy</strong>. According to Paul, we do not need to be overly descriptive when describing what caddy is missing. <strong>Simply writing “missing caddy” in the notes will be sufficient.</strong> Unchanged: <a href="https://www.xworx.app/wp-content/uploads/2025/12/20260204_163609-text.jpg"><img class="alignnone size-medium wp-image-13035" src="https://www.xworx.app/wp-content/uploads/2025/12/20260204_163609-text-169x300.jpg" alt="" width="169" height="300" /></a> Unchanged: <a href="https://www.xworx.app/wp-content/uploads/2025/12/20260204_163609-text.jpg"><img class="alignnone size-medium wp-image-13035" src="https://www.xworx.app/wp-content/uploads/2025/12/20260204_163609-text-169x300.jpg" alt="" width="169" height="300" /></a> Unchanged: <h1></h1> Unchanged: <h1></h1> Unchanged: <h3>A few quick a reminders and examples for micro PCs: Unchanged: <h3>A few quick a reminders and examples for micro PCs: Unchanged: 1) Please be sure not to cover up defects with labels. Unchanged: 1) Please be sure not to cover up defects with labels. Unchanged: 2) Be sure to notate subtle dents in meshing. Unchanged: 2) Be sure to notate subtle dents in meshing. Unchanged: 3) Look out for asset tags that blend in with the other manufacturer stickers.</h3> Unchanged: 3) Look out for asset tags that blend in with the other manufacturer stickers.</h3> Unchanged: Below is a photo of a machine that has dents on the metal meshing. These dents are significant enough where they need to be notated. But also, because this is a mini PC, it tech label was placed overtop of this dents. So please be sure to be on the lookout for these types of dents in machines and whenever you identify a flaw, be careful not to place a label over it so that other team members can inspect and verify the flaws as well. Unchanged: Below is a photo of a machine that has dents on the metal meshing. These dents are significant enough where they need to be notated. But also, because this is a mini PC, it tech label was placed overtop of this dents. So please be sure to be on the lookout for these types of dents in machines and whenever you identify a flaw, be careful not to place a label over it so that other team members can inspect and verify the flaws as well. Unchanged: <a href="https://www.xworx.app/wp-content/uploads/2025/12/20260205_095435.jpg"><img class="alignnone size-medium wp-image-13036" src="https://www.xworx.app/wp-content/uploads/2025/12/20260205_095435-214x300.jpg" alt="" width="214" height="300" /></a> Unchanged: <a href="https://www.xworx.app/wp-content/uploads/2025/12/20260205_095435.jpg"><img class="alignnone size-medium wp-image-13036" src="https://www.xworx.app/wp-content/uploads/2025/12/20260205_095435-214x300.jpg" alt="" width="214" height="300" /></a> Unchanged: Also, remember that not all asset tags jump out at you and often they are placed somewhat hidden or they look a bit like other manufacturer stickers. So identify these asset tags by their company names, and also be sure to scan QR codes that do not identify themselves because we've seen asset tags that are simply unmarked QR codes that link back to the original purchaser's company website. Unchanged: Also, remember that not all asset tags jump out at you and often they are placed somewhat hidden or they look a bit like other manufacturer stickers. So identify these asset tags by their company names, and also be sure to scan QR codes that do not identify themselves because we've seen asset tags that are simply unmarked QR codes that link back to the original purchaser's company website. Unchanged: <a href="https://www.xworx.app/wp-content/uploads/2025/12/Capture1.jpg"><img class="alignnone size-medium wp-image-13037" src="https://www.xworx.app/wp-content/uploads/2025/12/Capture1-300x221.jpg" alt="" width="300" height="221" /></a> Unchanged: <a href="https://www.xworx.app/wp-content/uploads/2025/12/Capture1.jpg"><img class="alignnone size-medium wp-image-13037" src="https://www.xworx.app/wp-content/uploads/2025/12/Capture1-300x221.jpg" alt="" width="300" height="221" /></a> Unchanged: Unchanged: Unchanged: Unchanged: Unchanged: <h2>Absolute Persistence in Dells - important BIOS area to now check in every Dell machine</h2> Unchanged: <h2>Absolute Persistence in Dells - important BIOS area to now check in every Dell machine</h2> Unchanged: We've recently come across and began processing<strong> Dell laptops with Absolute Persistence activated. It is now going to require us to check for this being present and active in all the Dell laptops moving forward</strong> because it does not reveal itself until very, very late in the process where we need to leave it plugged into the ethernet for several minutes after autopilot checking before the lock-out screen activates itself. Unchanged: We've recently come across and began processing<strong> Dell laptops with Absolute Persistence activated. It is now going to require us to check for this being present and active in all the Dell laptops moving forward</strong> because it does not reveal itself until very, very late in the process where we need to leave it plugged into the ethernet for several minutes after autopilot checking before the lock-out screen activates itself. Unchanged: Please take a look at the screenshot below: Unchanged: Please take a look at the screenshot below: Unchanged: <a href="https://www.xworx.app/wp-content/uploads/2025/02/20251027_140250.jpg"><img class="alignnone size-thumbnail wp-image-12701" src="https://www.xworx.app/wp-content/uploads/2025/02/20251027_140250-150x150.jpg" alt="" width="150" height="150" /></a> Unchanged: <a href="https://www.xworx.app/wp-content/uploads/2025/02/20251027_140250.jpg"><img class="alignnone size-thumbnail wp-image-12701" src="https://www.xworx.app/wp-content/uploads/2025/02/20251027_140250-150x150.jpg" alt="" width="150" height="150" /></a> Unchanged: Note how the <strong>options for Absolute Persistence are greyed out. This means that Absolute Persistence is activated</strong>. We cannot set this device as is. Hand it off to the PC Tech Team Lead and it will be recorded and sorted away for now. Unchanged: Note how the <strong>options for Absolute Persistence are greyed out. This means that Absolute Persistence is activated</strong>. We cannot set this device as is. Hand it off to the PC Tech Team Lead and it will be recorded and sorted away for now. Unchanged: There is <strong>one extra complication:</strong> <strong>all the BIOS options will be greyed out when the system is BIOS locked</strong> so that means there will be no way to know if Absolute Persistence is active or not, and <strong>you will need to let it sit connected to the internet after autopilot checking it. Ze has asked that we let it sit overnight or at least until the lock out screen shows up</strong>. If a lock out screen does not show up by morning, it should be all clear to sell. Unchanged: There is <strong>one extra complication:</strong> <strong>all the BIOS options will be greyed out when the system is BIOS locked</strong> so that means there will be no way to know if Absolute Persistence is active or not, and <strong>you will need to let it sit connected to the internet after autopilot checking it. Ze has asked that we let it sit overnight or at least until the lock out screen shows up</strong>. If a lock out screen does not show up by morning, it should be all clear to sell. Unchanged: Unchanged: Unchanged: <h2>HPs can have Absolute Persistence. Here is where to look:</h2> Unchanged: <h2>HPs can have Absolute Persistence. Here is where to look:</h2> Unchanged: Dell and HPs do not announce if they have Absolute Persistence active when you load into the BIOS. You have to go looking for it. <strong>Be sure to look for Absolute Persistence in the BIOS/UEFI of all laptops and computers</strong>. There is no way to tell if they have their Absolute Persistence active until you specifically go looking for it. Unchanged: Dell and HPs do not announce if they have Absolute Persistence active when you load into the BIOS. You have to go looking for it. <strong>Be sure to look for Absolute Persistence in the BIOS/UEFI of all laptops and computers</strong>. There is no way to tell if they have their Absolute Persistence active until you specifically go looking for it. Unchanged: See the photo below for what it looks like in the HP UEFI. Unchanged: See the photo below for what it looks like in the HP UEFI. Unchanged: <a href="https://www.xworx.app/wp-content/uploads/2025/02/Capture-3.jpg"><img class="alignnone size-thumbnail wp-image-12783" src="https://www.xworx.app/wp-content/uploads/2025/02/Capture-3-150x150.jpg" alt="" width="150" height="150" /></a> Unchanged: <a href="https://www.xworx.app/wp-content/uploads/2025/02/Capture-3.jpg"><img class="alignnone size-thumbnail wp-image-12783" src="https://www.xworx.app/wp-content/uploads/2025/02/Capture-3-150x150.jpg" alt="" width="150" height="150" /></a> Unchanged: Unchanged: Unchanged: <h2>Do not notate on your labels any asset tags remaining on systems</h2> Unchanged: <h2>Do not notate on your labels any asset tags remaining on systems</h2> Unchanged: Depending on what an asset tag says, we may choose to sell systems with asset tags that are non-removable assuming that the asset tag in no way implies or reveals who was the original owner.<strong> For the reason of trying to not draw any attention to something the previous owner wrote in the system, please do not mention the asset tags on labels</strong>. As an important reminder, the <strong>PC Tech Team Lead or any other supervisor needs to review any asset tags being intentionally left in machines</strong>, even if you deem it indecipherable yourself. Unchanged: Depending on what an asset tag says, we may choose to sell systems with asset tags that are non-removable assuming that the asset tag in no way implies or reveals who was the original owner.<strong> For the reason of trying to not draw any attention to something the previous owner wrote in the system, please do not mention the asset tags on labels</strong>. As an important reminder, the <strong>PC Tech Team Lead or any other supervisor needs to review any asset tags being intentionally left in machines</strong>, even if you deem it indecipherable yourself. Unchanged: Unchanged: Unchanged: <h2>New type of asset tag to look out for! Will require a closer look at labels across all machines.</h2> Unchanged: <h2>New type of asset tag to look out for! Will require a closer look at labels across all machines.</h2> Unchanged: An <strong>asset tag</strong> was recently discovered <strong>within a manufacturer label itself</strong>. We will need to begin visually scanning over manufacturer labels to look out for labels in this in the future. If you see a manufacture label like this, the <strong>preferred solution to keep the manufacturer label intact</strong> if possible if it contains important product information like the model number, serial number, or other details important for identifying the product, and to <strong>use scissors and cut out the offending asset tag portion. If that isn't possible, then it would be ok to fully remove the label.</strong> Unchanged: An <strong>asset tag</strong> was recently discovered <strong>within a manufacturer label itself</strong>. We will need to begin visually scanning over manufacturer labels to look out for labels in this in the future. If you see a manufacture label like this, the <strong>preferred solution to keep the manufacturer label intact</strong> if possible if it contains important product information like the model number, serial number, or other details important for identifying the product, and to <strong>use scissors and cut out the offending asset tag portion. If that isn't possible, then it would be ok to fully remove the label.</strong> Unchanged: It is going to require us to be even more detail oriented, but <strong>do not let this destroy your productivity output.</strong> <strong>Just quickly visually scan over the labels</strong> on the machines and look for brand names that should not be there. Unchanged: It is going to require us to be even more detail oriented, but <strong>do not let this destroy your productivity output.</strong> <strong>Just quickly visually scan over the labels</strong> on the machines and look for brand names that should not be there. Unchanged: Please click on the photo below to see an example. Unchanged: Please click on the photo below to see an example. Unchanged: <a href="https://www.xworx.app/wp-content/uploads/2025/02/IMG_1800.jpg"><img class="alignnone size-thumbnail wp-image-12747" src="https://www.xworx.app/wp-content/uploads/2025/02/IMG_1800-150x150.jpg" alt="" width="150" height="150" /></a> Unchanged: <a href="https://www.xworx.app/wp-content/uploads/2025/02/IMG_1800.jpg"><img class="alignnone size-thumbnail wp-image-12747" src="https://www.xworx.app/wp-content/uploads/2025/02/IMG_1800-150x150.jpg" alt="" width="150" height="150" /></a> Unchanged: Unchanged: Unchanged: <h2>Another example of a tricky asset tag</h2> Unchanged: <h2>Another example of a tricky asset tag</h2> Unchanged: <strong>This looks somewhat like a manufacturer tag at first glance</strong> as it only has this machine's serial number and an QR code. <strong>Unfortunately this is a QR link to rhinofamilyofcompanies.samanage.com.</strong> So here is a general overarching policy for asset tags: Be very suspicious and remove any sticker that is not 100% conclusively a manufacturer sticker, and in fact, you can <strong>remove any label that is deemed removable, meaning it isn't absolutely necessary to identify the product.</strong> Anything that looks out of place compared to similar models or anything that sticker that looks out of place in general, investigate it before assuming it is OK. <strong>Scan QR codes to verify them if you plan on leaving them on the machines.</strong> Unchanged: <strong>This looks somewhat like a manufacturer tag at first glance</strong> as it only has this machine's serial number and an QR code. <strong>Unfortunately this is a QR link to rhinofamilyofcompanies.samanage.com.</strong> So here is a general overarching policy for asset tags: Be very suspicious and remove any sticker that is not 100% conclusively a manufacturer sticker, and in fact, you can <strong>remove any label that is deemed removable, meaning it isn't absolutely necessary to identify the product.</strong> Anything that looks out of place compared to similar models or anything that sticker that looks out of place in general, investigate it before assuming it is OK. <strong>Scan QR codes to verify them if you plan on leaving them on the machines.</strong> Unchanged: <a href="https://www.xworx.app/wp-content/uploads/2025/02/20251112_144243-rotated.jpg"><img class="alignnone size-thumbnail wp-image-12765" src="https://www.xworx.app/wp-content/uploads/2025/02/20251112_144243-150x150.jpg" alt="" width="150" height="150" /></a> Unchanged: <a href="https://www.xworx.app/wp-content/uploads/2025/02/20251112_144243-rotated.jpg"><img class="alignnone size-thumbnail wp-image-12765" src="https://www.xworx.app/wp-content/uploads/2025/02/20251112_144243-150x150.jpg" alt="" width="150" height="150" /></a> Unchanged: Unchanged: Unchanged: <h2>Inspect ports closely and notate damage even if very minor</h2> Unchanged: <h2>Inspect ports closely and notate damage even if very minor</h2> Unchanged: Minor damage within ports is still enough damage where we need to mention it to the customer. The concern is that it is in a state that could get worse, like the port pins could break off when a cable is connected which has happened before even to us while working here at the warehouse. There is also a chance the port could be sensitive/finicky or stop working later. So please inspect all ports very closely for this reason to make sure you don't miss subtle damage. Thanks! Unchanged: Minor damage within ports is still enough damage where we need to mention it to the customer. The concern is that it is in a state that could get worse, like the port pins could break off when a cable is connected which has happened before even to us while working here at the warehouse. There is also a chance the port could be sensitive/finicky or stop working later. So please inspect all ports very closely for this reason to make sure you don't miss subtle damage. Thanks! Unchanged: <a href="https://www.xworx.app/wp-content/uploads/2025/02/Damaged-pin-within-DP-port.jpg"><img class="alignnone size-thumbnail wp-image-12761" src="https://www.xworx.app/wp-content/uploads/2025/02/Damaged-pin-within-DP-port-150x150.jpg" alt="" width="150" height="150" /> </a><a href="https://www.xworx.app/wp-content/uploads/2025/02/Capture-2.jpg"><img class="alignnone size-thumbnail wp-image-12762" src="https://www.xworx.app/wp-content/uploads/2025/02/Capture-2-150x150.jpg" alt="" width="150" height="150" /></a> Unchanged: <a href="https://www.xworx.app/wp-content/uploads/2025/02/Damaged-pin-within-DP-port.jpg"><img class="alignnone size-thumbnail wp-image-12761" src="https://www.xworx.app/wp-content/uploads/2025/02/Damaged-pin-within-DP-port-150x150.jpg" alt="" width="150" height="150" /> </a><a href="https://www.xworx.app/wp-content/uploads/2025/02/Capture-2.jpg"><img class="alignnone size-thumbnail wp-image-12762" src="https://www.xworx.app/wp-content/uploads/2025/02/Capture-2-150x150.jpg" alt="" width="150" height="150" /></a> Unchanged: Unchanged: Unchanged: <h2><em>Common issues to avoid found during micro PC QCing</em></h2> Unchanged: <h2><em>Common issues to avoid found during micro PC QCing</em></h2> Unchanged: <ul> Unchanged: <ul> Unchanged: <li>Wipe paper placement: try to<strong> not put wipe paper or sticker label on top of any manufacturer info</strong>. Find a spot on the machine where the wipe paper doesn't overlap anything.</li> Unchanged: <li>Wipe paper placement: try to<strong> not put wipe paper or sticker label on top of any manufacturer info</strong>. Find a spot on the machine where the wipe paper doesn't overlap anything.</li> Unchanged: <li>We need to begin<strong> checking for wifi cards.</strong></li> Unchanged: <li>We need to begin<strong> checking for wifi cards.</strong></li> Unchanged: <li>Don’t put painters <strong>tape over words on the wipe paper</strong>, just carefully tape over the corners.</li> Unchanged: <li>Don’t put painters <strong>tape over words on the wipe paper</strong>, just carefully tape over the corners.</li> Unchanged: <li><strong>Use a minimal amount of painters tape</strong> and make the presentation not look sloppy</li> Unchanged: <li><strong>Use a minimal amount of painters tape</strong> and make the presentation not look sloppy</li> Unchanged: <li>remove any <strong>serial numbers on case that do not match BIOS</strong> (meaning all BIOS and case serial numbers need to be cross-checked against each other every time)</li> Unchanged: <li>remove any <strong>serial numbers on case that do not match BIOS</strong> (meaning all BIOS and case serial numbers need to be cross-checked against each other every time)</li> Unchanged: <li>Use your finger to check the front panels to <strong>see if the plastic front clips are busted</strong> and the front panel may get ripped off on accident.</li> Unchanged: <li>Use your finger to check the front panels to <strong>see if the plastic front clips are busted</strong> and the front panel may get ripped off on accident.</li> Unchanged: <li>While checking the motherboard, if you <strong>notice any busted RAM clips</strong>, RAM slots, or other device slots damaged, please add that to the notes.</li> Unchanged: <li>While checking the motherboard, if you <strong>notice any busted RAM clips</strong>, RAM slots, or other device slots damaged, please add that to the notes.</li> Unchanged: <li><strong>Please begin referring to the antennae nub attached to the back of the case as the "antennae port"</strong> as the actual antenna would be a device we would attach to this nub, so we want to describe the computer as accurately as possible.</li> Unchanged: <li><strong>Please begin referring to the antennae nub attached to the back of the case as the "antennae port"</strong> as the actual antenna would be a device we would attach to this nub, so we want to describe the computer as accurately as possible.</li> Unchanged: <li>Don't forget to also leave a note in the <strong>notes section to indicate that the machines is BIOS locked</strong>, don't just put a check mark on the label! They are harder to see, and it is an important detail to the customer that we don't want to overlook.</li> Unchanged: <li>Don't forget to also leave a note in the <strong>notes section to indicate that the machines is BIOS locked</strong>, don't just put a check mark on the label! They are harder to see, and it is an important detail to the customer that we don't want to overlook.</li> Unchanged: </ul> Unchanged: </ul> Unchanged: <a href="https://www.xworx.app/wp-content/uploads/2025/02/IMG_3915.webp"><img class="alignnone size-thumbnail wp-image-12767" src="https://www.xworx.app/wp-content/uploads/2025/02/IMG_3915-150x150.webp" alt="" width="150" height="150" /></a> <a href="https://www.xworx.app/wp-content/uploads/2025/02/IMG_3911.webp"><img class="alignnone size-thumbnail wp-image-12768" src="https://www.xworx.app/wp-content/uploads/2025/02/IMG_3911-150x150.webp" alt="" width="150" height="150" /></a> <a href="https://www.xworx.app/wp-content/uploads/2025/02/IMG_3910.webp"><img class="alignnone size-thumbnail wp-image-12769" src="https://www.xworx.app/wp-content/uploads/2025/02/IMG_3910-150x150.webp" alt="" width="150" height="150" /></a> <a href="https://www.xworx.app/wp-content/uploads/2025/02/Broken_bezel.webp"><img class="alignnone size-thumbnail wp-image-12770" src="https://www.xworx.app/wp-content/uploads/2025/02/Broken_bezel-150x150.webp" alt="" width="150" height="150" /></a> <a href="https://www.xworx.app/wp-content/uploads/2025/02/Tape_covering_manufacturer.webp"><img class="alignnone size-thumbnail wp-image-12771" src="https://www.xworx.app/wp-content/uploads/2025/02/Tape_covering_manufacturer-150x150.webp" alt="" width="150" height="150" /></a> Unchanged: <a href="https://www.xworx.app/wp-content/uploads/2025/02/IMG_3915.webp"><img class="alignnone size-thumbnail wp-image-12767" src="https://www.xworx.app/wp-content/uploads/2025/02/IMG_3915-150x150.webp" alt="" width="150" height="150" /></a> <a href="https://www.xworx.app/wp-content/uploads/2025/02/IMG_3911.webp"><img class="alignnone size-thumbnail wp-image-12768" src="https://www.xworx.app/wp-content/uploads/2025/02/IMG_3911-150x150.webp" alt="" width="150" height="150" /></a> <a href="https://www.xworx.app/wp-content/uploads/2025/02/IMG_3910.webp"><img class="alignnone size-thumbnail wp-image-12769" src="https://www.xworx.app/wp-content/uploads/2025/02/IMG_3910-150x150.webp" alt="" width="150" height="150" /></a> <a href="https://www.xworx.app/wp-content/uploads/2025/02/Broken_bezel.webp"><img class="alignnone size-thumbnail wp-image-12770" src="https://www.xworx.app/wp-content/uploads/2025/02/Broken_bezel-150x150.webp" alt="" width="150" height="150" /></a> <a href="https://www.xworx.app/wp-content/uploads/2025/02/Tape_covering_manufacturer.webp"><img class="alignnone size-thumbnail wp-image-12771" src="https://www.xworx.app/wp-content/uploads/2025/02/Tape_covering_manufacturer-150x150.webp" alt="" width="150" height="150" /></a> Unchanged: Unchanged: Unchanged: Unchanged: Unchanged: <h3>Minimum size of SSDs to include/wipe in your devices: 128GB</h3> Unchanged: <h3>Minimum size of SSDs to include/wipe in your devices: 128GB</h3> Unchanged: Anything SSD storage underneath 128GB should be given to your supervisor to be taken out of normal circulation. Unchanged: Anything SSD storage underneath 128GB should be given to your supervisor to be taken out of normal circulation. Unchanged: Unchanged: Unchanged: <h2>P.S.</h2> Unchanged: <h2>P.S.</h2> Unchanged: <ul> Unchanged: <ul> Unchanged: <li>All PCs must be registered if possible. If a PC can not be registered, leave a note explaining the reason.</li> Unchanged: <li>All PCs must be registered if possible. If a PC can not be registered, leave a note explaining the reason.</li> Unchanged: <li>If a PC does not have a hard drive, plug a USB drive for wiping in Killdisk Active Boot Disk only, so it can print out an erase report.</li> Unchanged: <li>If a PC does not have a hard drive, plug a USB drive for wiping in Killdisk Active Boot Disk only, so it can print out an erase report.</li> Unchanged: <li>Remove the HDD and RAM from all scrap PCs.</li> Unchanged: <li>Remove the HDD and RAM from all scrap PCs.</li> Unchanged: <li>Remove the 6th Gen or newer CPU from scrap PCs.</li> Unchanged: <li>Remove the 6th Gen or newer CPU from scrap PCs.</li> Unchanged: </ul> Unchanged: </ul> — pctechlead@beyondsurplus.com: Updated post "PC Tech Level 3-Micro PC Wiping: Micro/Mini/Tiny PC PXE Boot and Registration" Show details
Content
Before After Unchanged: <strong>PXE boot, or Preboot Execution Environment, is a network booting process that allows computers to boot from a network instead of a local disk. PXE is a client-server protocol that uses a DHCP or TFTP server to download software for booting.</strong> Unchanged: <strong>PXE boot, or Preboot Execution Environment, is a network booting process that allows computers to boot from a network instead of a local disk. PXE is a client-server protocol that uses a DHCP or TFTP server to download software for booting.</strong> Unchanged: <strong>PXE boot is commonly used for:</strong> Unchanged: <strong>PXE boot is commonly used for:</strong> Unchanged: <ul> Unchanged: <ul> Unchanged: <li><strong>Mass deployment: Installing the same operating system (OS) on many computers at once</strong></li> Unchanged: <li><strong>Mass deployment: Installing the same operating system (OS) on many computers at once</strong></li> Unchanged: <li><strong>Disaster recovery: Recovering from a disaster by installing a new OS</strong></li> Unchanged: <li><strong>Disaster recovery: Recovering from a disaster by installing a new OS</strong></li> Unchanged: <li><strong>Remote maintenance: Performing maintenance tasks on systems without physically accessing them.</strong></li> Unchanged: <li><strong>Remote maintenance: Performing maintenance tasks on systems without physically accessing them.</strong></li> Unchanged: </ul> Unchanged: </ul> Unchanged: <h2>Tech Requirements</h2> Unchanged: <h2>Tech Requirements</h2> Unchanged: <ul> Unchanged: <ul> Unchanged: <li>Finish PC tech level 1 training and maintain a good performance.</li> Unchanged: <li>Finish PC tech level 1 training and maintain a good performance.</li> Unchanged: <li>Test the i series PC wholesale with minimal or no errors.</li> Unchanged: <li>Test the i series PC wholesale with minimal or no errors.</li> Unchanged: </ul> Unchanged: </ul> Unchanged: <h2><strong>Tools</strong></h2> Unchanged: <h2><strong>Tools</strong></h2> Unchanged: <ul> Unchanged: <ul> Unchanged: <li>Ballpoint Pen. (Do not use a Gel Pen)</li> Unchanged: <li>Ballpoint Pen. (Do not use a Gel Pen)</li> Unchanged: <li>The electric screwdriver set the torque at 1.</li> Unchanged: <li>The electric screwdriver set the torque at 1.</li> Unchanged: <li>Driver bits.</li> Unchanged: <li>Driver bits.</li> Unchanged: <li>Screwdriver set.</li> Unchanged: <li>Screwdriver set.</li> Unchanged: </ul> Unchanged: </ul> Unchanged: <h2><strong>Stage #1: Physical Condition Checker</strong></h2> Unchanged: <h2><strong>Stage #1: Physical Condition Checker</strong></h2> Unchanged: [embeddoc url="https://xworxapp.wpenginepowered.com/wp-content/uploads/2025/04/Desktop-wiping-checklist-1-1.pdf" width="600px" Height="800px" viewer="browser"] Unchanged: [embeddoc url="https://xworxapp.wpenginepowered.com/wp-content/uploads/2025/04/Desktop-wiping-checklist-1-1.pdf" width="600px" Height="800px" viewer="browser"] Unchanged: <ul> Unchanged: <ul> Unchanged: <li><strong>Scan the serial number </strong><strong>on the label to avoid human error.</strong></li> Unchanged: <li><strong>Scan the serial number </strong><strong>on the label to avoid human error.</strong></li> Unchanged: <li><strong>If the serial number is damaged, leave the section blank.</strong></li> Unchanged: <li><strong>If the serial number is damaged, leave the section blank.</strong></li> Unchanged: <li><b>Record the pickup number on the label. (<strong>#1126 for drop-off, #0000 for PC that does not have the pickup#)</strong></b></li> Unchanged: <li><b>Record the pickup number on the label. (<strong>#1126 for drop-off, #0000 for PC that does not have the pickup#)</strong></b></li> Unchanged: <li><strong>Print out the label.</strong></li> Unchanged: <li><strong>Print out the label.</strong></li> Unchanged: <li><strong>Apply the label to the PC.</strong></li> Unchanged: <li><strong>Apply the label to the PC.</strong></li> Unchanged: <li><a href="https://xworxapp.wpenginepowered.com/wp-content/uploads/2025/04/IMG_1463.jpg"><img class="alignnone size-medium wp-image-12084" src="https://xworxapp.wpenginepowered.com/wp-content/uploads/2025/04/IMG_1463-300x225.jpg" alt="" width="300" height="225" /></a></li> Unchanged: <li><a href="https://xworxapp.wpenginepowered.com/wp-content/uploads/2025/04/IMG_1463.jpg"><img class="alignnone size-medium wp-image-12084" src="https://xworxapp.wpenginepowered.com/wp-content/uploads/2025/04/IMG_1463-300x225.jpg" alt="" width="300" height="225" /></a></li> Unchanged: <li><strong>Inspect the PC's physical condition and record on the label</strong> Unchanged: <li><strong>Inspect the PC's physical condition and record on the label</strong> Unchanged: <ul> Unchanged: <ul> Unchanged: <li>Open the case and check the motherboard condition.</li> Unchanged: <li>Open the case and check the motherboard condition.</li> Unchanged: <li>Remove any loose screws inside.</li> Unchanged: <li>Remove any loose screws inside.</li> Unchanged: <li>Add RAM or storage as needed.</li> Unchanged: <li>Add RAM or storage as needed.</li> Unchanged: </ul> Unchanged: </ul> Unchanged: </li> Unchanged: </li> Unchanged: <li><strong>Based on the PC's physical condition, determine the next step for the PC. (</strong>Refer to the<strong> Micro PC put away </strong>section<strong>)</strong> Unchanged: <li><strong>Based on the PC's physical condition, determine the next step for the PC. (</strong>Refer to the<strong> Micro PC put away </strong>section<strong>)</strong> Unchanged: <ul> Unchanged: <ul> Unchanged: <li><strong>Scrap</strong>: Unchanged: <li><strong>Scrap</strong>: Unchanged: <ul> Unchanged: <ul> Unchanged: <li>Remove the RAM and storage, then initial on the Tech 1 field.</li> Unchanged: <li>Remove the RAM and storage, then initial on the Tech 1 field.</li> Unchanged: <li>Remove the CPU, then put the CPU in the CPU tray.</li> Unchanged: <li>Remove the CPU, then put the CPU in the CPU tray.</li> Unchanged: <li>Set it aside and accumulate until finished with all PCs for the day</li> Unchanged: <li>Set it aside and accumulate until finished with all PCs for the day</li> Unchanged: <li>Call a second person to verify the PC is good for scrap. The second person will be initialed on the Tech 2 field.</li> Unchanged: <li>Call a second person to verify the PC is good for scrap. The second person will be initialed on the Tech 2 field.</li> Unchanged: <li>Put away the scrap PCs by the end of the day.</li> Unchanged: <li>Put away the scrap PCs by the end of the day.</li> Unchanged: </ul> Unchanged: </ul> Unchanged: </li> Unchanged: </li> Unchanged: <li><strong>Need to set up for wiping</strong>: Unchanged: <li><strong>Need to set up for wiping</strong>: Unchanged: <ul> Unchanged: <ul> Unchanged: <li><strong>i series 6th Gen i-series or dual core:</strong> Remove M.2 NVME drive. Other types of hard drives leave AS-IS. Make sure RAM is 2GB or more.</li> Unchanged: <li><strong>i series 6th Gen i-series or dual core:</strong> Remove M.2 NVME drive. Other types of hard drives leave AS-IS. Make sure RAM is 2GB or more.</li> Unchanged: <li><strong>i series 7th gen and newer or AMD Ryzen:</strong> make sure all PCs are included with hard drives and RAM. Make sure to remove the asset tag from the hard drive if you add a hard drive to a PC.</li> Unchanged: <li><strong>i series 7th gen and newer or AMD Ryzen:</strong> make sure all PCs are included with hard drives and RAM. Make sure to remove the asset tag from the hard drive if you add a hard drive to a PC.</li> Unchanged: </ul> Unchanged: </ul> Unchanged: </li> Unchanged: </li> Unchanged: </ul> Unchanged: </ul> Unchanged: </li> Unchanged: </li> Unchanged: </ul> Unchanged: </ul> Unchanged: <hr /> Unchanged: <hr /> Unchanged: <h2><strong>Stage #2: Wiping Tech: Set up PCs for wiping</strong></h2> Unchanged: <h2><strong>Stage #2: Wiping Tech: Set up PCs for wiping</strong></h2> Unchanged: <strong>Most PCs will be erased through PXE boot.</strong> Unchanged: <strong>Most PCs will be erased through PXE boot.</strong> Unchanged: <strong>Some PCs can not boot to PXE for some reason and then need to use the Killdisk USB drive to erase the storage. </strong> Unchanged: <strong>Some PCs can not boot to PXE for some reason and then need to use the Killdisk USB drive to erase the storage. </strong> Unchanged: <strong>While going through the steps for wiping, mark the label accordingly. </strong> Unchanged: <strong>While going through the steps for wiping, mark the label accordingly. </strong> Unchanged: When you finish setting up one PC, set up the next one until the bench is filled out. Unchanged: When you finish setting up one PC, set up the next one until the bench is filled out. Unchanged: <h3><strong>Wipe through PXE</strong></h3> Unchanged: <h3><strong>Wipe through PXE</strong></h3> Unchanged: <strong>Connect the PC to the power supply, Video cable, keyboard, mouse, and Ethernet cable.</strong> Unchanged: <strong>Connect the PC to the power supply, Video cable, keyboard, mouse, and Ethernet cable.</strong> Unchanged: <ul> Unchanged: <ul> Unchanged: <li>Use the OEM brand AC adapter for the PC.</li> Unchanged: <li>Use the OEM brand AC adapter for the PC.</li> Unchanged: <li>If the PC has a bad Ethernet port, use an Ethernet dongle to connect to the Ethernet cable.</li> Unchanged: <li>If the PC has a bad Ethernet port, use an Ethernet dongle to connect to the Ethernet cable.</li> Unchanged: </ul> Unchanged: </ul> Unchanged: <strong>Based on the PC's power condition, determine the next step for the PC.</strong> Unchanged: <strong>Based on the PC's power condition, determine the next step for the PC.</strong> Unchanged: <ul> Unchanged: <ul> Unchanged: <li style="list-style-type: none;"> Unchanged: <li style="list-style-type: none;"> Unchanged: <ul> Unchanged: <ul> Unchanged: <li><strong>Scrap</strong>: Unchanged: <li><strong>Scrap</strong>: Unchanged: <ul> Unchanged: <ul> Unchanged: <li>Remove the RAM and storage, then initial on the Tech 1 field.</li> Unchanged: <li>Remove the RAM and storage, then initial on the Tech 1 field.</li> Unchanged: <li>Set it aside and accumulate until finished with all PCs for the day</li> Unchanged: <li>Set it aside and accumulate until finished with all PCs for the day</li> Unchanged: <li>Call a second person to verify the PC is good for scrap. The second person will be initialed on the Tech 2 field.</li> Unchanged: <li>Call a second person to verify the PC is good for scrap. The second person will be initialed on the Tech 2 field.</li> Unchanged: <li>Put away the scrap PCs by the end of the day.</li> Unchanged: <li>Put away the scrap PCs by the end of the day.</li> Unchanged: </ul> Unchanged: </ul> Unchanged: </li> Unchanged: </li> Unchanged: <li><strong>Good to set up for wiping</strong>: Unchanged: <li><strong>Good to set up for wiping</strong>: Unchanged: <ul> Unchanged: <ul> Unchanged: <li><strong>i series 6th Gen and older or dual-core PCs</strong></li> Unchanged: <li><strong>i series 6th Gen and older or dual-core PCs</strong></li> Unchanged: <li><strong>i series 7th gen and newer or AMD Ryzen</strong></li> Unchanged: <li><strong>i series 7th gen and newer or AMD Ryzen</strong></li> Unchanged: </ul> Unchanged: </ul> Unchanged: </li> Unchanged: </li> Unchanged: </ul> Unchanged: </ul> Unchanged: </li> Unchanged: </li> Unchanged: </ul> Unchanged: </ul> Unchanged: <strong>Power on the PC, then enter the BIOS settings.</strong> Unchanged: <strong>Power on the PC, then enter the BIOS settings.</strong> Unchanged: <ul> Unchanged: <ul> Unchanged: <li>Common Key for entering the BIOS setup. Unchanged: <li>Common Key for entering the BIOS setup. Unchanged: <ul> Unchanged: <ul> Unchanged: <li>Dell: F2</li> Unchanged: <li>Dell: F2</li> Unchanged: <li>Lenovo: Unchanged: <li>Lenovo: Unchanged: <ul> Unchanged: <ul> Unchanged: <li>F1</li> Unchanged: <li>F1</li> Unchanged: <li>Enter then F1</li> Unchanged: <li>Enter then F1</li> Unchanged: <li>F2</li> Unchanged: <li>F2</li> Unchanged: </ul> Unchanged: </ul> Unchanged: </li> Unchanged: </li> Unchanged: <li>HP: F10 or Esc then F10</li> Unchanged: <li>HP: F10 or Esc then F10</li> Unchanged: </ul> Unchanged: </ul> Unchanged: </li> Unchanged: </li> Unchanged: </ul> Unchanged: </ul> Unchanged: <strong>While booting, check for a splash screen(Owner tag, Asset tag, or Custom logo). Only the Dell splash screen can be removed or replaced.</strong> Unchanged: <strong>While booting, check for a splash screen(Owner tag, Asset tag, or Custom logo). Only the Dell splash screen can be removed or replaced.</strong> Unchanged: <strong>Refer to:</strong> Unchanged: <strong>Refer to:</strong> Unchanged: <ul> Unchanged: <ul> Unchanged: <li><strong><a href="https://www.dell.com/support/kbdoc/en-us/000129832/how-to-reset-a-custom-bios-splash-screen-to-the-dell-splash-screen" target="_blank" rel="noopener">How to reset a custom BIOS Splash screen to the Dell Splash Screen</a></strong></li> Unchanged: <li><strong><a href="https://www.dell.com/support/kbdoc/en-us/000129832/how-to-reset-a-custom-bios-splash-screen-to-the-dell-splash-screen" target="_blank" rel="noopener">How to reset a custom BIOS Splash screen to the Dell Splash Screen</a></strong></li> Unchanged: <li><strong><a href="https://xworxapp.wpenginepowered.com/?p=11884" target="_blank" rel="noopener">How to Use Dell DOS Asset Tag Utility to remove Asset tag and Owner Tag</a></strong></li> Unchanged: <li><strong><a href="https://xworxapp.wpenginepowered.com/?p=11884" target="_blank" rel="noopener">How to Use Dell DOS Asset Tag Utility to remove Asset tag and Owner Tag</a></strong></li> Unchanged: </ul> Unchanged: </ul> Unchanged: <strong>If the Splash Screen contains the customer's information(Company name or person's name, etc.) that can not be removed, the PC needs to be scrapped.</strong> Unchanged: <strong>If the Splash Screen contains the customer's information(Company name or person's name, etc.) that can not be removed, the PC needs to be scrapped.</strong> Unchanged: <strong>If you can remove the splash screen, go next. </strong> Unchanged: <strong>If you can remove the splash screen, go next. </strong> Unchanged: <strong>If the PC has a BIOS password, </strong> Unchanged: <strong>If the PC has a BIOS password, </strong> Unchanged: <ul> Unchanged: <ul> Unchanged: <li><strong>Use the <a href="https://beta.bios-pw.org/" target="_blank" rel="noopener">BIOS Master Password Generator</a> to generate a master password to unlock the BIOS.</strong></li> Unchanged: <li><strong>Use the <a href="https://beta.bios-pw.org/" target="_blank" rel="noopener">BIOS Master Password Generator</a> to generate a master password to unlock the BIOS.</strong></li> Unchanged: <li><strong>Find the PWSD jumper to reset the BIOS password.</strong></li> Unchanged: <li><strong>Find the PWSD jumper to reset the BIOS password.</strong></li> Unchanged: <li><a href="https://xworxapp.wpenginepowered.com/wp-content/uploads/2025/04/IMG_1466.jpg"><img class="alignnone size-medium wp-image-12086" src="https://xworxapp.wpenginepowered.com/wp-content/uploads/2025/04/IMG_1466-300x225.jpg" alt="" width="300" height="225" /></a></li> Unchanged: <li><a href="https://xworxapp.wpenginepowered.com/wp-content/uploads/2025/04/IMG_1466.jpg"><img class="alignnone size-medium wp-image-12086" src="https://xworxapp.wpenginepowered.com/wp-content/uploads/2025/04/IMG_1466-300x225.jpg" alt="" width="300" height="225" /></a></li> Unchanged: </ul> Unchanged: </ul> Unchanged: Example video for Lenovo micro PC. Use Google to learn what pins to use for your particular machine: Unchanged: Example video for Lenovo micro PC. Use Google to learn what pins to use for your particular machine: Unchanged: https://www.youtube.com/watch?v=wqRjWNAcicQ Unchanged: https://www.youtube.com/watch?v=wqRjWNAcicQ Unchanged: <strong>If the BIOS password can not be removed, refer to <a href="https://xworxapp.wpenginepowered.com/?p=11851" target="_blank" rel="noopener">How to bypass BIOS lock for booting to USB drive</a></strong> Unchanged: <strong>If the BIOS password can not be removed, refer to <a href="https://xworxapp.wpenginepowered.com/?p=11851" target="_blank" rel="noopener">How to bypass BIOS lock for booting to USB drive</a></strong> Unchanged: <strong>I</strong><strong>f the BIOS password is removed or the BIOS is not locked, go to the next step.</strong> Unchanged: <strong>I</strong><strong>f the BIOS password is removed or the BIOS is not locked, go to the next step.</strong> Unchanged: <strong>In the BIOS, locate the serial number, and compare it with the label to see if it matches. Record the serial number if the serial section on the label is blank.</strong> Unchanged: <strong>In the BIOS, locate the serial number, and compare it with the label to see if it matches. Record the serial number if the serial section on the label is blank.</strong> Unchanged: <strong>In the BIOS settings. Find the reset option. Reset the BIOS to Factory default or BIOS default. (This will eliminate some issues caused by the wrong BIOS setting.) </strong> Unchanged: <strong>In the BIOS settings. Find the reset option. Reset the BIOS to Factory default or BIOS default. (This will eliminate some issues caused by the wrong BIOS setting.) </strong> Unchanged: <a href="https://xworxapp.wpenginepowered.com/wp-content/uploads/2025/04/IMG_1468.jpg"><img class="alignnone size-medium wp-image-12087" src="https://xworxapp.wpenginepowered.com/wp-content/uploads/2025/04/IMG_1468-300x169.jpg" alt="" width="300" height="169" /></a> Unchanged: <a href="https://xworxapp.wpenginepowered.com/wp-content/uploads/2025/04/IMG_1468.jpg"><img class="alignnone size-medium wp-image-12087" src="https://xworxapp.wpenginepowered.com/wp-content/uploads/2025/04/IMG_1468-300x169.jpg" alt="" width="300" height="169" /></a> Unchanged: <strong>Reboot the PC and re-enter the BIOS settings.</strong> Unchanged: <strong>Reboot the PC and re-enter the BIOS settings.</strong> Unchanged: <strong>Disable Secure Boot. (With Secure Boot on, the PXE boot will not work.)</strong> Unchanged: <strong>Disable Secure Boot. (With Secure Boot on, the PXE boot will not work.)</strong> Unchanged: <a href="https://xworxapp.wpenginepowered.com/wp-content/uploads/2025/04/IMG_1470.jpg"><img class="alignnone size-medium wp-image-12088" src="https://xworxapp.wpenginepowered.com/wp-content/uploads/2025/04/IMG_1470-300x169.jpg" alt="" width="300" height="169" /></a> Unchanged: <a href="https://xworxapp.wpenginepowered.com/wp-content/uploads/2025/04/IMG_1470.jpg"><img class="alignnone size-medium wp-image-12088" src="https://xworxapp.wpenginepowered.com/wp-content/uploads/2025/04/IMG_1470-300x169.jpg" alt="" width="300" height="169" /></a> Unchanged: <strong>Enable Network boot or PXE boot in BIOS (IPv4). </strong> Unchanged: <strong>Enable Network boot or PXE boot in BIOS (IPv4). </strong> Unchanged: <strong>Change network boot to 1st boot in the boot order.</strong> Unchanged: <strong>Change network boot to 1st boot in the boot order.</strong> Unchanged: <a href="https://xworxapp.wpenginepowered.com/wp-content/uploads/2025/04/IMG_1471.jpg"><img class="alignnone size-medium wp-image-12089" src="https://xworxapp.wpenginepowered.com/wp-content/uploads/2025/04/IMG_1471-300x169.jpg" alt="" width="300" height="169" /></a> Unchanged: <a href="https://xworxapp.wpenginepowered.com/wp-content/uploads/2025/04/IMG_1471.jpg"><img class="alignnone size-medium wp-image-12089" src="https://xworxapp.wpenginepowered.com/wp-content/uploads/2025/04/IMG_1471-300x169.jpg" alt="" width="300" height="169" /></a> Unchanged: <strong>Change the SATA setting from RAID to AHCI for the Dell PC.</strong> Unchanged: <strong>Change the SATA setting from RAID to AHCI for the Dell PC.</strong> Unchanged: <strong>Disable Intel VMD and adjust SATA settings to AHCI for 11th Gen or newer PCs.</strong> Unchanged: <strong>Disable Intel VMD and adjust SATA settings to AHCI for 11th Gen or newer PCs.</strong> Unchanged: <strong>Save settings and reboot the PC.</strong> Unchanged: <strong>Save settings and reboot the PC.</strong> Unchanged: If everything is working correctly, the PC will PXE boot; this process can take a few minutes. Unchanged: If everything is working correctly, the PC will PXE boot; this process can take a few minutes. Unchanged: The first time the PXE menu is loaded on the PC, it will display “Host is NOT registered.” Unchanged: The first time the PXE menu is loaded on the PC, it will display “Host is NOT registered.” Unchanged: <a href="https://xworxapp.wpenginepowered.com/wp-content/uploads/2022/03/IMG_1475.jpg"><img class="alignnone size-medium wp-image-8132" src="https://xworxapp.wpenginepowered.com/wp-content/uploads/2022/03/IMG_1475-300x169.jpg" alt="" width="300" height="169" /></a> Unchanged: <a href="https://xworxapp.wpenginepowered.com/wp-content/uploads/2022/03/IMG_1475.jpg"><img class="alignnone size-medium wp-image-8132" src="https://xworxapp.wpenginepowered.com/wp-content/uploads/2022/03/IMG_1475-300x169.jpg" alt="" width="300" height="169" /></a> Unchanged: If the PC uses an Ethernet dongle to PXE boot, it might display (Host is registered as XXXXXXXXXX), just go to the step to load "Killdisk Active Boot Disk". Unchanged: If the PC uses an Ethernet dongle to PXE boot, it might display (Host is registered as XXXXXXXXXX), just go to the step to load "Killdisk Active Boot Disk". Unchanged: <strong><span style="color: #ff0000;">If a PC does not have storage, plug an empty USB drive into the PC. The PC will give a registration error if there is no storage media detected.</span></strong> Unchanged: <strong><span style="color: #ff0000;">If a PC does not have storage, plug an empty USB drive into the PC. The PC will give a registration error if there is no storage media detected.</span></strong> Unchanged: Select “Quick Registration and Inventory” from the menu. (Make sure the PC has a hard drive or USB drive.) Unchanged: Select “Quick Registration and Inventory” from the menu. (Make sure the PC has a hard drive or USB drive.) Unchanged: After letting the program run, the PC will be rebooted to the PXE screen again. This time will display "Host is registered as XXXXXXXXXX". (Check the section on the label) Unchanged: After letting the program run, the PC will be rebooted to the PXE screen again. This time will display "Host is registered as XXXXXXXXXX". (Check the section on the label) Unchanged: Then choose “Killdisk Active Boot Disk” Unchanged: Then choose “Killdisk Active Boot Disk” Unchanged: <a href="https://xworxapp.wpenginepowered.com/wp-content/uploads/2022/03/IMG_1476.jpg"><img class="alignnone size-medium wp-image-8133" src="https://xworxapp.wpenginepowered.com/wp-content/uploads/2022/03/IMG_1476-300x169.jpg" alt="" width="300" height="169" /></a> Unchanged: <a href="https://xworxapp.wpenginepowered.com/wp-content/uploads/2022/03/IMG_1476.jpg"><img class="alignnone size-medium wp-image-8133" src="https://xworxapp.wpenginepowered.com/wp-content/uploads/2022/03/IMG_1476-300x169.jpg" alt="" width="300" height="169" /></a> Unchanged: After KillDisk is loaded, click the NIC Logo in the system tray, then click the Initialize Network button. Unchanged: After KillDisk is loaded, click the NIC Logo in the system tray, then click the Initialize Network button. Unchanged: <a href="https://xworxapp.wpenginepowered.com/wp-content/uploads/2022/03/IMG_1478.jpg"><img class="alignnone size-medium wp-image-8135" src="https://xworxapp.wpenginepowered.com/wp-content/uploads/2022/03/IMG_1478-300x169.jpg" alt="" width="300" height="169" /></a> Unchanged: <a href="https://xworxapp.wpenginepowered.com/wp-content/uploads/2022/03/IMG_1478.jpg"><img class="alignnone size-medium wp-image-8135" src="https://xworxapp.wpenginepowered.com/wp-content/uploads/2022/03/IMG_1478-300x169.jpg" alt="" width="300" height="169" /></a> Unchanged: After initializing the network, Unchanged: After initializing the network, Unchanged: Open the <span lang="zxx"><u>Active@KillDisk</u></span> Unchanged: Open the <span lang="zxx"><u>Active@KillDisk</u></span> Unchanged: The system may give you an error about Active@KillDisk already being open. If this error pops up, press Alt + Tab and switch to Active@KillDisk. Unchanged: The system may give you an error about Active@KillDisk already being open. If this error pops up, press Alt + Tab and switch to Active@KillDisk. Unchanged: On the bottom right of the opened window, there is a network status icon. The green check mark means the PC is online. If the network status icon has a red x on it, that means the PC is offline. Unchanged: On the bottom right of the opened window, there is a network status icon. The green check mark means the PC is online. If the network status icon has a red x on it, that means the PC is offline. Unchanged: <a href="https://xworxapp.wpenginepowered.com/wp-content/uploads/2022/03/IMG_2267.jpg"><img class="alignnone size-medium wp-image-9190" src="https://xworxapp.wpenginepowered.com/wp-content/uploads/2022/03/IMG_2267-300x169.jpg" alt="" width="300" height="169" /></a><a href="https://xworxapp.wpenginepowered.com/wp-content/uploads/2022/03/IMG_2265.jpg"><img class="alignnone size-medium wp-image-9189" src="https://xworxapp.wpenginepowered.com/wp-content/uploads/2022/03/IMG_2265-300x169.jpg" alt="" width="300" height="169" /></a> Unchanged: <a href="https://xworxapp.wpenginepowered.com/wp-content/uploads/2022/03/IMG_2267.jpg"><img class="alignnone size-medium wp-image-9190" src="https://xworxapp.wpenginepowered.com/wp-content/uploads/2022/03/IMG_2267-300x169.jpg" alt="" width="300" height="169" /></a><a href="https://xworxapp.wpenginepowered.com/wp-content/uploads/2022/03/IMG_2265.jpg"><img class="alignnone size-medium wp-image-9189" src="https://xworxapp.wpenginepowered.com/wp-content/uploads/2022/03/IMG_2265-300x169.jpg" alt="" width="300" height="169" /></a> Unchanged: Then choose all Hard Drives that need to be wiped and click the “ERASE DISK” button. (Ctrl+clicked the drives that need to be wiped.) Unchanged: Then choose all Hard Drives that need to be wiped and click the “ERASE DISK” button. (Ctrl+clicked the drives that need to be wiped.) Unchanged: <strong>Wipe an empty USB drive if there is no storage in the PC.</strong> Unchanged: <strong>Wipe an empty USB drive if there is no storage in the PC.</strong> Unchanged: For the offline PC, expand the Erase Certificate option, choose Save to PDF, and change the save location to X:\ Unchanged: For the offline PC, expand the Erase Certificate option, choose Save to PDF, and change the save location to X:\ Unchanged: <a href="https://xworxapp.wpenginepowered.com/wp-content/uploads/2022/03/snap_153039.jpg"><img class="alignnone size-medium wp-image-11840" src="https://xworxapp.wpenginepowered.com/wp-content/uploads/2022/03/snap_153039-300x164.jpg" alt="" width="300" height="164" /></a> Unchanged: <a href="https://xworxapp.wpenginepowered.com/wp-content/uploads/2022/03/snap_153039.jpg"><img class="alignnone size-medium wp-image-11840" src="https://xworxapp.wpenginepowered.com/wp-content/uploads/2022/03/snap_153039-300x164.jpg" alt="" width="300" height="164" /></a> Unchanged: In the Disk Erase tab, make sure the Erase method is US DoD 5220.22-M 3 Pass. Verify is 100%, check the Initialize disk after erase, check the Write fingerprint to the first sector, and click Start. Unchanged: In the Disk Erase tab, make sure the Erase method is US DoD 5220.22-M 3 Pass. Verify is 100%, check the Initialize disk after erase, check the Write fingerprint to the first sector, and click Start. Unchanged: <a href="https://xworxapp.wpenginepowered.com/wp-content/uploads/2022/03/IMG_1485.jpg"><img class="alignnone size-medium wp-image-8136" src="https://xworxapp.wpenginepowered.com/wp-content/uploads/2022/03/IMG_1485-300x169.jpg" alt="" width="300" height="169" /></a> Unchanged: <a href="https://xworxapp.wpenginepowered.com/wp-content/uploads/2022/03/IMG_1485.jpg"><img class="alignnone size-medium wp-image-8136" src="https://xworxapp.wpenginepowered.com/wp-content/uploads/2022/03/IMG_1485-300x169.jpg" alt="" width="300" height="169" /></a> Unchanged: <hr /> Unchanged: <hr /> Unchanged: <h2><strong>Stage #3: Erase Certificate Matching</strong></h2> Unchanged: <h2><strong>Stage #3: Erase Certificate Matching</strong></h2> Unchanged: <h3><strong>The PC was wiped through the PXE Killdisk</strong></h3> Unchanged: <h3><strong>The PC was wiped through the PXE Killdisk</strong></h3> Unchanged: Collect Erase Certificates from the Printer. (Next day) Unchanged: Collect Erase Certificates from the Printer. (Next day) Unchanged: The printer is located in the PC tech area. Unchanged: The printer is located in the PC tech area. Unchanged: <a href="https://xworxapp.wpenginepowered.com/wp-content/uploads/2022/03/IMG_1016.jpg"><img class="alignnone wp-image-11841 size-medium" src="https://xworxapp.wpenginepowered.com/wp-content/uploads/2022/03/IMG_1016-300x266.jpg" alt="" width="300" height="266" /></a> Unchanged: <a href="https://xworxapp.wpenginepowered.com/wp-content/uploads/2022/03/IMG_1016.jpg"><img class="alignnone wp-image-11841 size-medium" src="https://xworxapp.wpenginepowered.com/wp-content/uploads/2022/03/IMG_1016-300x266.jpg" alt="" width="300" height="266" /></a> Unchanged: <h3><strong>For the offline PC, you need to print the certificate manually.</strong></h3> Unchanged: <h3><strong>For the offline PC, you need to print the certificate manually.</strong></h3> Unchanged: Plug a<strong> formatted USB drive </strong>into the PC. Unchanged: Plug a<strong> formatted USB drive </strong>into the PC. Unchanged: On the wiping result window, click the <strong>Print</strong> button, and the <strong>Print Preview</strong> window will open. Unchanged: On the wiping result window, click the <strong>Print</strong> button, and the <strong>Print Preview</strong> window will open. Unchanged: <a href="https://xworxapp.wpenginepowered.com/wp-content/uploads/2022/03/Untitled.jpg" data-lb-type="grouped-post"><img class="alignnone size-medium wp-image-11844" src="https://xworxapp.wpenginepowered.com/wp-content/uploads/2022/03/Untitled-300x225.jpg" alt="" width="300" height="225" /></a> Unchanged: <a href="https://xworxapp.wpenginepowered.com/wp-content/uploads/2022/03/Untitled.jpg" data-lb-type="grouped-post"><img class="alignnone size-medium wp-image-11844" src="https://xworxapp.wpenginepowered.com/wp-content/uploads/2022/03/Untitled-300x225.jpg" alt="" width="300" height="225" /></a> Unchanged: Click the print icon on the Print Preview window, then save the <strong>Erase Certificate </strong>PDF file to the USB drive. Unchanged: Click the print icon on the Print Preview window, then save the <strong>Erase Certificate </strong>PDF file to the USB drive. Unchanged: <a href="https://xworxapp.wpenginepowered.com/wp-content/uploads/2022/03/IMG_1018.jpg" data-lb-type="grouped-post"><img class="alignnone size-medium wp-image-11845" src="https://xworxapp.wpenginepowered.com/wp-content/uploads/2022/03/IMG_1018-300x225.jpg" alt="" width="300" height="225" /></a> Unchanged: <a href="https://xworxapp.wpenginepowered.com/wp-content/uploads/2022/03/IMG_1018.jpg" data-lb-type="grouped-post"><img class="alignnone size-medium wp-image-11845" src="https://xworxapp.wpenginepowered.com/wp-content/uploads/2022/03/IMG_1018-300x225.jpg" alt="" width="300" height="225" /></a> Unchanged: Unplug the <strong>formatted USB</strong> and go to the next PC that needs to print the <strong>Erase Certificate </strong>manually. Unchanged: Unplug the <strong>formatted USB</strong> and go to the next PC that needs to print the <strong>Erase Certificate </strong>manually. Unchanged: After collecting all PDF files, go to a workstation to print out the <strong>Erase Certificate.</strong> Unchanged: After collecting all PDF files, go to a workstation to print out the <strong>Erase Certificate.</strong> Unchanged: <h3><strong>Match the Erase Certificate with the wiped PC.</strong></h3> Unchanged: <h3><strong>Match the Erase Certificate with the wiped PC.</strong></h3> Unchanged: Match the PC serial number and put the certificate with the PC. The certificate will list the PC's serial number as “BIOS Serial.” Unchanged: Match the PC serial number and put the certificate with the PC. The certificate will list the PC's serial number as “BIOS Serial.” Unchanged: Use painter's tape to tape the folded certificate at the bottom of the PC. Display the Hardware Information for QC. Unchanged: Use painter's tape to tape the folded certificate at the bottom of the PC. Display the Hardware Information for QC. Unchanged: <a href="https://xworxapp.wpenginepowered.com/wp-content/uploads/2022/03/Screenshot-2022-03-09-085300-2.jpg"><img class="alignnone wp-image-11846 size-medium" src="https://xworxapp.wpenginepowered.com/wp-content/uploads/2022/03/Screenshot-2022-03-09-085300-2-216x300.jpg" alt="" width="216" height="300" /></a><a href="https://xworxapp.wpenginepowered.com/wp-content/uploads/2025/04/IMG_1473.jpg"><img class="alignnone size-medium wp-image-12091" src="https://xworxapp.wpenginepowered.com/wp-content/uploads/2025/04/IMG_1473-300x169.jpg" alt="" width="300" height="169" /></a> Unchanged: <a href="https://xworxapp.wpenginepowered.com/wp-content/uploads/2022/03/Screenshot-2022-03-09-085300-2.jpg"><img class="alignnone wp-image-11846 size-medium" src="https://xworxapp.wpenginepowered.com/wp-content/uploads/2022/03/Screenshot-2022-03-09-085300-2-216x300.jpg" alt="" width="216" height="300" /></a><a href="https://xworxapp.wpenginepowered.com/wp-content/uploads/2025/04/IMG_1473.jpg"><img class="alignnone size-medium wp-image-12091" src="https://xworxapp.wpenginepowered.com/wp-content/uploads/2025/04/IMG_1473-300x169.jpg" alt="" width="300" height="169" /></a> Unchanged: <span style="color: #ff0000;"><strong>Do not remove the wiped USB drive.</strong></span> Unchanged: <span style="color: #ff0000;"><strong>Do not remove the wiped USB drive.</strong></span> Unchanged: Mark the label based on the sanitizing status. Unchanged: Mark the label based on the sanitizing status. Unchanged: Record any defects that developed overnight, then initial on the Tech 1 field. Unchanged: Record any defects that developed overnight, then initial on the Tech 1 field. Unchanged: If wiping fails: Unchanged: If wiping fails: Unchanged: <ul> Unchanged: <ul> Unchanged: <li><strong>6th Gen i-series CPU:</strong> remove the hard drive, make the hard drive not included on the label, and mark off the hard drive information from the Erase Certificate.</li> Unchanged: <li><strong>6th Gen i-series CPU:</strong> remove the hard drive, make the hard drive not included on the label, and mark off the hard drive information from the Erase Certificate.</li> Unchanged: <li><strong>7th Gen i-series or newer and AMD Ryzen CPU:</strong> replace the hard drive and wipe the new drive.</li> Unchanged: <li><strong>7th Gen i-series or newer and AMD Ryzen CPU:</strong> replace the hard drive and wipe the new drive.</li> Unchanged: </ul> Unchanged: </ul> Unchanged: <h3><a href="https://xworxapp.wpenginepowered.com/wp-content/uploads/2022/03/2024-09-09-10_05_33-Laptop-Wiping_-Laptop-PEX-Boot-and-Registration.-–-Process-Database.jpg"><img class="alignnone size-medium wp-image-11716" src="https://xworxapp.wpenginepowered.com/wp-content/uploads/2022/03/2024-09-09-10_05_33-Laptop-Wiping_-Laptop-PEX-Boot-and-Registration.-–-Process-Database-151x300.jpg" alt="" width="151" height="300" /></a></h3> Unchanged: <h3><a href="https://xworxapp.wpenginepowered.com/wp-content/uploads/2022/03/2024-09-09-10_05_33-Laptop-Wiping_-Laptop-PEX-Boot-and-Registration.-–-Process-Database.jpg"><img class="alignnone size-medium wp-image-11716" src="https://xworxapp.wpenginepowered.com/wp-content/uploads/2022/03/2024-09-09-10_05_33-Laptop-Wiping_-Laptop-PEX-Boot-and-Registration.-–-Process-Database-151x300.jpg" alt="" width="151" height="300" /></a></h3> Unchanged: If the certificate did not print out for any reason, notify your supervisor. Unchanged: If the certificate did not print out for any reason, notify your supervisor. Unchanged: <hr /> Unchanged: <hr /> Unchanged: <h2><strong>Stage #4: PC wipe Quality Checker</strong></h2> Unchanged: <h2><strong>Stage #4: PC wipe Quality Checker</strong></h2> Unchanged: <strong>Check the PC's physical condition and compare it with the label.</strong> Unchanged: <strong>Check the PC's physical condition and compare it with the label.</strong> Unchanged: <strong>Double-check all sections on the label with the PC, and make sure all sections are checked and correct.</strong> Unchanged: <strong>Double-check all sections on the label with the PC, and make sure all sections are checked and correct.</strong> Unchanged: <strong>After QC the PCs,</strong> Unchanged: <strong>After QC the PCs,</strong> Unchanged: <ul> Unchanged: <ul> Unchanged: <li><strong>6th Gen i-series CPU:</strong> <strong>disconnect all the cables and the USB drive.</strong></li> Unchanged: <li><strong>6th Gen i-series CPU:</strong> <strong>disconnect all the cables and the USB drive.</strong></li> Unchanged: <li><strong>7th Gen i-series or newer and AMD Ryzen CPU:</strong> Unchanged: <li><strong>7th Gen i-series or newer and AMD Ryzen CPU:</strong> Unchanged: <ul> Unchanged: <ul> Unchanged: <li><strong>Check the Autopilot status. Refer to <a href="https://xworxapp.wpenginepowered.com/?p=11800" target="_blank" rel="noopener">How to check Autopilot status for a Windows machine</a></strong></li> Unchanged: <li><strong>Check the Autopilot status. Refer to <a href="https://xworxapp.wpenginepowered.com/?p=11800" target="_blank" rel="noopener">How to check Autopilot status for a Windows machine</a></strong></li> Unchanged: <li><strong> Mark the Label based on the Autopilot status. Circle the OS version on the label.</strong></li> Unchanged: <li><strong> Mark the Label based on the Autopilot status. Circle the OS version on the label.</strong></li> Unchanged: <li><strong>Disconnect all cables.</strong></li> Unchanged: <li><strong>Disconnect all cables.</strong></li> Unchanged: </ul> Unchanged: </ul> Unchanged: </li> Unchanged: </li> Unchanged: </ul> Unchanged: </ul> Unchanged: <hr /> Unchanged: <hr /> Unchanged: <h2><strong>Stage #5: Micro PC put away</strong></h2> Unchanged: <h2><strong>Stage #5: Micro PC put away</strong></h2> Unchanged: Check the label for the PC's condition Unchanged: Check the label for the PC's condition Unchanged: Based on the PC's condition, sort the PCs. Unchanged: Based on the PC's condition, sort the PCs. Unchanged: Put away the PC in the destination vessel. Unchanged: Put away the PC in the destination vessel. Unchanged: <ul> Unchanged: <ul> Unchanged: <li><strong>PC that wipes successfully with no issue(Normal wear and tear allowed), put away: Wiped Micro PCs Unchanged: <li><strong>PC that wipes successfully with no issue(Normal wear and tear allowed), put away: Wiped Micro PCs Unchanged: </strong></li> Unchanged: </strong></li> Unchanged: <li><strong>PC Scrap: (anyone that applies) put away: #1009 SCRAP: PC COMPUTER (Remove RAM, and storage for all PCs)(Remove CPU for 6th Gen or newer CPU PCs) </strong> Unchanged: <li><strong>PC Scrap: (anyone that applies) put away: #1009 SCRAP: PC COMPUTER (Remove RAM, and storage for all PCs)(Remove CPU for 6th Gen or newer CPU PCs) </strong> Unchanged: <ul> Unchanged: <ul> Unchanged: <li><strong>PC that has a power issue. (Include does not power on, Power on no post, power on then off, or random shut off.)</strong></li> Unchanged: <li><strong>PC that has a power issue. (Include does not power on, Power on no post, power on then off, or random shut off.)</strong></li> Unchanged: <li><strong>The s</strong><strong>plash screen cannot be removed.</strong></li> Unchanged: <li><strong>The s</strong><strong>plash screen cannot be removed.</strong></li> Unchanged: <li><strong>Damaged motherboard.</strong></li> Unchanged: <li><strong>Damaged motherboard.</strong></li> Unchanged: <li><strong>Autopilot is locked or unable to check Autopilot status. (7th Gen or newer I series or AMD Ryzen CPUs.)</strong></li> Unchanged: <li><strong>Autopilot is locked or unable to check Autopilot status. (7th Gen or newer I series or AMD Ryzen CPUs.)</strong></li> Unchanged: <li><strong>More than 1 damaged port</strong></li> Unchanged: <li><strong>More than 1 damaged port</strong></li> Unchanged: </ul> Unchanged: </ul> Unchanged: </li> Unchanged: </li> Unchanged: </ul> Unchanged: </ul> Unchanged: <h2></h2> Unchanged: <h2></h2> Unchanged: Unchanged: Unchanged: <h3>Notating missing 2.5" drive caddies in micro PCs</h3> Unchanged: <h3>Notating missing 2.5" drive caddies in micro PCs</h3> Unchanged: You may encounter newer units that have both an m.2 nvme slot and a 2.5" sata slot, however,<strong> the caddy for the sata slot is missing</strong>. Unchanged: You may encounter newer units that have both an m.2 nvme slot and a 2.5" sata slot, however,<strong> the caddy for the sata slot is missing</strong>. Unchanged: Regardless of whether it is unclear if the machine originally came with a caddy since 2.5" SSDs are less common than m.2 drives these days, <strong>we need to mention in the notes that the caddy is missing if there is a SATA slot that is unusable without a caddy</strong>. According to Paul, we do not need to be overly descriptive when describing what caddy is missing. <strong>Simply writing “missing caddy” in the notes will be sufficient.</strong> Unchanged: Regardless of whether it is unclear if the machine originally came with a caddy since 2.5" SSDs are less common than m.2 drives these days, <strong>we need to mention in the notes that the caddy is missing if there is a SATA slot that is unusable without a caddy</strong>. According to Paul, we do not need to be overly descriptive when describing what caddy is missing. <strong>Simply writing “missing caddy” in the notes will be sufficient.</strong> Unchanged: <a href="https://www.xworx.app/wp-content/uploads/2025/12/20260204_163609-text.jpg"><img class="alignnone size-medium wp-image-13035" src="https://www.xworx.app/wp-content/uploads/2025/12/20260204_163609-text-169x300.jpg" alt="" width="169" height="300" /></a> Unchanged: <a href="https://www.xworx.app/wp-content/uploads/2025/12/20260204_163609-text.jpg"><img class="alignnone size-medium wp-image-13035" src="https://www.xworx.app/wp-content/uploads/2025/12/20260204_163609-text-169x300.jpg" alt="" width="169" height="300" /></a> Added: Added: Added: <h3>Notating missing 2.5" drive caddies in micro PCs</h3> Added: <strong><span style="color: #6495ed;">PC Tech Level 3: All Other PC/Server Testing Instructions</span></strong> <a href="https://www.xworx.app/?p=4984" target="_blank" rel="noopener">https://www.xworx.app/?p=4984, </a><strong><span style="color: #6495ed;">PC Tech Level 3-Micro PC Wiping: Micro/Mini/Tiny PC PXE Boot and Registrations </span></strong><a href="https://www.xworx.app/?p=12082" target="_blank" rel="noopener">https://www.xworx.app/?p=12082</a> Added: You may encounter newer units that have both an m.2 nvme slot and a 2.5" sata slot, however,<strong> the caddy for the sata slot is missing</strong>. Added: Regardless of whether it is unclear if the machine originally came with a caddy since 2.5" SSDs are less common than m.2 drives these days, <strong>we need to mention in the notes that the caddy is missing if there is a SATA slot that is unusable without a caddy</strong>. According to Paul, we do not need to be overly descriptive when describing what caddy is missing. <strong>Simply writing “missing caddy” in the notes will be sufficient.</strong> Added: <a href="https://www.xworx.app/wp-content/uploads/2025/12/20260204_163609-text.jpg"><img class="alignnone size-medium wp-image-13035" src="https://www.xworx.app/wp-content/uploads/2025/12/20260204_163609-text-169x300.jpg" alt="" width="169" height="300" /></a> Added: <h1></h1> Added: <h3>A few quick a reminders and examples for micro PCs: Added: 1) Please be sure not to cover up defects with labels. Added: 2) Be sure to notate subtle dents in meshing. Added: 3) Look out for asset tags that blend in with the other manufacturer stickers.</h3> Added: Below is a photo of a machine that has dents on the metal meshing. These dents are significant enough where they need to be notated. But also, because this is a mini PC, it tech label was placed overtop of this dents. So please be sure to be on the lookout for these types of dents in machines and whenever you identify a flaw, be careful not to place a label over it so that other team members can inspect and verify the flaws as well. Added: <a href="https://www.xworx.app/wp-content/uploads/2025/12/20260205_095435.jpg"><img class="alignnone size-medium wp-image-13036" src="https://www.xworx.app/wp-content/uploads/2025/12/20260205_095435-214x300.jpg" alt="" width="214" height="300" /></a> Added: Also, remember that not all asset tags jump out at you and often they are placed somewhat hidden or they look a bit like other manufacturer stickers. So identify these asset tags by their company names, and also be sure to scan QR codes that do not identify themselves because we've seen asset tags that are simply unmarked QR codes that link back to the original purchaser's company website. Added: <a href="https://www.xworx.app/wp-content/uploads/2025/12/Capture1.jpg"><img class="alignnone size-medium wp-image-13037" src="https://www.xworx.app/wp-content/uploads/2025/12/Capture1-300x221.jpg" alt="" width="300" height="221" /></a> Unchanged: Unchanged: Unchanged: Unchanged: Unchanged: <h2>Absolute Persistence in Dells - important BIOS area to now check in every Dell machine</h2> Unchanged: <h2>Absolute Persistence in Dells - important BIOS area to now check in every Dell machine</h2> Unchanged: We've recently come across and began processing<strong> Dell laptops with Absolute Persistence activated. It is now going to require us to check for this being present and active in all the Dell laptops moving forward</strong> because it does not reveal itself until very, very late in the process where we need to leave it plugged into the ethernet for several minutes after autopilot checking before the lock-out screen activates itself. Unchanged: We've recently come across and began processing<strong> Dell laptops with Absolute Persistence activated. It is now going to require us to check for this being present and active in all the Dell laptops moving forward</strong> because it does not reveal itself until very, very late in the process where we need to leave it plugged into the ethernet for several minutes after autopilot checking before the lock-out screen activates itself. Unchanged: Please take a look at the screenshot below: Unchanged: Please take a look at the screenshot below: Unchanged: <a href="https://www.xworx.app/wp-content/uploads/2025/02/20251027_140250.jpg"><img class="alignnone size-thumbnail wp-image-12701" src="https://www.xworx.app/wp-content/uploads/2025/02/20251027_140250-150x150.jpg" alt="" width="150" height="150" /></a> Unchanged: <a href="https://www.xworx.app/wp-content/uploads/2025/02/20251027_140250.jpg"><img class="alignnone size-thumbnail wp-image-12701" src="https://www.xworx.app/wp-content/uploads/2025/02/20251027_140250-150x150.jpg" alt="" width="150" height="150" /></a> Unchanged: Note how the <strong>options for Absolute Persistence are greyed out. This means that Absolute Persistence is activated</strong>. We cannot set this device as is. Hand it off to the PC Tech Team Lead and it will be recorded and sorted away for now. Unchanged: Note how the <strong>options for Absolute Persistence are greyed out. This means that Absolute Persistence is activated</strong>. We cannot set this device as is. Hand it off to the PC Tech Team Lead and it will be recorded and sorted away for now. Unchanged: There is <strong>one extra complication:</strong> <strong>all the BIOS options will be greyed out when the system is BIOS locked</strong> so that means there will be no way to know if Absolute Persistence is active or not, and <strong>you will need to let it sit connected to the internet after autopilot checking it. Ze has asked that we let it sit overnight or at least until the lock out screen shows up</strong>. If a lock out screen does not show up by morning, it should be all clear to sell. Unchanged: There is <strong>one extra complication:</strong> <strong>all the BIOS options will be greyed out when the system is BIOS locked</strong> so that means there will be no way to know if Absolute Persistence is active or not, and <strong>you will need to let it sit connected to the internet after autopilot checking it. Ze has asked that we let it sit overnight or at least until the lock out screen shows up</strong>. If a lock out screen does not show up by morning, it should be all clear to sell. Unchanged: Unchanged: Unchanged: <h2>HPs can have Absolute Persistence. Here is where to look:</h2> Unchanged: <h2>HPs can have Absolute Persistence. Here is where to look:</h2> Unchanged: Dell and HPs do not announce if they have Absolute Persistence active when you load into the BIOS. You have to go looking for it. <strong>Be sure to look for Absolute Persistence in the BIOS/UEFI of all laptops and computers</strong>. There is no way to tell if they have their Absolute Persistence active until you specifically go looking for it. Unchanged: Dell and HPs do not announce if they have Absolute Persistence active when you load into the BIOS. You have to go looking for it. <strong>Be sure to look for Absolute Persistence in the BIOS/UEFI of all laptops and computers</strong>. There is no way to tell if they have their Absolute Persistence active until you specifically go looking for it. Unchanged: See the photo below for what it looks like in the HP UEFI. Unchanged: See the photo below for what it looks like in the HP UEFI. Unchanged: <a href="https://www.xworx.app/wp-content/uploads/2025/02/Capture-3.jpg"><img class="alignnone size-thumbnail wp-image-12783" src="https://www.xworx.app/wp-content/uploads/2025/02/Capture-3-150x150.jpg" alt="" width="150" height="150" /></a> Unchanged: <a href="https://www.xworx.app/wp-content/uploads/2025/02/Capture-3.jpg"><img class="alignnone size-thumbnail wp-image-12783" src="https://www.xworx.app/wp-content/uploads/2025/02/Capture-3-150x150.jpg" alt="" width="150" height="150" /></a> Unchanged: Unchanged: Unchanged: <h2>Do not notate on your labels any asset tags remaining on systems</h2> Unchanged: <h2>Do not notate on your labels any asset tags remaining on systems</h2> Unchanged: Depending on what an asset tag says, we may choose to sell systems with asset tags that are non-removable assuming that the asset tag in no way implies or reveals who was the original owner.<strong> For the reason of trying to not draw any attention to something the previous owner wrote in the system, please do not mention the asset tags on labels</strong>. As an important reminder, the <strong>PC Tech Team Lead or any other supervisor needs to review any asset tags being intentionally left in machines</strong>, even if you deem it indecipherable yourself. Unchanged: Depending on what an asset tag says, we may choose to sell systems with asset tags that are non-removable assuming that the asset tag in no way implies or reveals who was the original owner.<strong> For the reason of trying to not draw any attention to something the previous owner wrote in the system, please do not mention the asset tags on labels</strong>. As an important reminder, the <strong>PC Tech Team Lead or any other supervisor needs to review any asset tags being intentionally left in machines</strong>, even if you deem it indecipherable yourself. Unchanged: Unchanged: Unchanged: <h2>New type of asset tag to look out for! Will require a closer look at labels across all machines.</h2> Unchanged: <h2>New type of asset tag to look out for! Will require a closer look at labels across all machines.</h2> Unchanged: An <strong>asset tag</strong> was recently discovered <strong>within a manufacturer label itself</strong>. We will need to begin visually scanning over manufacturer labels to look out for labels in this in the future. If you see a manufacture label like this, the <strong>preferred solution to keep the manufacturer label intact</strong> if possible if it contains important product information like the model number, serial number, or other details important for identifying the product, and to <strong>use scissors and cut out the offending asset tag portion. If that isn't possible, then it would be ok to fully remove the label.</strong> Unchanged: An <strong>asset tag</strong> was recently discovered <strong>within a manufacturer label itself</strong>. We will need to begin visually scanning over manufacturer labels to look out for labels in this in the future. If you see a manufacture label like this, the <strong>preferred solution to keep the manufacturer label intact</strong> if possible if it contains important product information like the model number, serial number, or other details important for identifying the product, and to <strong>use scissors and cut out the offending asset tag portion. If that isn't possible, then it would be ok to fully remove the label.</strong> Unchanged: It is going to require us to be even more detail oriented, but <strong>do not let this destroy your productivity output.</strong> <strong>Just quickly visually scan over the labels</strong> on the machines and look for brand names that should not be there. Unchanged: It is going to require us to be even more detail oriented, but <strong>do not let this destroy your productivity output.</strong> <strong>Just quickly visually scan over the labels</strong> on the machines and look for brand names that should not be there. Unchanged: Please click on the photo below to see an example. Unchanged: Please click on the photo below to see an example. Unchanged: <a href="https://www.xworx.app/wp-content/uploads/2025/02/IMG_1800.jpg"><img class="alignnone size-thumbnail wp-image-12747" src="https://www.xworx.app/wp-content/uploads/2025/02/IMG_1800-150x150.jpg" alt="" width="150" height="150" /></a> Unchanged: <a href="https://www.xworx.app/wp-content/uploads/2025/02/IMG_1800.jpg"><img class="alignnone size-thumbnail wp-image-12747" src="https://www.xworx.app/wp-content/uploads/2025/02/IMG_1800-150x150.jpg" alt="" width="150" height="150" /></a> Unchanged: Unchanged: Unchanged: <h2>Another example of a tricky asset tag</h2> Unchanged: <h2>Another example of a tricky asset tag</h2> Unchanged: <strong>This looks somewhat like a manufacturer tag at first glance</strong> as it only has this machine's serial number and an QR code. <strong>Unfortunately this is a QR link to rhinofamilyofcompanies.samanage.com.</strong> So here is a general overarching policy for asset tags: Be very suspicious and remove any sticker that is not 100% conclusively a manufacturer sticker, and in fact, you can <strong>remove any label that is deemed removable, meaning it isn't absolutely necessary to identify the product.</strong> Anything that looks out of place compared to similar models or anything that sticker that looks out of place in general, investigate it before assuming it is OK. <strong>Scan QR codes to verify them if you plan on leaving them on the machines.</strong> Unchanged: <strong>This looks somewhat like a manufacturer tag at first glance</strong> as it only has this machine's serial number and an QR code. <strong>Unfortunately this is a QR link to rhinofamilyofcompanies.samanage.com.</strong> So here is a general overarching policy for asset tags: Be very suspicious and remove any sticker that is not 100% conclusively a manufacturer sticker, and in fact, you can <strong>remove any label that is deemed removable, meaning it isn't absolutely necessary to identify the product.</strong> Anything that looks out of place compared to similar models or anything that sticker that looks out of place in general, investigate it before assuming it is OK. <strong>Scan QR codes to verify them if you plan on leaving them on the machines.</strong> Unchanged: <a href="https://www.xworx.app/wp-content/uploads/2025/02/20251112_144243-rotated.jpg"><img class="alignnone size-thumbnail wp-image-12765" src="https://www.xworx.app/wp-content/uploads/2025/02/20251112_144243-150x150.jpg" alt="" width="150" height="150" /></a> Unchanged: <a href="https://www.xworx.app/wp-content/uploads/2025/02/20251112_144243-rotated.jpg"><img class="alignnone size-thumbnail wp-image-12765" src="https://www.xworx.app/wp-content/uploads/2025/02/20251112_144243-150x150.jpg" alt="" width="150" height="150" /></a> Unchanged: Unchanged: Unchanged: <h2>Inspect ports closely and notate damage even if very minor</h2> Unchanged: <h2>Inspect ports closely and notate damage even if very minor</h2> Unchanged: Minor damage within ports is still enough damage where we need to mention it to the customer. The concern is that it is in a state that could get worse, like the port pins could break off when a cable is connected which has happened before even to us while working here at the warehouse. There is also a chance the port could be sensitive/finicky or stop working later. So please inspect all ports very closely for this reason to make sure you don't miss subtle damage. Thanks! Unchanged: Minor damage within ports is still enough damage where we need to mention it to the customer. The concern is that it is in a state that could get worse, like the port pins could break off when a cable is connected which has happened before even to us while working here at the warehouse. There is also a chance the port could be sensitive/finicky or stop working later. So please inspect all ports very closely for this reason to make sure you don't miss subtle damage. Thanks! Unchanged: <a href="https://www.xworx.app/wp-content/uploads/2025/02/Damaged-pin-within-DP-port.jpg"><img class="alignnone size-thumbnail wp-image-12761" src="https://www.xworx.app/wp-content/uploads/2025/02/Damaged-pin-within-DP-port-150x150.jpg" alt="" width="150" height="150" /> </a><a href="https://www.xworx.app/wp-content/uploads/2025/02/Capture-2.jpg"><img class="alignnone size-thumbnail wp-image-12762" src="https://www.xworx.app/wp-content/uploads/2025/02/Capture-2-150x150.jpg" alt="" width="150" height="150" /></a> Unchanged: <a href="https://www.xworx.app/wp-content/uploads/2025/02/Damaged-pin-within-DP-port.jpg"><img class="alignnone size-thumbnail wp-image-12761" src="https://www.xworx.app/wp-content/uploads/2025/02/Damaged-pin-within-DP-port-150x150.jpg" alt="" width="150" height="150" /> </a><a href="https://www.xworx.app/wp-content/uploads/2025/02/Capture-2.jpg"><img class="alignnone size-thumbnail wp-image-12762" src="https://www.xworx.app/wp-content/uploads/2025/02/Capture-2-150x150.jpg" alt="" width="150" height="150" /></a> Unchanged: Unchanged: Unchanged: <h2><em>Common issues to avoid found during micro PC QCing</em></h2> Unchanged: <h2><em>Common issues to avoid found during micro PC QCing</em></h2> Unchanged: <ul> Unchanged: <ul> Unchanged: <li>Wipe paper placement: try to<strong> not put wipe paper or sticker label on top of any manufacturer info</strong>. Find a spot on the machine where the wipe paper doesn't overlap anything.</li> Unchanged: <li>Wipe paper placement: try to<strong> not put wipe paper or sticker label on top of any manufacturer info</strong>. Find a spot on the machine where the wipe paper doesn't overlap anything.</li> Unchanged: <li>We need to begin<strong> checking for wifi cards.</strong></li> Unchanged: <li>We need to begin<strong> checking for wifi cards.</strong></li> Unchanged: <li>Don’t put painters <strong>tape over words on the wipe paper</strong>, just carefully tape over the corners.</li> Unchanged: <li>Don’t put painters <strong>tape over words on the wipe paper</strong>, just carefully tape over the corners.</li> Unchanged: <li><strong>Use a minimal amount of painters tape</strong> and make the presentation not look sloppy</li> Unchanged: <li><strong>Use a minimal amount of painters tape</strong> and make the presentation not look sloppy</li> Unchanged: <li>remove any <strong>serial numbers on case that do not match BIOS</strong> (meaning all BIOS and case serial numbers need to be cross-checked against each other every time)</li> Unchanged: <li>remove any <strong>serial numbers on case that do not match BIOS</strong> (meaning all BIOS and case serial numbers need to be cross-checked against each other every time)</li> Unchanged: <li>Use your finger to check the front panels to <strong>see if the plastic front clips are busted</strong> and the front panel may get ripped off on accident.</li> Unchanged: <li>Use your finger to check the front panels to <strong>see if the plastic front clips are busted</strong> and the front panel may get ripped off on accident.</li> Unchanged: <li>While checking the motherboard, if you <strong>notice any busted RAM clips</strong>, RAM slots, or other device slots damaged, please add that to the notes.</li> Unchanged: <li>While checking the motherboard, if you <strong>notice any busted RAM clips</strong>, RAM slots, or other device slots damaged, please add that to the notes.</li> Unchanged: <li><strong>Please begin referring to the antennae nub attached to the back of the case as the "antennae port"</strong> as the actual antenna would be a device we would attach to this nub, so we want to describe the computer as accurately as possible.</li> Unchanged: <li><strong>Please begin referring to the antennae nub attached to the back of the case as the "antennae port"</strong> as the actual antenna would be a device we would attach to this nub, so we want to describe the computer as accurately as possible.</li> Unchanged: <li>Don't forget to also leave a note in the <strong>notes section to indicate that the machines is BIOS locked</strong>, don't just put a check mark on the label! They are harder to see, and it is an important detail to the customer that we don't want to overlook.</li> Unchanged: <li>Don't forget to also leave a note in the <strong>notes section to indicate that the machines is BIOS locked</strong>, don't just put a check mark on the label! They are harder to see, and it is an important detail to the customer that we don't want to overlook.</li> Unchanged: </ul> Unchanged: </ul> Unchanged: <a href="https://www.xworx.app/wp-content/uploads/2025/02/IMG_3915.webp"><img class="alignnone size-thumbnail wp-image-12767" src="https://www.xworx.app/wp-content/uploads/2025/02/IMG_3915-150x150.webp" alt="" width="150" height="150" /></a> <a href="https://www.xworx.app/wp-content/uploads/2025/02/IMG_3911.webp"><img class="alignnone size-thumbnail wp-image-12768" src="https://www.xworx.app/wp-content/uploads/2025/02/IMG_3911-150x150.webp" alt="" width="150" height="150" /></a> <a href="https://www.xworx.app/wp-content/uploads/2025/02/IMG_3910.webp"><img class="alignnone size-thumbnail wp-image-12769" src="https://www.xworx.app/wp-content/uploads/2025/02/IMG_3910-150x150.webp" alt="" width="150" height="150" /></a> <a href="https://www.xworx.app/wp-content/uploads/2025/02/Broken_bezel.webp"><img class="alignnone size-thumbnail wp-image-12770" src="https://www.xworx.app/wp-content/uploads/2025/02/Broken_bezel-150x150.webp" alt="" width="150" height="150" /></a> <a href="https://www.xworx.app/wp-content/uploads/2025/02/Tape_covering_manufacturer.webp"><img class="alignnone size-thumbnail wp-image-12771" src="https://www.xworx.app/wp-content/uploads/2025/02/Tape_covering_manufacturer-150x150.webp" alt="" width="150" height="150" /></a> Unchanged: <a href="https://www.xworx.app/wp-content/uploads/2025/02/IMG_3915.webp"><img class="alignnone size-thumbnail wp-image-12767" src="https://www.xworx.app/wp-content/uploads/2025/02/IMG_3915-150x150.webp" alt="" width="150" height="150" /></a> <a href="https://www.xworx.app/wp-content/uploads/2025/02/IMG_3911.webp"><img class="alignnone size-thumbnail wp-image-12768" src="https://www.xworx.app/wp-content/uploads/2025/02/IMG_3911-150x150.webp" alt="" width="150" height="150" /></a> <a href="https://www.xworx.app/wp-content/uploads/2025/02/IMG_3910.webp"><img class="alignnone size-thumbnail wp-image-12769" src="https://www.xworx.app/wp-content/uploads/2025/02/IMG_3910-150x150.webp" alt="" width="150" height="150" /></a> <a href="https://www.xworx.app/wp-content/uploads/2025/02/Broken_bezel.webp"><img class="alignnone size-thumbnail wp-image-12770" src="https://www.xworx.app/wp-content/uploads/2025/02/Broken_bezel-150x150.webp" alt="" width="150" height="150" /></a> <a href="https://www.xworx.app/wp-content/uploads/2025/02/Tape_covering_manufacturer.webp"><img class="alignnone size-thumbnail wp-image-12771" src="https://www.xworx.app/wp-content/uploads/2025/02/Tape_covering_manufacturer-150x150.webp" alt="" width="150" height="150" /></a> Unchanged: Unchanged: Unchanged: Unchanged: Unchanged: <h3>Minimum size of SSDs to include/wipe in your devices: 128GB</h3> Unchanged: <h3>Minimum size of SSDs to include/wipe in your devices: 128GB</h3> Unchanged: Anything SSD storage underneath 128GB should be given to your supervisor to be taken out of normal circulation. Unchanged: Anything SSD storage underneath 128GB should be given to your supervisor to be taken out of normal circulation. Unchanged: Unchanged: Unchanged: <h2>P.S.</h2> Unchanged: <h2>P.S.</h2> Unchanged: <ul> Unchanged: <ul> Unchanged: <li>All PCs must be registered if possible. If a PC can not be registered, leave a note explaining the reason.</li> Unchanged: <li>All PCs must be registered if possible. If a PC can not be registered, leave a note explaining the reason.</li> Unchanged: <li>If a PC does not have a hard drive, plug a USB drive for wiping in Killdisk Active Boot Disk only, so it can print out an erase report.</li> Unchanged: <li>If a PC does not have a hard drive, plug a USB drive for wiping in Killdisk Active Boot Disk only, so it can print out an erase report.</li> Unchanged: <li>Remove the HDD and RAM from all scrap PCs.</li> Unchanged: <li>Remove the HDD and RAM from all scrap PCs.</li> Unchanged: <li>Remove the 6th Gen or newer CPU from scrap PCs.</li> Unchanged: <li>Remove the 6th Gen or newer CPU from scrap PCs.</li> Unchanged: </ul> Unchanged: </ul> — pctechlead@beyondsurplus.com: Updated post "PC Tech Level 3-Micro PC Wiping: Micro/Mini/Tiny PC PXE Boot and Registration" Show details
Content
Before After Unchanged: <strong>PXE boot, or Preboot Execution Environment, is a network booting process that allows computers to boot from a network instead of a local disk. PXE is a client-server protocol that uses a DHCP or TFTP server to download software for booting.</strong> Unchanged: <strong>PXE boot, or Preboot Execution Environment, is a network booting process that allows computers to boot from a network instead of a local disk. PXE is a client-server protocol that uses a DHCP or TFTP server to download software for booting.</strong> Unchanged: <strong>PXE boot is commonly used for:</strong> Unchanged: <strong>PXE boot is commonly used for:</strong> Unchanged: <ul> Unchanged: <ul> Unchanged: <li><strong>Mass deployment: Installing the same operating system (OS) on many computers at once</strong></li> Unchanged: <li><strong>Mass deployment: Installing the same operating system (OS) on many computers at once</strong></li> Unchanged: <li><strong>Disaster recovery: Recovering from a disaster by installing a new OS</strong></li> Unchanged: <li><strong>Disaster recovery: Recovering from a disaster by installing a new OS</strong></li> Unchanged: <li><strong>Remote maintenance: Performing maintenance tasks on systems without physically accessing them.</strong></li> Unchanged: <li><strong>Remote maintenance: Performing maintenance tasks on systems without physically accessing them.</strong></li> Unchanged: </ul> Unchanged: </ul> Unchanged: <h2>Tech Requirements</h2> Unchanged: <h2>Tech Requirements</h2> Unchanged: <ul> Unchanged: <ul> Unchanged: <li>Finish PC tech level 1 training and maintain a good performance.</li> Unchanged: <li>Finish PC tech level 1 training and maintain a good performance.</li> Unchanged: <li>Test the i series PC wholesale with minimal or no errors.</li> Unchanged: <li>Test the i series PC wholesale with minimal or no errors.</li> Unchanged: </ul> Unchanged: </ul> Unchanged: <h2><strong>Tools</strong></h2> Unchanged: <h2><strong>Tools</strong></h2> Unchanged: <ul> Unchanged: <ul> Unchanged: <li>Ballpoint Pen. (Do not use a Gel Pen)</li> Unchanged: <li>Ballpoint Pen. (Do not use a Gel Pen)</li> Unchanged: <li>The electric screwdriver set the torque at 1.</li> Unchanged: <li>The electric screwdriver set the torque at 1.</li> Unchanged: <li>Driver bits.</li> Unchanged: <li>Driver bits.</li> Unchanged: <li>Screwdriver set.</li> Unchanged: <li>Screwdriver set.</li> Unchanged: </ul> Unchanged: </ul> Unchanged: <h2><strong>Stage #1: Physical Condition Checker</strong></h2> Unchanged: <h2><strong>Stage #1: Physical Condition Checker</strong></h2> Unchanged: [embeddoc url="https://xworxapp.wpenginepowered.com/wp-content/uploads/2025/04/Desktop-wiping-checklist-1-1.pdf" width="600px" Height="800px" viewer="browser"] Unchanged: [embeddoc url="https://xworxapp.wpenginepowered.com/wp-content/uploads/2025/04/Desktop-wiping-checklist-1-1.pdf" width="600px" Height="800px" viewer="browser"] Unchanged: <ul> Unchanged: <ul> Unchanged: <li><strong>Scan the serial number </strong><strong>on the label to avoid human error.</strong></li> Unchanged: <li><strong>Scan the serial number </strong><strong>on the label to avoid human error.</strong></li> Unchanged: <li><strong>If the serial number is damaged, leave the section blank.</strong></li> Unchanged: <li><strong>If the serial number is damaged, leave the section blank.</strong></li> Unchanged: <li><b>Record the pickup number on the label. (<strong>#1126 for drop-off, #0000 for PC that does not have the pickup#)</strong></b></li> Unchanged: <li><b>Record the pickup number on the label. (<strong>#1126 for drop-off, #0000 for PC that does not have the pickup#)</strong></b></li> Unchanged: <li><strong>Print out the label.</strong></li> Unchanged: <li><strong>Print out the label.</strong></li> Unchanged: <li><strong>Apply the label to the PC.</strong></li> Unchanged: <li><strong>Apply the label to the PC.</strong></li> Unchanged: <li><a href="https://xworxapp.wpenginepowered.com/wp-content/uploads/2025/04/IMG_1463.jpg"><img class="alignnone size-medium wp-image-12084" src="https://xworxapp.wpenginepowered.com/wp-content/uploads/2025/04/IMG_1463-300x225.jpg" alt="" width="300" height="225" /></a></li> Unchanged: <li><a href="https://xworxapp.wpenginepowered.com/wp-content/uploads/2025/04/IMG_1463.jpg"><img class="alignnone size-medium wp-image-12084" src="https://xworxapp.wpenginepowered.com/wp-content/uploads/2025/04/IMG_1463-300x225.jpg" alt="" width="300" height="225" /></a></li> Unchanged: <li><strong>Inspect the PC's physical condition and record on the label</strong> Unchanged: <li><strong>Inspect the PC's physical condition and record on the label</strong> Unchanged: <ul> Unchanged: <ul> Unchanged: <li>Open the case and check the motherboard condition.</li> Unchanged: <li>Open the case and check the motherboard condition.</li> Unchanged: <li>Remove any loose screws inside.</li> Unchanged: <li>Remove any loose screws inside.</li> Unchanged: <li>Add RAM or storage as needed.</li> Unchanged: <li>Add RAM or storage as needed.</li> Unchanged: </ul> Unchanged: </ul> Unchanged: </li> Unchanged: </li> Unchanged: <li><strong>Based on the PC's physical condition, determine the next step for the PC. (</strong>Refer to the<strong> Micro PC put away </strong>section<strong>)</strong> Unchanged: <li><strong>Based on the PC's physical condition, determine the next step for the PC. (</strong>Refer to the<strong> Micro PC put away </strong>section<strong>)</strong> Unchanged: <ul> Unchanged: <ul> Unchanged: <li><strong>Scrap</strong>: Unchanged: <li><strong>Scrap</strong>: Unchanged: <ul> Unchanged: <ul> Unchanged: <li>Remove the RAM and storage, then initial on the Tech 1 field.</li> Unchanged: <li>Remove the RAM and storage, then initial on the Tech 1 field.</li> Unchanged: <li>Remove the CPU, then put the CPU in the CPU tray.</li> Unchanged: <li>Remove the CPU, then put the CPU in the CPU tray.</li> Unchanged: <li>Set it aside and accumulate until finished with all PCs for the day</li> Unchanged: <li>Set it aside and accumulate until finished with all PCs for the day</li> Unchanged: <li>Call a second person to verify the PC is good for scrap. The second person will be initialed on the Tech 2 field.</li> Unchanged: <li>Call a second person to verify the PC is good for scrap. The second person will be initialed on the Tech 2 field.</li> Unchanged: <li>Put away the scrap PCs by the end of the day.</li> Unchanged: <li>Put away the scrap PCs by the end of the day.</li> Unchanged: </ul> Unchanged: </ul> Unchanged: </li> Unchanged: </li> Unchanged: <li><strong>Need to set up for wiping</strong>: Unchanged: <li><strong>Need to set up for wiping</strong>: Unchanged: <ul> Unchanged: <ul> Unchanged: <li><strong>i series 6th Gen i-series or dual core:</strong> Remove M.2 NVME drive. Other types of hard drives leave AS-IS. Make sure RAM is 2GB or more.</li> Unchanged: <li><strong>i series 6th Gen i-series or dual core:</strong> Remove M.2 NVME drive. Other types of hard drives leave AS-IS. Make sure RAM is 2GB or more.</li> Unchanged: <li><strong>i series 7th gen and newer or AMD Ryzen:</strong> make sure all PCs are included with hard drives and RAM. Make sure to remove the asset tag from the hard drive if you add a hard drive to a PC.</li> Unchanged: <li><strong>i series 7th gen and newer or AMD Ryzen:</strong> make sure all PCs are included with hard drives and RAM. Make sure to remove the asset tag from the hard drive if you add a hard drive to a PC.</li> Unchanged: </ul> Unchanged: </ul> Unchanged: </li> Unchanged: </li> Unchanged: </ul> Unchanged: </ul> Unchanged: </li> Unchanged: </li> Unchanged: </ul> Unchanged: </ul> Unchanged: <hr /> Unchanged: <hr /> Unchanged: <h2><strong>Stage #2: Wiping Tech: Set up PCs for wiping</strong></h2> Unchanged: <h2><strong>Stage #2: Wiping Tech: Set up PCs for wiping</strong></h2> Unchanged: <strong>Most PCs will be erased through PXE boot.</strong> Unchanged: <strong>Most PCs will be erased through PXE boot.</strong> Unchanged: <strong>Some PCs can not boot to PXE for some reason and then need to use the Killdisk USB drive to erase the storage. </strong> Unchanged: <strong>Some PCs can not boot to PXE for some reason and then need to use the Killdisk USB drive to erase the storage. </strong> Unchanged: <strong>While going through the steps for wiping, mark the label accordingly. </strong> Unchanged: <strong>While going through the steps for wiping, mark the label accordingly. </strong> Unchanged: When you finish setting up one PC, set up the next one until the bench is filled out. Unchanged: When you finish setting up one PC, set up the next one until the bench is filled out. Unchanged: <h3><strong>Wipe through PXE</strong></h3> Unchanged: <h3><strong>Wipe through PXE</strong></h3> Unchanged: <strong>Connect the PC to the power supply, Video cable, keyboard, mouse, and Ethernet cable.</strong> Unchanged: <strong>Connect the PC to the power supply, Video cable, keyboard, mouse, and Ethernet cable.</strong> Unchanged: <ul> Unchanged: <ul> Unchanged: <li>Use the OEM brand AC adapter for the PC.</li> Unchanged: <li>Use the OEM brand AC adapter for the PC.</li> Unchanged: <li>If the PC has a bad Ethernet port, use an Ethernet dongle to connect to the Ethernet cable.</li> Unchanged: <li>If the PC has a bad Ethernet port, use an Ethernet dongle to connect to the Ethernet cable.</li> Unchanged: </ul> Unchanged: </ul> Unchanged: <strong>Based on the PC's power condition, determine the next step for the PC.</strong> Unchanged: <strong>Based on the PC's power condition, determine the next step for the PC.</strong> Unchanged: <ul> Unchanged: <ul> Unchanged: <li style="list-style-type: none;"> Unchanged: <li style="list-style-type: none;"> Unchanged: <ul> Unchanged: <ul> Unchanged: <li><strong>Scrap</strong>: Unchanged: <li><strong>Scrap</strong>: Unchanged: <ul> Unchanged: <ul> Unchanged: <li>Remove the RAM and storage, then initial on the Tech 1 field.</li> Unchanged: <li>Remove the RAM and storage, then initial on the Tech 1 field.</li> Unchanged: <li>Set it aside and accumulate until finished with all PCs for the day</li> Unchanged: <li>Set it aside and accumulate until finished with all PCs for the day</li> Unchanged: <li>Call a second person to verify the PC is good for scrap. The second person will be initialed on the Tech 2 field.</li> Unchanged: <li>Call a second person to verify the PC is good for scrap. The second person will be initialed on the Tech 2 field.</li> Unchanged: <li>Put away the scrap PCs by the end of the day.</li> Unchanged: <li>Put away the scrap PCs by the end of the day.</li> Unchanged: </ul> Unchanged: </ul> Unchanged: </li> Unchanged: </li> Unchanged: <li><strong>Good to set up for wiping</strong>: Unchanged: <li><strong>Good to set up for wiping</strong>: Unchanged: <ul> Unchanged: <ul> Unchanged: <li><strong>i series 6th Gen and older or dual-core PCs</strong></li> Unchanged: <li><strong>i series 6th Gen and older or dual-core PCs</strong></li> Unchanged: <li><strong>i series 7th gen and newer or AMD Ryzen</strong></li> Unchanged: <li><strong>i series 7th gen and newer or AMD Ryzen</strong></li> Unchanged: </ul> Unchanged: </ul> Unchanged: </li> Unchanged: </li> Unchanged: </ul> Unchanged: </ul> Unchanged: </li> Unchanged: </li> Unchanged: </ul> Unchanged: </ul> Unchanged: <strong>Power on the PC, then enter the BIOS settings.</strong> Unchanged: <strong>Power on the PC, then enter the BIOS settings.</strong> Unchanged: <ul> Unchanged: <ul> Unchanged: <li>Common Key for entering the BIOS setup. Unchanged: <li>Common Key for entering the BIOS setup. Unchanged: <ul> Unchanged: <ul> Unchanged: <li>Dell: F2</li> Unchanged: <li>Dell: F2</li> Unchanged: <li>Lenovo: Unchanged: <li>Lenovo: Unchanged: <ul> Unchanged: <ul> Unchanged: <li>F1</li> Unchanged: <li>F1</li> Unchanged: <li>Enter then F1</li> Unchanged: <li>Enter then F1</li> Unchanged: <li>F2</li> Unchanged: <li>F2</li> Unchanged: </ul> Unchanged: </ul> Unchanged: </li> Unchanged: </li> Unchanged: <li>HP: F10 or Esc then F10</li> Unchanged: <li>HP: F10 or Esc then F10</li> Unchanged: </ul> Unchanged: </ul> Unchanged: </li> Unchanged: </li> Unchanged: </ul> Unchanged: </ul> Unchanged: <strong>While booting, check for a splash screen(Owner tag, Asset tag, or Custom logo). Only the Dell splash screen can be removed or replaced.</strong> Unchanged: <strong>While booting, check for a splash screen(Owner tag, Asset tag, or Custom logo). Only the Dell splash screen can be removed or replaced.</strong> Unchanged: <strong>Refer to:</strong> Unchanged: <strong>Refer to:</strong> Unchanged: <ul> Unchanged: <ul> Unchanged: <li><strong><a href="https://www.dell.com/support/kbdoc/en-us/000129832/how-to-reset-a-custom-bios-splash-screen-to-the-dell-splash-screen" target="_blank" rel="noopener">How to reset a custom BIOS Splash screen to the Dell Splash Screen</a></strong></li> Unchanged: <li><strong><a href="https://www.dell.com/support/kbdoc/en-us/000129832/how-to-reset-a-custom-bios-splash-screen-to-the-dell-splash-screen" target="_blank" rel="noopener">How to reset a custom BIOS Splash screen to the Dell Splash Screen</a></strong></li> Unchanged: <li><strong><a href="https://xworxapp.wpenginepowered.com/?p=11884" target="_blank" rel="noopener">How to Use Dell DOS Asset Tag Utility to remove Asset tag and Owner Tag</a></strong></li> Unchanged: <li><strong><a href="https://xworxapp.wpenginepowered.com/?p=11884" target="_blank" rel="noopener">How to Use Dell DOS Asset Tag Utility to remove Asset tag and Owner Tag</a></strong></li> Unchanged: </ul> Unchanged: </ul> Unchanged: <strong>If the Splash Screen contains the customer's information(Company name or person's name, etc.) that can not be removed, the PC needs to be scrapped.</strong> Unchanged: <strong>If the Splash Screen contains the customer's information(Company name or person's name, etc.) that can not be removed, the PC needs to be scrapped.</strong> Unchanged: <strong>If you can remove the splash screen, go next. </strong> Unchanged: <strong>If you can remove the splash screen, go next. </strong> Unchanged: <strong>If the PC has a BIOS password, </strong> Unchanged: <strong>If the PC has a BIOS password, </strong> Unchanged: <ul> Unchanged: <ul> Unchanged: <li><strong>Use the <a href="https://beta.bios-pw.org/" target="_blank" rel="noopener">BIOS Master Password Generator</a> to generate a master password to unlock the BIOS.</strong></li> Unchanged: <li><strong>Use the <a href="https://beta.bios-pw.org/" target="_blank" rel="noopener">BIOS Master Password Generator</a> to generate a master password to unlock the BIOS.</strong></li> Unchanged: <li><strong>Find the PWSD jumper to reset the BIOS password.</strong></li> Unchanged: <li><strong>Find the PWSD jumper to reset the BIOS password.</strong></li> Unchanged: <li><a href="https://xworxapp.wpenginepowered.com/wp-content/uploads/2025/04/IMG_1466.jpg"><img class="alignnone size-medium wp-image-12086" src="https://xworxapp.wpenginepowered.com/wp-content/uploads/2025/04/IMG_1466-300x225.jpg" alt="" width="300" height="225" /></a></li> Unchanged: <li><a href="https://xworxapp.wpenginepowered.com/wp-content/uploads/2025/04/IMG_1466.jpg"><img class="alignnone size-medium wp-image-12086" src="https://xworxapp.wpenginepowered.com/wp-content/uploads/2025/04/IMG_1466-300x225.jpg" alt="" width="300" height="225" /></a></li> Unchanged: </ul> Unchanged: </ul> Unchanged: Example video for Lenovo micro PC. Use Google to learn what pins to use for your particular machine: Unchanged: Example video for Lenovo micro PC. Use Google to learn what pins to use for your particular machine: Unchanged: https://www.youtube.com/watch?v=wqRjWNAcicQ Unchanged: https://www.youtube.com/watch?v=wqRjWNAcicQ Unchanged: <strong>If the BIOS password can not be removed, refer to <a href="https://xworxapp.wpenginepowered.com/?p=11851" target="_blank" rel="noopener">How to bypass BIOS lock for booting to USB drive</a></strong> Unchanged: <strong>If the BIOS password can not be removed, refer to <a href="https://xworxapp.wpenginepowered.com/?p=11851" target="_blank" rel="noopener">How to bypass BIOS lock for booting to USB drive</a></strong> Unchanged: <strong>I</strong><strong>f the BIOS password is removed or the BIOS is not locked, go to the next step.</strong> Unchanged: <strong>I</strong><strong>f the BIOS password is removed or the BIOS is not locked, go to the next step.</strong> Unchanged: <strong>In the BIOS, locate the serial number, and compare it with the label to see if it matches. Record the serial number if the serial section on the label is blank.</strong> Unchanged: <strong>In the BIOS, locate the serial number, and compare it with the label to see if it matches. Record the serial number if the serial section on the label is blank.</strong> Unchanged: <strong>In the BIOS settings. Find the reset option. Reset the BIOS to Factory default or BIOS default. (This will eliminate some issues caused by the wrong BIOS setting.) </strong> Unchanged: <strong>In the BIOS settings. Find the reset option. Reset the BIOS to Factory default or BIOS default. (This will eliminate some issues caused by the wrong BIOS setting.) </strong> Unchanged: <a href="https://xworxapp.wpenginepowered.com/wp-content/uploads/2025/04/IMG_1468.jpg"><img class="alignnone size-medium wp-image-12087" src="https://xworxapp.wpenginepowered.com/wp-content/uploads/2025/04/IMG_1468-300x169.jpg" alt="" width="300" height="169" /></a> Unchanged: <a href="https://xworxapp.wpenginepowered.com/wp-content/uploads/2025/04/IMG_1468.jpg"><img class="alignnone size-medium wp-image-12087" src="https://xworxapp.wpenginepowered.com/wp-content/uploads/2025/04/IMG_1468-300x169.jpg" alt="" width="300" height="169" /></a> Unchanged: <strong>Reboot the PC and re-enter the BIOS settings.</strong> Unchanged: <strong>Reboot the PC and re-enter the BIOS settings.</strong> Unchanged: <strong>Disable Secure Boot. (With Secure Boot on, the PXE boot will not work.)</strong> Unchanged: <strong>Disable Secure Boot. (With Secure Boot on, the PXE boot will not work.)</strong> Unchanged: <a href="https://xworxapp.wpenginepowered.com/wp-content/uploads/2025/04/IMG_1470.jpg"><img class="alignnone size-medium wp-image-12088" src="https://xworxapp.wpenginepowered.com/wp-content/uploads/2025/04/IMG_1470-300x169.jpg" alt="" width="300" height="169" /></a> Unchanged: <a href="https://xworxapp.wpenginepowered.com/wp-content/uploads/2025/04/IMG_1470.jpg"><img class="alignnone size-medium wp-image-12088" src="https://xworxapp.wpenginepowered.com/wp-content/uploads/2025/04/IMG_1470-300x169.jpg" alt="" width="300" height="169" /></a> Unchanged: <strong>Enable Network boot or PXE boot in BIOS (IPv4). </strong> Unchanged: <strong>Enable Network boot or PXE boot in BIOS (IPv4). </strong> Unchanged: <strong>Change network boot to 1st boot in the boot order.</strong> Unchanged: <strong>Change network boot to 1st boot in the boot order.</strong> Unchanged: <a href="https://xworxapp.wpenginepowered.com/wp-content/uploads/2025/04/IMG_1471.jpg"><img class="alignnone size-medium wp-image-12089" src="https://xworxapp.wpenginepowered.com/wp-content/uploads/2025/04/IMG_1471-300x169.jpg" alt="" width="300" height="169" /></a> Unchanged: <a href="https://xworxapp.wpenginepowered.com/wp-content/uploads/2025/04/IMG_1471.jpg"><img class="alignnone size-medium wp-image-12089" src="https://xworxapp.wpenginepowered.com/wp-content/uploads/2025/04/IMG_1471-300x169.jpg" alt="" width="300" height="169" /></a> Unchanged: <strong>Change the SATA setting from RAID to AHCI for the Dell PC.</strong> Unchanged: <strong>Change the SATA setting from RAID to AHCI for the Dell PC.</strong> Unchanged: <strong>Disable Intel VMD and adjust SATA settings to AHCI for 11th Gen or newer PCs.</strong> Unchanged: <strong>Disable Intel VMD and adjust SATA settings to AHCI for 11th Gen or newer PCs.</strong> Unchanged: <strong>Save settings and reboot the PC.</strong> Unchanged: <strong>Save settings and reboot the PC.</strong> Unchanged: If everything is working correctly, the PC will PXE boot; this process can take a few minutes. Unchanged: If everything is working correctly, the PC will PXE boot; this process can take a few minutes. Unchanged: The first time the PXE menu is loaded on the PC, it will display “Host is NOT registered.” Unchanged: The first time the PXE menu is loaded on the PC, it will display “Host is NOT registered.” Unchanged: <a href="https://xworxapp.wpenginepowered.com/wp-content/uploads/2022/03/IMG_1475.jpg"><img class="alignnone size-medium wp-image-8132" src="https://xworxapp.wpenginepowered.com/wp-content/uploads/2022/03/IMG_1475-300x169.jpg" alt="" width="300" height="169" /></a> Unchanged: <a href="https://xworxapp.wpenginepowered.com/wp-content/uploads/2022/03/IMG_1475.jpg"><img class="alignnone size-medium wp-image-8132" src="https://xworxapp.wpenginepowered.com/wp-content/uploads/2022/03/IMG_1475-300x169.jpg" alt="" width="300" height="169" /></a> Unchanged: If the PC uses an Ethernet dongle to PXE boot, it might display (Host is registered as XXXXXXXXXX), just go to the step to load "Killdisk Active Boot Disk". Unchanged: If the PC uses an Ethernet dongle to PXE boot, it might display (Host is registered as XXXXXXXXXX), just go to the step to load "Killdisk Active Boot Disk". Unchanged: <strong><span style="color: #ff0000;">If a PC does not have storage, plug an empty USB drive into the PC. The PC will give a registration error if there is no storage media detected.</span></strong> Unchanged: <strong><span style="color: #ff0000;">If a PC does not have storage, plug an empty USB drive into the PC. The PC will give a registration error if there is no storage media detected.</span></strong> Unchanged: Select “Quick Registration and Inventory” from the menu. (Make sure the PC has a hard drive or USB drive.) Unchanged: Select “Quick Registration and Inventory” from the menu. (Make sure the PC has a hard drive or USB drive.) Unchanged: After letting the program run, the PC will be rebooted to the PXE screen again. This time will display "Host is registered as XXXXXXXXXX". (Check the section on the label) Unchanged: After letting the program run, the PC will be rebooted to the PXE screen again. This time will display "Host is registered as XXXXXXXXXX". (Check the section on the label) Unchanged: Then choose “Killdisk Active Boot Disk” Unchanged: Then choose “Killdisk Active Boot Disk” Unchanged: <a href="https://xworxapp.wpenginepowered.com/wp-content/uploads/2022/03/IMG_1476.jpg"><img class="alignnone size-medium wp-image-8133" src="https://xworxapp.wpenginepowered.com/wp-content/uploads/2022/03/IMG_1476-300x169.jpg" alt="" width="300" height="169" /></a> Unchanged: <a href="https://xworxapp.wpenginepowered.com/wp-content/uploads/2022/03/IMG_1476.jpg"><img class="alignnone size-medium wp-image-8133" src="https://xworxapp.wpenginepowered.com/wp-content/uploads/2022/03/IMG_1476-300x169.jpg" alt="" width="300" height="169" /></a> Unchanged: After KillDisk is loaded, click the NIC Logo in the system tray, then click the Initialize Network button. Unchanged: After KillDisk is loaded, click the NIC Logo in the system tray, then click the Initialize Network button. Unchanged: <a href="https://xworxapp.wpenginepowered.com/wp-content/uploads/2022/03/IMG_1478.jpg"><img class="alignnone size-medium wp-image-8135" src="https://xworxapp.wpenginepowered.com/wp-content/uploads/2022/03/IMG_1478-300x169.jpg" alt="" width="300" height="169" /></a> Unchanged: <a href="https://xworxapp.wpenginepowered.com/wp-content/uploads/2022/03/IMG_1478.jpg"><img class="alignnone size-medium wp-image-8135" src="https://xworxapp.wpenginepowered.com/wp-content/uploads/2022/03/IMG_1478-300x169.jpg" alt="" width="300" height="169" /></a> Unchanged: After initializing the network, Unchanged: After initializing the network, Unchanged: Open the <span lang="zxx"><u>Active@KillDisk</u></span> Unchanged: Open the <span lang="zxx"><u>Active@KillDisk</u></span> Unchanged: The system may give you an error about Active@KillDisk already being open. If this error pops up, press Alt + Tab and switch to Active@KillDisk. Unchanged: The system may give you an error about Active@KillDisk already being open. If this error pops up, press Alt + Tab and switch to Active@KillDisk. Unchanged: On the bottom right of the opened window, there is a network status icon. The green check mark means the PC is online. If the network status icon has a red x on it, that means the PC is offline. Unchanged: On the bottom right of the opened window, there is a network status icon. The green check mark means the PC is online. If the network status icon has a red x on it, that means the PC is offline. Unchanged: <a href="https://xworxapp.wpenginepowered.com/wp-content/uploads/2022/03/IMG_2267.jpg"><img class="alignnone size-medium wp-image-9190" src="https://xworxapp.wpenginepowered.com/wp-content/uploads/2022/03/IMG_2267-300x169.jpg" alt="" width="300" height="169" /></a><a href="https://xworxapp.wpenginepowered.com/wp-content/uploads/2022/03/IMG_2265.jpg"><img class="alignnone size-medium wp-image-9189" src="https://xworxapp.wpenginepowered.com/wp-content/uploads/2022/03/IMG_2265-300x169.jpg" alt="" width="300" height="169" /></a> Unchanged: <a href="https://xworxapp.wpenginepowered.com/wp-content/uploads/2022/03/IMG_2267.jpg"><img class="alignnone size-medium wp-image-9190" src="https://xworxapp.wpenginepowered.com/wp-content/uploads/2022/03/IMG_2267-300x169.jpg" alt="" width="300" height="169" /></a><a href="https://xworxapp.wpenginepowered.com/wp-content/uploads/2022/03/IMG_2265.jpg"><img class="alignnone size-medium wp-image-9189" src="https://xworxapp.wpenginepowered.com/wp-content/uploads/2022/03/IMG_2265-300x169.jpg" alt="" width="300" height="169" /></a> Unchanged: Then choose all Hard Drives that need to be wiped and click the “ERASE DISK” button. (Ctrl+clicked the drives that need to be wiped.) Unchanged: Then choose all Hard Drives that need to be wiped and click the “ERASE DISK” button. (Ctrl+clicked the drives that need to be wiped.) Unchanged: <strong>Wipe an empty USB drive if there is no storage in the PC.</strong> Unchanged: <strong>Wipe an empty USB drive if there is no storage in the PC.</strong> Unchanged: For the offline PC, expand the Erase Certificate option, choose Save to PDF, and change the save location to X:\ Unchanged: For the offline PC, expand the Erase Certificate option, choose Save to PDF, and change the save location to X:\ Unchanged: <a href="https://xworxapp.wpenginepowered.com/wp-content/uploads/2022/03/snap_153039.jpg"><img class="alignnone size-medium wp-image-11840" src="https://xworxapp.wpenginepowered.com/wp-content/uploads/2022/03/snap_153039-300x164.jpg" alt="" width="300" height="164" /></a> Unchanged: <a href="https://xworxapp.wpenginepowered.com/wp-content/uploads/2022/03/snap_153039.jpg"><img class="alignnone size-medium wp-image-11840" src="https://xworxapp.wpenginepowered.com/wp-content/uploads/2022/03/snap_153039-300x164.jpg" alt="" width="300" height="164" /></a> Unchanged: In the Disk Erase tab, make sure the Erase method is US DoD 5220.22-M 3 Pass. Verify is 100%, check the Initialize disk after erase, check the Write fingerprint to the first sector, and click Start. Unchanged: In the Disk Erase tab, make sure the Erase method is US DoD 5220.22-M 3 Pass. Verify is 100%, check the Initialize disk after erase, check the Write fingerprint to the first sector, and click Start. Unchanged: <a href="https://xworxapp.wpenginepowered.com/wp-content/uploads/2022/03/IMG_1485.jpg"><img class="alignnone size-medium wp-image-8136" src="https://xworxapp.wpenginepowered.com/wp-content/uploads/2022/03/IMG_1485-300x169.jpg" alt="" width="300" height="169" /></a> Unchanged: <a href="https://xworxapp.wpenginepowered.com/wp-content/uploads/2022/03/IMG_1485.jpg"><img class="alignnone size-medium wp-image-8136" src="https://xworxapp.wpenginepowered.com/wp-content/uploads/2022/03/IMG_1485-300x169.jpg" alt="" width="300" height="169" /></a> Unchanged: <hr /> Unchanged: <hr /> Unchanged: <h2><strong>Stage #3: Erase Certificate Matching</strong></h2> Unchanged: <h2><strong>Stage #3: Erase Certificate Matching</strong></h2> Unchanged: <h3><strong>The PC was wiped through the PXE Killdisk</strong></h3> Unchanged: <h3><strong>The PC was wiped through the PXE Killdisk</strong></h3> Unchanged: Collect Erase Certificates from the Printer. (Next day) Unchanged: Collect Erase Certificates from the Printer. (Next day) Unchanged: The printer is located in the PC tech area. Unchanged: The printer is located in the PC tech area. Unchanged: <a href="https://xworxapp.wpenginepowered.com/wp-content/uploads/2022/03/IMG_1016.jpg"><img class="alignnone wp-image-11841 size-medium" src="https://xworxapp.wpenginepowered.com/wp-content/uploads/2022/03/IMG_1016-300x266.jpg" alt="" width="300" height="266" /></a> Unchanged: <a href="https://xworxapp.wpenginepowered.com/wp-content/uploads/2022/03/IMG_1016.jpg"><img class="alignnone wp-image-11841 size-medium" src="https://xworxapp.wpenginepowered.com/wp-content/uploads/2022/03/IMG_1016-300x266.jpg" alt="" width="300" height="266" /></a> Unchanged: <h3><strong>For the offline PC, you need to print the certificate manually.</strong></h3> Unchanged: <h3><strong>For the offline PC, you need to print the certificate manually.</strong></h3> Unchanged: Plug a<strong> formatted USB drive </strong>into the PC. Unchanged: Plug a<strong> formatted USB drive </strong>into the PC. Unchanged: On the wiping result window, click the <strong>Print</strong> button, and the <strong>Print Preview</strong> window will open. Unchanged: On the wiping result window, click the <strong>Print</strong> button, and the <strong>Print Preview</strong> window will open. Unchanged: <a href="https://xworxapp.wpenginepowered.com/wp-content/uploads/2022/03/Untitled.jpg" data-lb-type="grouped-post"><img class="alignnone size-medium wp-image-11844" src="https://xworxapp.wpenginepowered.com/wp-content/uploads/2022/03/Untitled-300x225.jpg" alt="" width="300" height="225" /></a> Unchanged: <a href="https://xworxapp.wpenginepowered.com/wp-content/uploads/2022/03/Untitled.jpg" data-lb-type="grouped-post"><img class="alignnone size-medium wp-image-11844" src="https://xworxapp.wpenginepowered.com/wp-content/uploads/2022/03/Untitled-300x225.jpg" alt="" width="300" height="225" /></a> Unchanged: Click the print icon on the Print Preview window, then save the <strong>Erase Certificate </strong>PDF file to the USB drive. Unchanged: Click the print icon on the Print Preview window, then save the <strong>Erase Certificate </strong>PDF file to the USB drive. Unchanged: <a href="https://xworxapp.wpenginepowered.com/wp-content/uploads/2022/03/IMG_1018.jpg" data-lb-type="grouped-post"><img class="alignnone size-medium wp-image-11845" src="https://xworxapp.wpenginepowered.com/wp-content/uploads/2022/03/IMG_1018-300x225.jpg" alt="" width="300" height="225" /></a> Unchanged: <a href="https://xworxapp.wpenginepowered.com/wp-content/uploads/2022/03/IMG_1018.jpg" data-lb-type="grouped-post"><img class="alignnone size-medium wp-image-11845" src="https://xworxapp.wpenginepowered.com/wp-content/uploads/2022/03/IMG_1018-300x225.jpg" alt="" width="300" height="225" /></a> Unchanged: Unplug the <strong>formatted USB</strong> and go to the next PC that needs to print the <strong>Erase Certificate </strong>manually. Unchanged: Unplug the <strong>formatted USB</strong> and go to the next PC that needs to print the <strong>Erase Certificate </strong>manually. Unchanged: After collecting all PDF files, go to a workstation to print out the <strong>Erase Certificate.</strong> Unchanged: After collecting all PDF files, go to a workstation to print out the <strong>Erase Certificate.</strong> Unchanged: <h3><strong>Match the Erase Certificate with the wiped PC.</strong></h3> Unchanged: <h3><strong>Match the Erase Certificate with the wiped PC.</strong></h3> Unchanged: Match the PC serial number and put the certificate with the PC. The certificate will list the PC's serial number as “BIOS Serial.” Unchanged: Match the PC serial number and put the certificate with the PC. The certificate will list the PC's serial number as “BIOS Serial.” Unchanged: Use painter's tape to tape the folded certificate at the bottom of the PC. Display the Hardware Information for QC. Unchanged: Use painter's tape to tape the folded certificate at the bottom of the PC. Display the Hardware Information for QC. Unchanged: <a href="https://xworxapp.wpenginepowered.com/wp-content/uploads/2022/03/Screenshot-2022-03-09-085300-2.jpg"><img class="alignnone wp-image-11846 size-medium" src="https://xworxapp.wpenginepowered.com/wp-content/uploads/2022/03/Screenshot-2022-03-09-085300-2-216x300.jpg" alt="" width="216" height="300" /></a><a href="https://xworxapp.wpenginepowered.com/wp-content/uploads/2025/04/IMG_1473.jpg"><img class="alignnone size-medium wp-image-12091" src="https://xworxapp.wpenginepowered.com/wp-content/uploads/2025/04/IMG_1473-300x169.jpg" alt="" width="300" height="169" /></a> Unchanged: <a href="https://xworxapp.wpenginepowered.com/wp-content/uploads/2022/03/Screenshot-2022-03-09-085300-2.jpg"><img class="alignnone wp-image-11846 size-medium" src="https://xworxapp.wpenginepowered.com/wp-content/uploads/2022/03/Screenshot-2022-03-09-085300-2-216x300.jpg" alt="" width="216" height="300" /></a><a href="https://xworxapp.wpenginepowered.com/wp-content/uploads/2025/04/IMG_1473.jpg"><img class="alignnone size-medium wp-image-12091" src="https://xworxapp.wpenginepowered.com/wp-content/uploads/2025/04/IMG_1473-300x169.jpg" alt="" width="300" height="169" /></a> Unchanged: <span style="color: #ff0000;"><strong>Do not remove the wiped USB drive.</strong></span> Unchanged: <span style="color: #ff0000;"><strong>Do not remove the wiped USB drive.</strong></span> Unchanged: Mark the label based on the sanitizing status. Unchanged: Mark the label based on the sanitizing status. Unchanged: Record any defects that developed overnight, then initial on the Tech 1 field. Unchanged: Record any defects that developed overnight, then initial on the Tech 1 field. Unchanged: If wiping fails: Unchanged: If wiping fails: Unchanged: <ul> Unchanged: <ul> Unchanged: <li><strong>6th Gen i-series CPU:</strong> remove the hard drive, make the hard drive not included on the label, and mark off the hard drive information from the Erase Certificate.</li> Unchanged: <li><strong>6th Gen i-series CPU:</strong> remove the hard drive, make the hard drive not included on the label, and mark off the hard drive information from the Erase Certificate.</li> Unchanged: <li><strong>7th Gen i-series or newer and AMD Ryzen CPU:</strong> replace the hard drive and wipe the new drive.</li> Unchanged: <li><strong>7th Gen i-series or newer and AMD Ryzen CPU:</strong> replace the hard drive and wipe the new drive.</li> Unchanged: </ul> Unchanged: </ul> Unchanged: <h3><a href="https://xworxapp.wpenginepowered.com/wp-content/uploads/2022/03/2024-09-09-10_05_33-Laptop-Wiping_-Laptop-PEX-Boot-and-Registration.-–-Process-Database.jpg"><img class="alignnone size-medium wp-image-11716" src="https://xworxapp.wpenginepowered.com/wp-content/uploads/2022/03/2024-09-09-10_05_33-Laptop-Wiping_-Laptop-PEX-Boot-and-Registration.-–-Process-Database-151x300.jpg" alt="" width="151" height="300" /></a></h3> Unchanged: <h3><a href="https://xworxapp.wpenginepowered.com/wp-content/uploads/2022/03/2024-09-09-10_05_33-Laptop-Wiping_-Laptop-PEX-Boot-and-Registration.-–-Process-Database.jpg"><img class="alignnone size-medium wp-image-11716" src="https://xworxapp.wpenginepowered.com/wp-content/uploads/2022/03/2024-09-09-10_05_33-Laptop-Wiping_-Laptop-PEX-Boot-and-Registration.-–-Process-Database-151x300.jpg" alt="" width="151" height="300" /></a></h3> Unchanged: If the certificate did not print out for any reason, notify your supervisor. Unchanged: If the certificate did not print out for any reason, notify your supervisor. Unchanged: <hr /> Unchanged: <hr /> Unchanged: <h2><strong>Stage #4: PC wipe Quality Checker</strong></h2> Unchanged: <h2><strong>Stage #4: PC wipe Quality Checker</strong></h2> Unchanged: <strong>Check the PC's physical condition and compare it with the label.</strong> Unchanged: <strong>Check the PC's physical condition and compare it with the label.</strong> Unchanged: <strong>Double-check all sections on the label with the PC, and make sure all sections are checked and correct.</strong> Unchanged: <strong>Double-check all sections on the label with the PC, and make sure all sections are checked and correct.</strong> Unchanged: <strong>After QC the PCs,</strong> Unchanged: <strong>After QC the PCs,</strong> Unchanged: <ul> Unchanged: <ul> Unchanged: <li><strong>6th Gen i-series CPU:</strong> <strong>disconnect all the cables and the USB drive.</strong></li> Unchanged: <li><strong>6th Gen i-series CPU:</strong> <strong>disconnect all the cables and the USB drive.</strong></li> Unchanged: <li><strong>7th Gen i-series or newer and AMD Ryzen CPU:</strong> Unchanged: <li><strong>7th Gen i-series or newer and AMD Ryzen CPU:</strong> Unchanged: <ul> Unchanged: <ul> Unchanged: <li><strong>Check the Autopilot status. Refer to <a href="https://xworxapp.wpenginepowered.com/?p=11800" target="_blank" rel="noopener">How to check Autopilot status for a Windows machine</a></strong></li> Unchanged: <li><strong>Check the Autopilot status. Refer to <a href="https://xworxapp.wpenginepowered.com/?p=11800" target="_blank" rel="noopener">How to check Autopilot status for a Windows machine</a></strong></li> Unchanged: <li><strong> Mark the Label based on the Autopilot status. Circle the OS version on the label.</strong></li> Unchanged: <li><strong> Mark the Label based on the Autopilot status. Circle the OS version on the label.</strong></li> Unchanged: <li><strong>Disconnect all cables.</strong></li> Unchanged: <li><strong>Disconnect all cables.</strong></li> Unchanged: </ul> Unchanged: </ul> Unchanged: </li> Unchanged: </li> Unchanged: </ul> Unchanged: </ul> Unchanged: <hr /> Unchanged: <hr /> Unchanged: <h2><strong>Stage #5: Micro PC put away</strong></h2> Unchanged: <h2><strong>Stage #5: Micro PC put away</strong></h2> Unchanged: Check the label for the PC's condition Unchanged: Check the label for the PC's condition Unchanged: Based on the PC's condition, sort the PCs. Unchanged: Based on the PC's condition, sort the PCs. Unchanged: Put away the PC in the destination vessel. Unchanged: Put away the PC in the destination vessel. Unchanged: <ul> Unchanged: <ul> Unchanged: <li><strong>PC that wipes successfully with no issue(Normal wear and tear allowed), put away: Wiped Micro PCs Unchanged: <li><strong>PC that wipes successfully with no issue(Normal wear and tear allowed), put away: Wiped Micro PCs Unchanged: </strong></li> Unchanged: </strong></li> Unchanged: <li><strong>PC Scrap: (anyone that applies) put away: #1009 SCRAP: PC COMPUTER (Remove RAM, and storage for all PCs)(Remove CPU for 6th Gen or newer CPU PCs) </strong> Unchanged: <li><strong>PC Scrap: (anyone that applies) put away: #1009 SCRAP: PC COMPUTER (Remove RAM, and storage for all PCs)(Remove CPU for 6th Gen or newer CPU PCs) </strong> Unchanged: <ul> Unchanged: <ul> Unchanged: <li><strong>PC that has a power issue. (Include does not power on, Power on no post, power on then off, or random shut off.)</strong></li> Unchanged: <li><strong>PC that has a power issue. (Include does not power on, Power on no post, power on then off, or random shut off.)</strong></li> Unchanged: <li><strong>The s</strong><strong>plash screen cannot be removed.</strong></li> Unchanged: <li><strong>The s</strong><strong>plash screen cannot be removed.</strong></li> Unchanged: <li><strong>Damaged motherboard.</strong></li> Unchanged: <li><strong>Damaged motherboard.</strong></li> Unchanged: <li><strong>Autopilot is locked or unable to check Autopilot status. (7th Gen or newer I series or AMD Ryzen CPUs.)</strong></li> Unchanged: <li><strong>Autopilot is locked or unable to check Autopilot status. (7th Gen or newer I series or AMD Ryzen CPUs.)</strong></li> Unchanged: <li><strong>More than 1 damaged port</strong></li> Unchanged: <li><strong>More than 1 damaged port</strong></li> Unchanged: </ul> Unchanged: </ul> Unchanged: </li> Unchanged: </li> Unchanged: </ul> Unchanged: </ul> Unchanged: <h2></h2> Unchanged: <h2></h2> Added: Added: <h3>Notating missing 2.5" drive caddies in micro PCs</h3> Added: You may encounter newer units that have both an m.2 nvme slot and a 2.5" sata slot, however,<strong> the caddy for the sata slot is missing</strong>. Added: Regardless of whether it is unclear if the machine originally came with a caddy since 2.5" SSDs are less common than m.2 drives these days, <strong>we need to mention in the notes that the caddy is missing if there is a SATA slot that is unusable without a caddy</strong>. According to Paul, we do not need to be overly descriptive when describing what caddy is missing. <strong>Simply writing “missing caddy” in the notes will be sufficient.</strong> Added: <a href="https://www.xworx.app/wp-content/uploads/2025/12/20260204_163609-text.jpg"><img class="alignnone size-medium wp-image-13035" src="https://www.xworx.app/wp-content/uploads/2025/12/20260204_163609-text-169x300.jpg" alt="" width="169" height="300" /></a> Added: Added: Unchanged: <h2>Absolute Persistence in Dells - important BIOS area to now check in every Dell machine</h2> Unchanged: <h2>Absolute Persistence in Dells - important BIOS area to now check in every Dell machine</h2> Unchanged: We've recently come across and began processing<strong> Dell laptops with Absolute Persistence activated. It is now going to require us to check for this being present and active in all the Dell laptops moving forward</strong> because it does not reveal itself until very, very late in the process where we need to leave it plugged into the ethernet for several minutes after autopilot checking before the lock-out screen activates itself. Unchanged: We've recently come across and began processing<strong> Dell laptops with Absolute Persistence activated. It is now going to require us to check for this being present and active in all the Dell laptops moving forward</strong> because it does not reveal itself until very, very late in the process where we need to leave it plugged into the ethernet for several minutes after autopilot checking before the lock-out screen activates itself. Unchanged: Please take a look at the screenshot below: Unchanged: Please take a look at the screenshot below: Unchanged: <a href="https://www.xworx.app/wp-content/uploads/2025/02/20251027_140250.jpg"><img class="alignnone size-thumbnail wp-image-12701" src="https://www.xworx.app/wp-content/uploads/2025/02/20251027_140250-150x150.jpg" alt="" width="150" height="150" /></a> Unchanged: <a href="https://www.xworx.app/wp-content/uploads/2025/02/20251027_140250.jpg"><img class="alignnone size-thumbnail wp-image-12701" src="https://www.xworx.app/wp-content/uploads/2025/02/20251027_140250-150x150.jpg" alt="" width="150" height="150" /></a> Unchanged: Note how the <strong>options for Absolute Persistence are greyed out. This means that Absolute Persistence is activated</strong>. We cannot set this device as is. Hand it off to the PC Tech Team Lead and it will be recorded and sorted away for now. Unchanged: Note how the <strong>options for Absolute Persistence are greyed out. This means that Absolute Persistence is activated</strong>. We cannot set this device as is. Hand it off to the PC Tech Team Lead and it will be recorded and sorted away for now. Unchanged: There is <strong>one extra complication:</strong> <strong>all the BIOS options will be greyed out when the system is BIOS locked</strong> so that means there will be no way to know if Absolute Persistence is active or not, and <strong>you will need to let it sit connected to the internet after autopilot checking it. Ze has asked that we let it sit overnight or at least until the lock out screen shows up</strong>. If a lock out screen does not show up by morning, it should be all clear to sell. Unchanged: There is <strong>one extra complication:</strong> <strong>all the BIOS options will be greyed out when the system is BIOS locked</strong> so that means there will be no way to know if Absolute Persistence is active or not, and <strong>you will need to let it sit connected to the internet after autopilot checking it. Ze has asked that we let it sit overnight or at least until the lock out screen shows up</strong>. If a lock out screen does not show up by morning, it should be all clear to sell. Unchanged: Unchanged: Unchanged: <h2>HPs can have Absolute Persistence. Here is where to look:</h2> Unchanged: <h2>HPs can have Absolute Persistence. Here is where to look:</h2> Unchanged: Dell and HPs do not announce if they have Absolute Persistence active when you load into the BIOS. You have to go looking for it. <strong>Be sure to look for Absolute Persistence in the BIOS/UEFI of all laptops and computers</strong>. There is no way to tell if they have their Absolute Persistence active until you specifically go looking for it. Unchanged: Dell and HPs do not announce if they have Absolute Persistence active when you load into the BIOS. You have to go looking for it. <strong>Be sure to look for Absolute Persistence in the BIOS/UEFI of all laptops and computers</strong>. There is no way to tell if they have their Absolute Persistence active until you specifically go looking for it. Unchanged: See the photo below for what it looks like in the HP UEFI. Unchanged: See the photo below for what it looks like in the HP UEFI. Unchanged: <a href="https://www.xworx.app/wp-content/uploads/2025/02/Capture-3.jpg"><img class="alignnone size-thumbnail wp-image-12783" src="https://www.xworx.app/wp-content/uploads/2025/02/Capture-3-150x150.jpg" alt="" width="150" height="150" /></a> Unchanged: <a href="https://www.xworx.app/wp-content/uploads/2025/02/Capture-3.jpg"><img class="alignnone size-thumbnail wp-image-12783" src="https://www.xworx.app/wp-content/uploads/2025/02/Capture-3-150x150.jpg" alt="" width="150" height="150" /></a> Unchanged: Unchanged: Unchanged: <h2>Do not notate on your labels any asset tags remaining on systems</h2> Unchanged: <h2>Do not notate on your labels any asset tags remaining on systems</h2> Unchanged: Depending on what an asset tag says, we may choose to sell systems with asset tags that are non-removable assuming that the asset tag in no way implies or reveals who was the original owner.<strong> For the reason of trying to not draw any attention to something the previous owner wrote in the system, please do not mention the asset tags on labels</strong>. As an important reminder, the <strong>PC Tech Team Lead or any other supervisor needs to review any asset tags being intentionally left in machines</strong>, even if you deem it indecipherable yourself. Unchanged: Depending on what an asset tag says, we may choose to sell systems with asset tags that are non-removable assuming that the asset tag in no way implies or reveals who was the original owner.<strong> For the reason of trying to not draw any attention to something the previous owner wrote in the system, please do not mention the asset tags on labels</strong>. As an important reminder, the <strong>PC Tech Team Lead or any other supervisor needs to review any asset tags being intentionally left in machines</strong>, even if you deem it indecipherable yourself. Unchanged: Unchanged: Unchanged: <h2>New type of asset tag to look out for! Will require a closer look at labels across all machines.</h2> Unchanged: <h2>New type of asset tag to look out for! Will require a closer look at labels across all machines.</h2> Unchanged: An <strong>asset tag</strong> was recently discovered <strong>within a manufacturer label itself</strong>. We will need to begin visually scanning over manufacturer labels to look out for labels in this in the future. If you see a manufacture label like this, the <strong>preferred solution to keep the manufacturer label intact</strong> if possible if it contains important product information like the model number, serial number, or other details important for identifying the product, and to <strong>use scissors and cut out the offending asset tag portion. If that isn't possible, then it would be ok to fully remove the label.</strong> Unchanged: An <strong>asset tag</strong> was recently discovered <strong>within a manufacturer label itself</strong>. We will need to begin visually scanning over manufacturer labels to look out for labels in this in the future. If you see a manufacture label like this, the <strong>preferred solution to keep the manufacturer label intact</strong> if possible if it contains important product information like the model number, serial number, or other details important for identifying the product, and to <strong>use scissors and cut out the offending asset tag portion. If that isn't possible, then it would be ok to fully remove the label.</strong> Unchanged: It is going to require us to be even more detail oriented, but <strong>do not let this destroy your productivity output.</strong> <strong>Just quickly visually scan over the labels</strong> on the machines and look for brand names that should not be there. Unchanged: It is going to require us to be even more detail oriented, but <strong>do not let this destroy your productivity output.</strong> <strong>Just quickly visually scan over the labels</strong> on the machines and look for brand names that should not be there. Unchanged: Please click on the photo below to see an example. Unchanged: Please click on the photo below to see an example. Unchanged: <a href="https://www.xworx.app/wp-content/uploads/2025/02/IMG_1800.jpg"><img class="alignnone size-thumbnail wp-image-12747" src="https://www.xworx.app/wp-content/uploads/2025/02/IMG_1800-150x150.jpg" alt="" width="150" height="150" /></a> Unchanged: <a href="https://www.xworx.app/wp-content/uploads/2025/02/IMG_1800.jpg"><img class="alignnone size-thumbnail wp-image-12747" src="https://www.xworx.app/wp-content/uploads/2025/02/IMG_1800-150x150.jpg" alt="" width="150" height="150" /></a> Unchanged: Unchanged: Unchanged: <h2>Another example of a tricky asset tag</h2> Unchanged: <h2>Another example of a tricky asset tag</h2> Unchanged: <strong>This looks somewhat like a manufacturer tag at first glance</strong> as it only has this machine's serial number and an QR code. <strong>Unfortunately this is a QR link to rhinofamilyofcompanies.samanage.com.</strong> So here is a general overarching policy for asset tags: Be very suspicious and remove any sticker that is not 100% conclusively a manufacturer sticker, and in fact, you can <strong>remove any label that is deemed removable, meaning it isn't absolutely necessary to identify the product.</strong> Anything that looks out of place compared to similar models or anything that sticker that looks out of place in general, investigate it before assuming it is OK. <strong>Scan QR codes to verify them if you plan on leaving them on the machines.</strong> Unchanged: <strong>This looks somewhat like a manufacturer tag at first glance</strong> as it only has this machine's serial number and an QR code. <strong>Unfortunately this is a QR link to rhinofamilyofcompanies.samanage.com.</strong> So here is a general overarching policy for asset tags: Be very suspicious and remove any sticker that is not 100% conclusively a manufacturer sticker, and in fact, you can <strong>remove any label that is deemed removable, meaning it isn't absolutely necessary to identify the product.</strong> Anything that looks out of place compared to similar models or anything that sticker that looks out of place in general, investigate it before assuming it is OK. <strong>Scan QR codes to verify them if you plan on leaving them on the machines.</strong> Unchanged: <a href="https://www.xworx.app/wp-content/uploads/2025/02/20251112_144243-rotated.jpg"><img class="alignnone size-thumbnail wp-image-12765" src="https://www.xworx.app/wp-content/uploads/2025/02/20251112_144243-150x150.jpg" alt="" width="150" height="150" /></a> Unchanged: <a href="https://www.xworx.app/wp-content/uploads/2025/02/20251112_144243-rotated.jpg"><img class="alignnone size-thumbnail wp-image-12765" src="https://www.xworx.app/wp-content/uploads/2025/02/20251112_144243-150x150.jpg" alt="" width="150" height="150" /></a> Unchanged: Unchanged: Unchanged: <h2>Inspect ports closely and notate damage even if very minor</h2> Unchanged: <h2>Inspect ports closely and notate damage even if very minor</h2> Unchanged: Minor damage within ports is still enough damage where we need to mention it to the customer. The concern is that it is in a state that could get worse, like the port pins could break off when a cable is connected which has happened before even to us while working here at the warehouse. There is also a chance the port could be sensitive/finicky or stop working later. So please inspect all ports very closely for this reason to make sure you don't miss subtle damage. Thanks! Unchanged: Minor damage within ports is still enough damage where we need to mention it to the customer. The concern is that it is in a state that could get worse, like the port pins could break off when a cable is connected which has happened before even to us while working here at the warehouse. There is also a chance the port could be sensitive/finicky or stop working later. So please inspect all ports very closely for this reason to make sure you don't miss subtle damage. Thanks! Unchanged: <a href="https://www.xworx.app/wp-content/uploads/2025/02/Damaged-pin-within-DP-port.jpg"><img class="alignnone size-thumbnail wp-image-12761" src="https://www.xworx.app/wp-content/uploads/2025/02/Damaged-pin-within-DP-port-150x150.jpg" alt="" width="150" height="150" /> </a><a href="https://www.xworx.app/wp-content/uploads/2025/02/Capture-2.jpg"><img class="alignnone size-thumbnail wp-image-12762" src="https://www.xworx.app/wp-content/uploads/2025/02/Capture-2-150x150.jpg" alt="" width="150" height="150" /></a> Unchanged: <a href="https://www.xworx.app/wp-content/uploads/2025/02/Damaged-pin-within-DP-port.jpg"><img class="alignnone size-thumbnail wp-image-12761" src="https://www.xworx.app/wp-content/uploads/2025/02/Damaged-pin-within-DP-port-150x150.jpg" alt="" width="150" height="150" /> </a><a href="https://www.xworx.app/wp-content/uploads/2025/02/Capture-2.jpg"><img class="alignnone size-thumbnail wp-image-12762" src="https://www.xworx.app/wp-content/uploads/2025/02/Capture-2-150x150.jpg" alt="" width="150" height="150" /></a> Unchanged: Unchanged: Unchanged: <h2><em>Common issues to avoid found during micro PC QCing</em></h2> Unchanged: <h2><em>Common issues to avoid found during micro PC QCing</em></h2> Unchanged: <ul> Unchanged: <ul> Unchanged: <li>Wipe paper placement: try to<strong> not put wipe paper or sticker label on top of any manufacturer info</strong>. Find a spot on the machine where the wipe paper doesn't overlap anything.</li> Unchanged: <li>Wipe paper placement: try to<strong> not put wipe paper or sticker label on top of any manufacturer info</strong>. Find a spot on the machine where the wipe paper doesn't overlap anything.</li> Unchanged: <li>We need to begin<strong> checking for wifi cards.</strong></li> Unchanged: <li>We need to begin<strong> checking for wifi cards.</strong></li> Unchanged: <li>Don’t put painters <strong>tape over words on the wipe paper</strong>, just carefully tape over the corners.</li> Unchanged: <li>Don’t put painters <strong>tape over words on the wipe paper</strong>, just carefully tape over the corners.</li> Unchanged: <li><strong>Use a minimal amount of painters tape</strong> and make the presentation not look sloppy</li> Unchanged: <li><strong>Use a minimal amount of painters tape</strong> and make the presentation not look sloppy</li> Unchanged: <li>remove any <strong>serial numbers on case that do not match BIOS</strong> (meaning all BIOS and case serial numbers need to be cross-checked against each other every time)</li> Unchanged: <li>remove any <strong>serial numbers on case that do not match BIOS</strong> (meaning all BIOS and case serial numbers need to be cross-checked against each other every time)</li> Unchanged: <li>Use your finger to check the front panels to <strong>see if the plastic front clips are busted</strong> and the front panel may get ripped off on accident.</li> Unchanged: <li>Use your finger to check the front panels to <strong>see if the plastic front clips are busted</strong> and the front panel may get ripped off on accident.</li> Unchanged: <li>While checking the motherboard, if you <strong>notice any busted RAM clips</strong>, RAM slots, or other device slots damaged, please add that to the notes.</li> Unchanged: <li>While checking the motherboard, if you <strong>notice any busted RAM clips</strong>, RAM slots, or other device slots damaged, please add that to the notes.</li> Unchanged: <li><strong>Please begin referring to the antennae nub attached to the back of the case as the "antennae port"</strong> as the actual antenna would be a device we would attach to this nub, so we want to describe the computer as accurately as possible.</li> Unchanged: <li><strong>Please begin referring to the antennae nub attached to the back of the case as the "antennae port"</strong> as the actual antenna would be a device we would attach to this nub, so we want to describe the computer as accurately as possible.</li> Unchanged: <li>Don't forget to also leave a note in the <strong>notes section to indicate that the machines is BIOS locked</strong>, don't just put a check mark on the label! They are harder to see, and it is an important detail to the customer that we don't want to overlook.</li> Unchanged: <li>Don't forget to also leave a note in the <strong>notes section to indicate that the machines is BIOS locked</strong>, don't just put a check mark on the label! They are harder to see, and it is an important detail to the customer that we don't want to overlook.</li> Unchanged: </ul> Unchanged: </ul> Unchanged: <a href="https://www.xworx.app/wp-content/uploads/2025/02/IMG_3915.webp"><img class="alignnone size-thumbnail wp-image-12767" src="https://www.xworx.app/wp-content/uploads/2025/02/IMG_3915-150x150.webp" alt="" width="150" height="150" /></a> <a href="https://www.xworx.app/wp-content/uploads/2025/02/IMG_3911.webp"><img class="alignnone size-thumbnail wp-image-12768" src="https://www.xworx.app/wp-content/uploads/2025/02/IMG_3911-150x150.webp" alt="" width="150" height="150" /></a> <a href="https://www.xworx.app/wp-content/uploads/2025/02/IMG_3910.webp"><img class="alignnone size-thumbnail wp-image-12769" src="https://www.xworx.app/wp-content/uploads/2025/02/IMG_3910-150x150.webp" alt="" width="150" height="150" /></a> <a href="https://www.xworx.app/wp-content/uploads/2025/02/Broken_bezel.webp"><img class="alignnone size-thumbnail wp-image-12770" src="https://www.xworx.app/wp-content/uploads/2025/02/Broken_bezel-150x150.webp" alt="" width="150" height="150" /></a> <a href="https://www.xworx.app/wp-content/uploads/2025/02/Tape_covering_manufacturer.webp"><img class="alignnone size-thumbnail wp-image-12771" src="https://www.xworx.app/wp-content/uploads/2025/02/Tape_covering_manufacturer-150x150.webp" alt="" width="150" height="150" /></a> Unchanged: <a href="https://www.xworx.app/wp-content/uploads/2025/02/IMG_3915.webp"><img class="alignnone size-thumbnail wp-image-12767" src="https://www.xworx.app/wp-content/uploads/2025/02/IMG_3915-150x150.webp" alt="" width="150" height="150" /></a> <a href="https://www.xworx.app/wp-content/uploads/2025/02/IMG_3911.webp"><img class="alignnone size-thumbnail wp-image-12768" src="https://www.xworx.app/wp-content/uploads/2025/02/IMG_3911-150x150.webp" alt="" width="150" height="150" /></a> <a href="https://www.xworx.app/wp-content/uploads/2025/02/IMG_3910.webp"><img class="alignnone size-thumbnail wp-image-12769" src="https://www.xworx.app/wp-content/uploads/2025/02/IMG_3910-150x150.webp" alt="" width="150" height="150" /></a> <a href="https://www.xworx.app/wp-content/uploads/2025/02/Broken_bezel.webp"><img class="alignnone size-thumbnail wp-image-12770" src="https://www.xworx.app/wp-content/uploads/2025/02/Broken_bezel-150x150.webp" alt="" width="150" height="150" /></a> <a href="https://www.xworx.app/wp-content/uploads/2025/02/Tape_covering_manufacturer.webp"><img class="alignnone size-thumbnail wp-image-12771" src="https://www.xworx.app/wp-content/uploads/2025/02/Tape_covering_manufacturer-150x150.webp" alt="" width="150" height="150" /></a> Unchanged: Unchanged: Unchanged: Unchanged: Unchanged: <h3>Minimum size of SSDs to include/wipe in your devices: 128GB</h3> Unchanged: <h3>Minimum size of SSDs to include/wipe in your devices: 128GB</h3> Unchanged: Anything SSD storage underneath 128GB should be given to your supervisor to be taken out of normal circulation. Unchanged: Anything SSD storage underneath 128GB should be given to your supervisor to be taken out of normal circulation. Unchanged: Unchanged: Unchanged: <h2>P.S.</h2> Unchanged: <h2>P.S.</h2> Unchanged: <ul> Unchanged: <ul> Unchanged: <li>All PCs must be registered if possible. If a PC can not be registered, leave a note explaining the reason.</li> Unchanged: <li>All PCs must be registered if possible. If a PC can not be registered, leave a note explaining the reason.</li> Unchanged: <li>If a PC does not have a hard drive, plug a USB drive for wiping in Killdisk Active Boot Disk only, so it can print out an erase report.</li> Unchanged: <li>If a PC does not have a hard drive, plug a USB drive for wiping in Killdisk Active Boot Disk only, so it can print out an erase report.</li> Unchanged: <li>Remove the HDD and RAM from all scrap PCs.</li> Unchanged: <li>Remove the HDD and RAM from all scrap PCs.</li> Unchanged: <li>Remove the 6th Gen or newer CPU from scrap PCs.</li> Unchanged: <li>Remove the 6th Gen or newer CPU from scrap PCs.</li> Unchanged: </ul> Unchanged: </ul> - — ZeDong: Created post "PC Tech Level 3-Micro PC Wiping: Micro/Mini/Tiny PC PXE Boot and Registration"


Read, Matt C
Joseph Jacoby 3/16
Read Edmundo Sanchez 03/17/2026